This post may contain affiliate links. Please see my full disclosure and privacy policy for details.

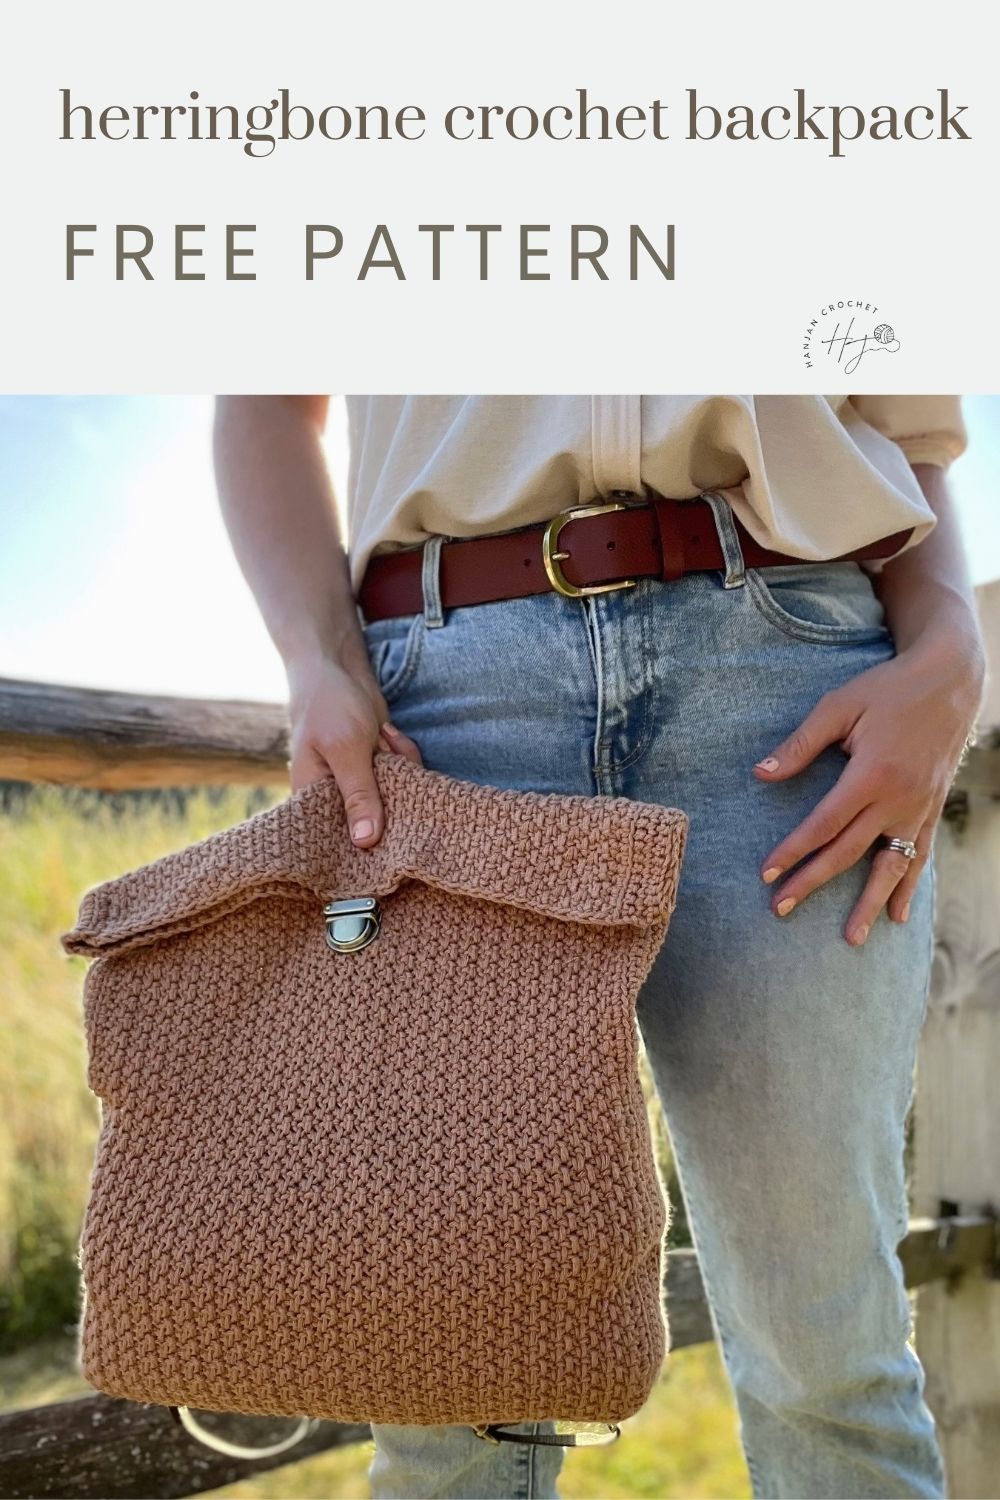
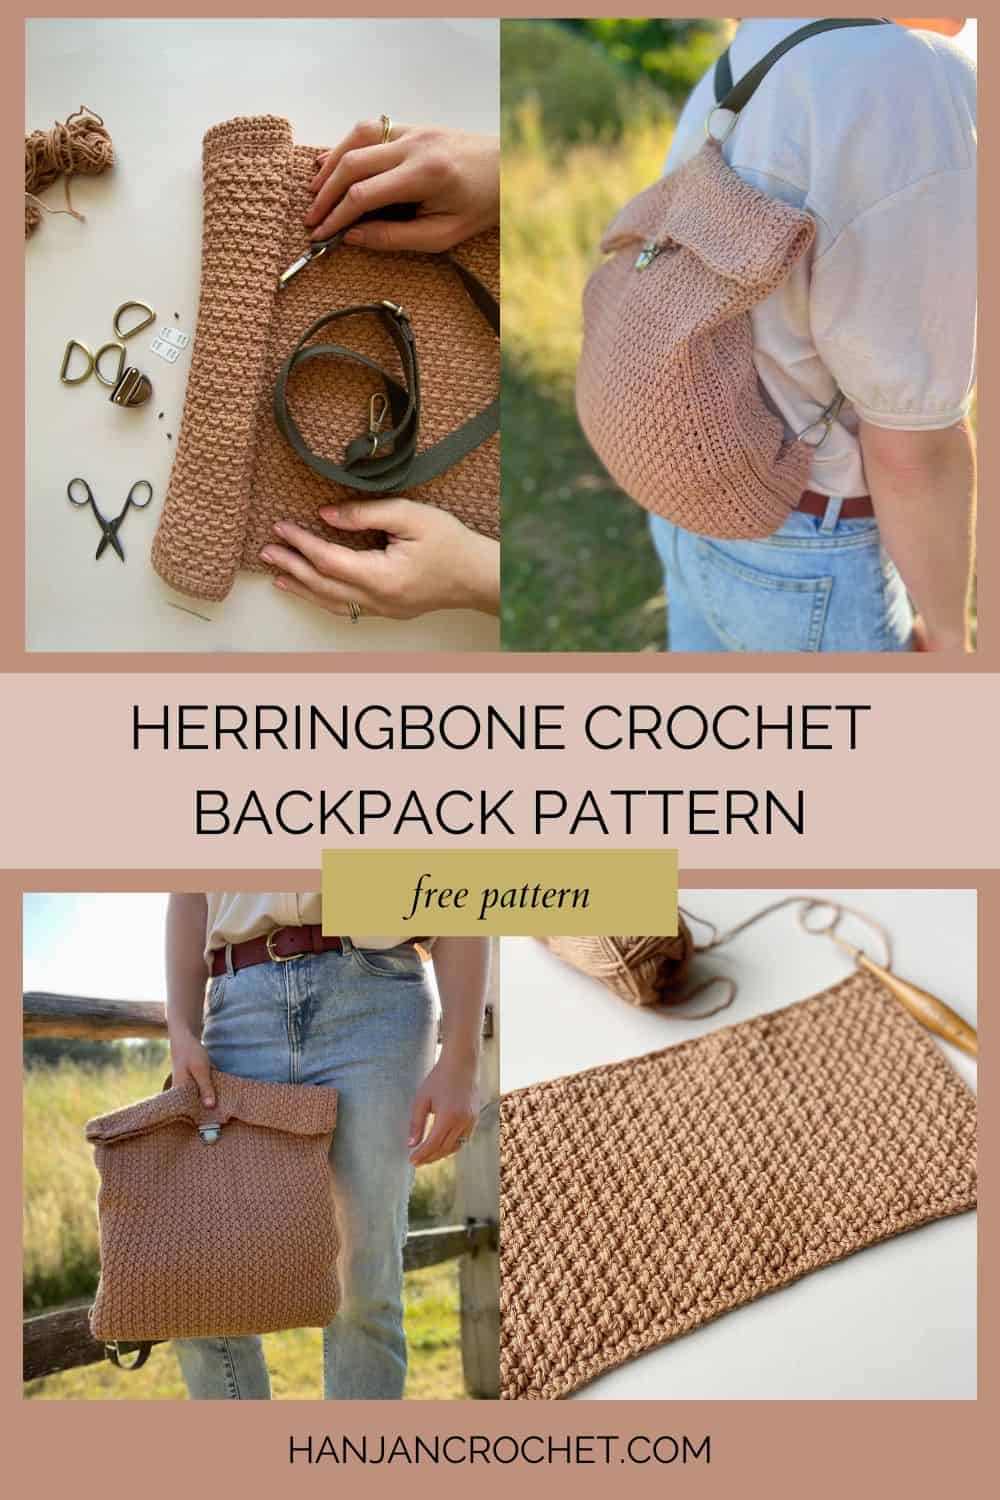
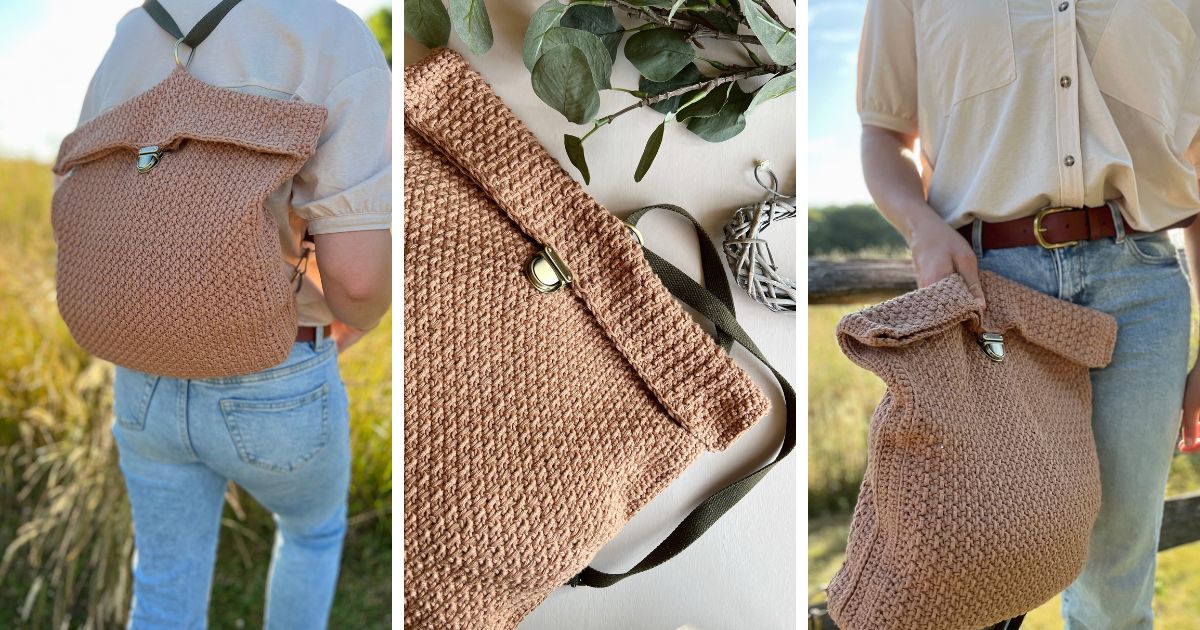
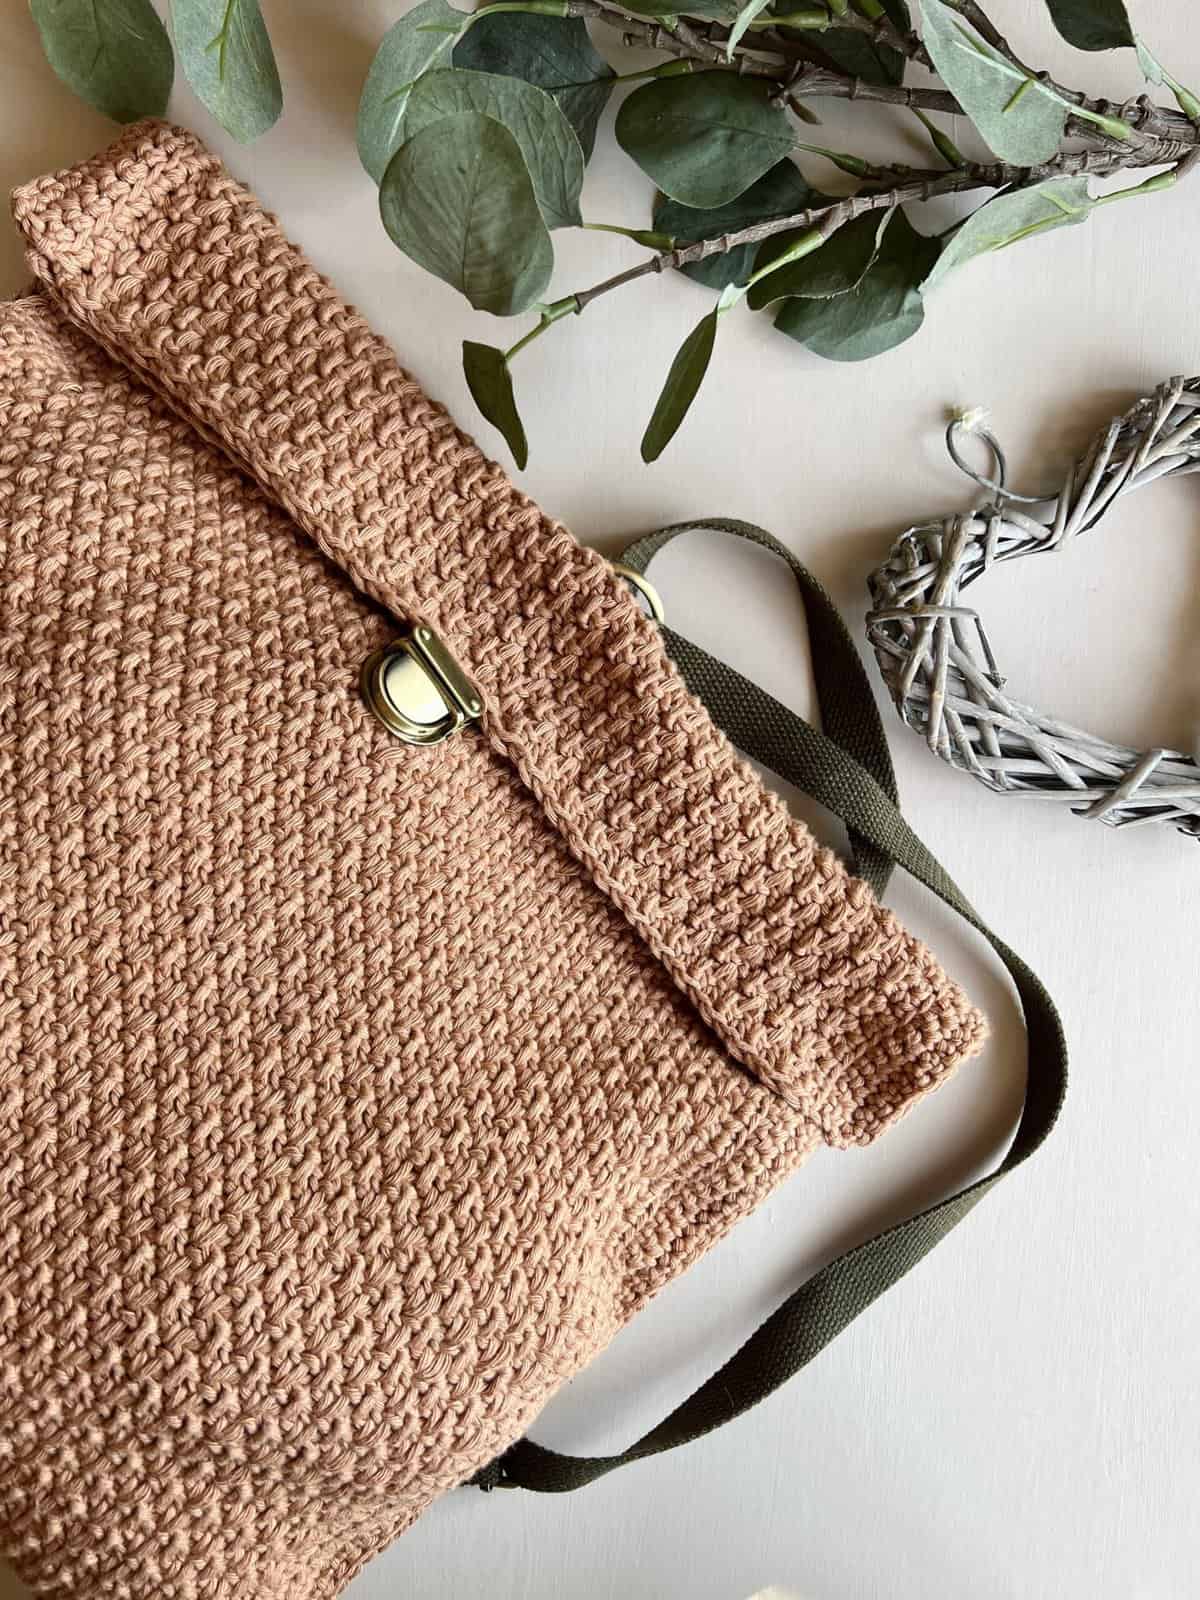
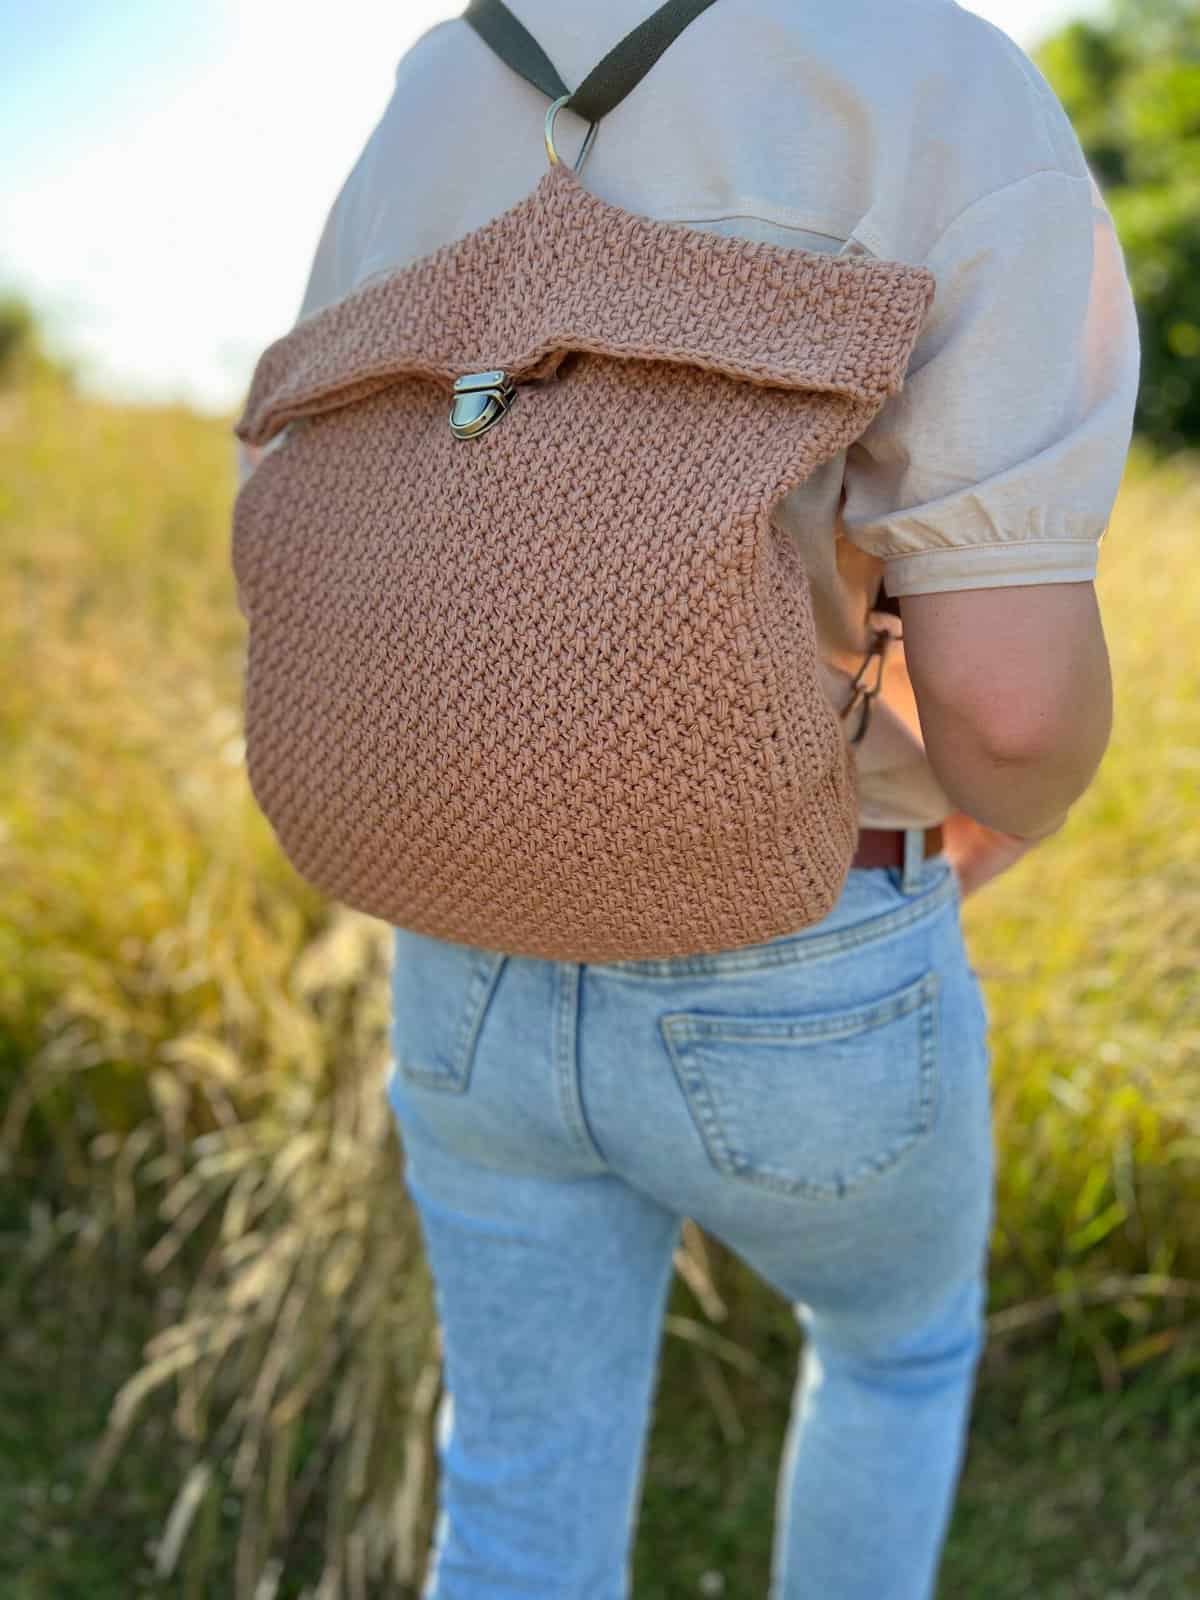
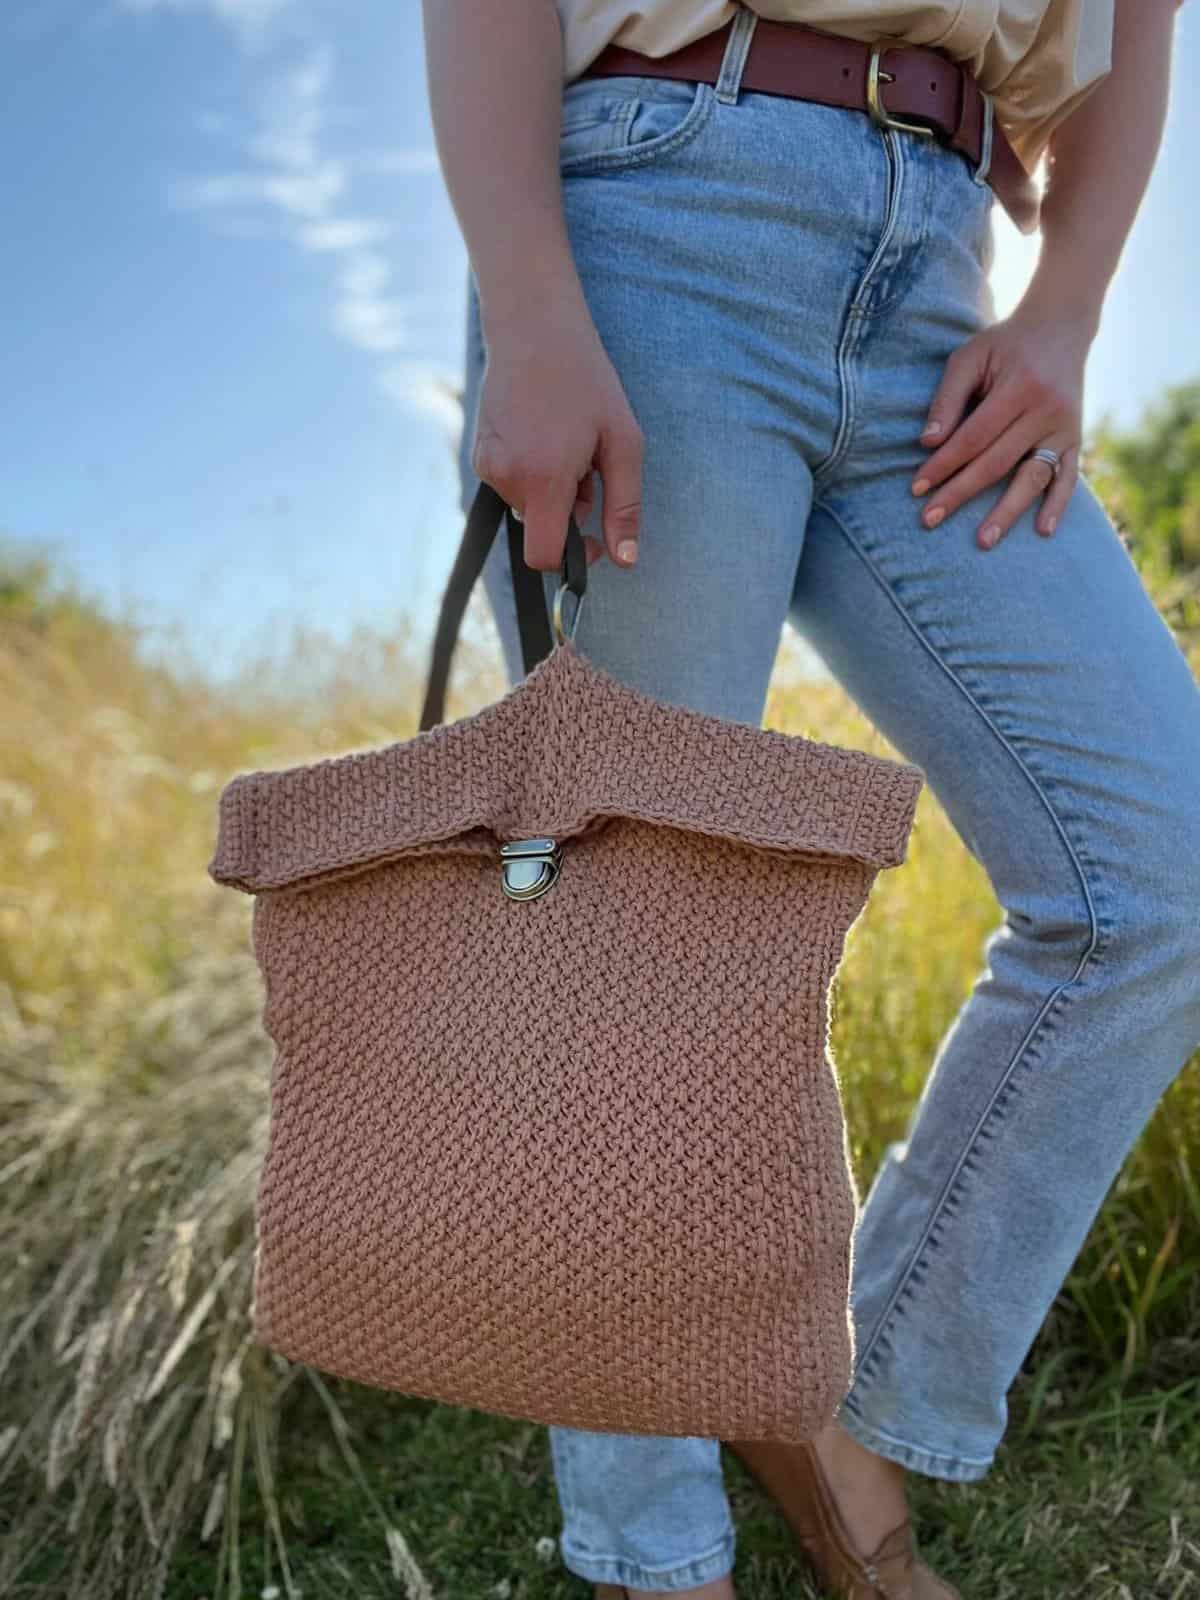
Simplicity itself, this modern herringbone crochet backpack pattern is textured, easy and stylish. Made from just two matching rectangles, the real magic happens when you attach the straps and clasp to transform it into a stunning and useful accessory!
This bag is chic, it’s classy, and it has that effortless sack look to it so you can stuff anything you want in it. Whether that’s snacks for the road, books for a quiet day at the park, or a change of clothes before you hit the pool — hey, it’s your backpack (or crochet rucksack!). In this tutorial, you’ll find everything you need to create your own textured crochet backpack including materials, stitches, a detailed video tutorial and free written pattern for blog subscribers.
Crochet Backpack Pattern Overview
We’ll be using the herringbone stitch to add subtle texture to your crochet backpack and you can decide whether you want to sew on leather straps or hand-make them with your own design. Once you get the hang of the pattern, you can even do some fancy colorblock or stripes! But I just loved making it in one solid colour because that really added definition to the stitch!

⭐⭐⭐ Difficulty level: Intermediate – but nice and easy once you get going
💬 Hook Size: 4.5mm (G+)
📏 Sizes: 13.5″ x 13″ x 3″
✨ Crochet Technique: Herringbone half double crochet stitch
⚖️ Yarn Weight: Worsted Weight (category 4)
🧶 Yarn Used: Paintbox Simply Cotton Aran
🕐 Approx Crochet Time: 3-4 hours depending on your pace
👍 Perfect For: easy classic styling, or why not try adding some appliqué embellishments?
Summarise and Save For Later:
Table of Contents
Things you’ll love about this easy herringbone stitch backpack pattern
Crochet Rucksack Pattern Materials
- A 4.5mm (G+) crochet hook or hook needed to meet gauge
- Scissors
- Tapestry needle
- Stitch markers
- 3 x D rings
- 1 x metal clip clasp
- 1 x bag strap of your choice, approx. 120cm/ 47” long with metal clasp at each end
Along with the above you will need the following yarn for your bag:
Paintbox Simply Cotton Aran, 100% cotton (93yds/85m/50g). For mine I used the color Soft Fudge (610).
You will need approximately 8 balls/400g for the backpack.
It’s a category 4, worsted weight yarn which is what gives the backpack its structure. Find out more about yarn weights and categories.
See my other worsted weight crochet patterns – you might find your next project there too!
Yarn Substitutes
Alternatively, here are some fabulous yarns that would also work really well for this design:
- Dishie by WeCrochet: 100% Cotton, 173m, 190yds per 100g skein.
- Dishie Twist by WeCrochet: 100% Cotton, 173m, 190yds per 100g skein.
Sizing
This backpack is made in one universal size and the dimensions are given below:
- Width: 13.5″ / 34cm
- Length: 13″ / 33cm
- Depth: 3″ / 7cm
If you want to make more crochet projects in this gorgeous stitch with its subtle texture and easy disposition, here are some suggestions:
- Summer Stripes Beach Bag (a different type of bag made from the same stitch!)
- The Happy Herringbone Blanket (there’s some colorwork in this one)
- Herringbone Headband (quick, easy, and a great gift item)
Glossary and Abbreviations
- ch(s) – chain(s) (how to make a crochet chain)
- sp – space
- ss – slip stitch (crochet a slip stitch)
- st – stitch
- RS – right side
- WS – wrong side
- sk – skip
- rep – repeat
- yo – yarn over
Crochet Stitches
The pattern is written in standard US terms and uses the following crochet stitches:
sc – single crochet (how to single crochet stitch)
hdc – half double crochet (how to hdc)
Want to remove Ads?
- Get ad-free access on all posts; 200+ patterns & tutorials!
- Member-only resource library with downloadable PDF guides
- Bonus eBook (Worth over $30)
Special Stitches
Herringbone Half Double Crochet
Yarn over, insert hook into next stitch and pull up a loop (3 loops on hook). Pull first loop straight through the second loop (similar to a slip stitch). Yarn over, pull through two remaining loops on hook.
This stitch is used in the herringbone half double crochet moss stitch which gives amazing texture!
I love it so much that I’ve used it in lots of other designs like my herringbone moss stitch mittens and my cosy winter hat pattern too. It really is a brilliantly adaptable stitch that works for so many fabrics.
Join our pattern support group!
We’ve built an amazing community always ready to help each other. Join today!
How do you crochet a textured backpack like this?
- Two identical front and back panels, a little bit of yarn to seam it all together, and a strap and clasp to add the finishing touches — that’s all this simple crochet backpack is made of!
- There’s a quick two-row repeat using the herringbone half double crochet.
- Once you’ve made the panels, you’ll add a few rows for the sides and bottom to give it volume and then you can stitch it together with a nice flat slip stitch seam (or use the whip stitch).
Pattern Gauge
Gauge: 15sts x 19 rows = 4″ x 4″ / 10 cm x 10 cm measured over main set pattern (Hhdc working into 2 rows below).
Making a crochet gauge swatch is particularly important when crocheting garments to ensure that it ends up the desired size.
Before you dive into crocheting your backpack, take a moment to read through the pattern notes—it’s a game-changer!
These handy insights will not only simplify your pattern-reading journey but also ensure a smoother crochet experience. You’ll find helpful tips on deciphering the sizing, transitioning yarn colours, and tips on turning your work.
Trust me, a quick peek at these notes will set you up for crochet success!
- Please read through the entire pattern before beginning.
- Ch 1 at the start of a row does not count as a st.
- Turn the work at the end of every row.
- The backpack is made from just 2 panels of crochet that are seamed together to form the shape of the bag.
- The clasps and strap are then added to complete.
Free Herringbone Crochet Backpack Pattern
There are a few options for you to access and enjoy this crochet pattern:
- View the free pattern on the blog – all blog subscribers will be able to view the patterns supported by ads by logging into their Grow account.
- Purchase the individual pattern on Etsy or Ravelry as a beautifully formatted PDF with extra stitch charts, schematic and colour information page and more!
Get this pattern ad free
Get the PDF Pattern
Perfect to print out or use on any device, with added schematic and charts, colour inspiration and stitch tutorials.
Pattern Support
I am delighted to invite you to join the HanJan Crochet Community Facebook Group where we host all pattern support queries and love to see your progress, yarn choices and finished projects!
Crochet Pattern Free for Blog Subscribers to View
US Crochet Terminology
To unlock Exclusive Content on the HanJan Crochet Blog, all you need to do is click the box below and the Grow.me app will pop up, allowing you to enter your email and create a password.
Once you’ve created an account, every time you see Exclusive Content on my blog (or any others that use Grow), simply login to your Grow account. Be sure to switch to the login screen to enter your login credentials.
If you forget your password, click the “forgot password” link and follow the prompts. Please note that I’m unable to assist with resetting Grow passwords or accessing your Grow account, so be sure to save your login information in a safe place.
Thank you for subscribing and for joining me at HanJan Crochet! I hope you enjoy the exclusive content available on the site and I can’t wait to see what you create 🙂
Make 2 matching panels. One for the Front and one for the Back.
Foundation chain: ch52
Row 1: hdc in 2nd ch from hook and each to end [51].
Row 2: RS: ch1, Hhdc in next st, *ch1, skip 1, Hhdc in next st; rep from * to end.
Row 3: ch1, sc in next st, Hhdc in next st 2 rows below, *ch1, skip 1, Hhdc in next st 2 rows below; rep from * to last st, sc in last st.
Row 4: ch1, sc in next st, ch1 skip 1, *Hhdc in next st 2 rows below, ch1, skip 1; rep from * to last st, sc in last st.
Rows 3 and 4 create the Set Pattern.
Rows 5-70: Repeat the Set Pattern.
Row 71: ch1, sc in next st, Hhdc in next st 2 rows below, *sc in next st, Hhdc in next st 2 rows below; rep from * to last st, sc in last st.
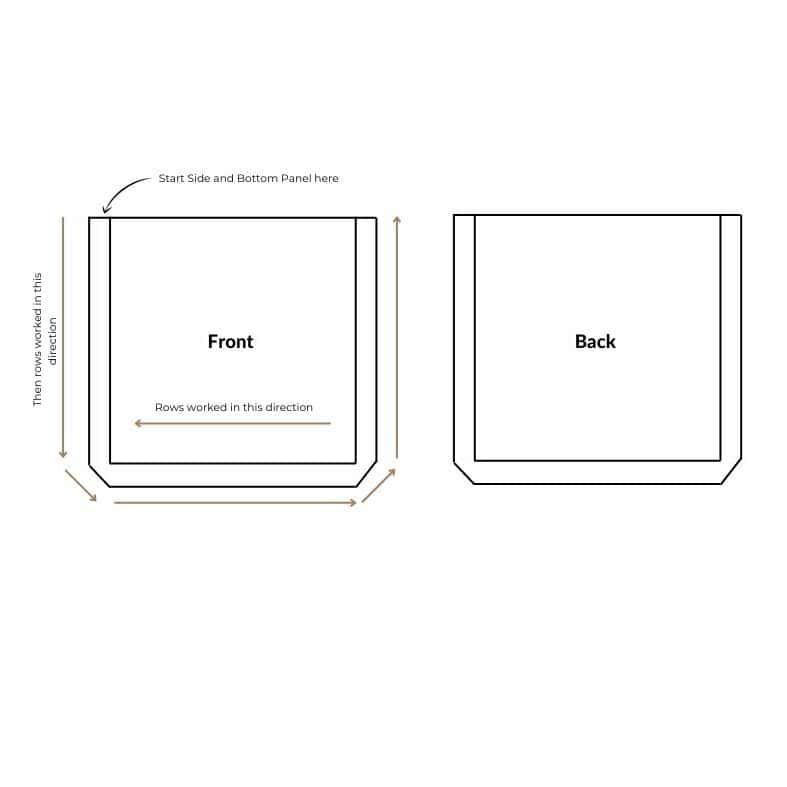
Continue to work the Side and Bottom Panel now:
Rotate to work along first long edge, along the bottom short edge and along second long edge now.
Row 1: ch1, sc in side of each row along first long edge (71sts), sc in each st along Row 1 (51sts), sc in side of each row along second long edge (71sts) [193].
Rows 2-4: ch1, sc in each st to end.
Joining the Front and Back Panels:
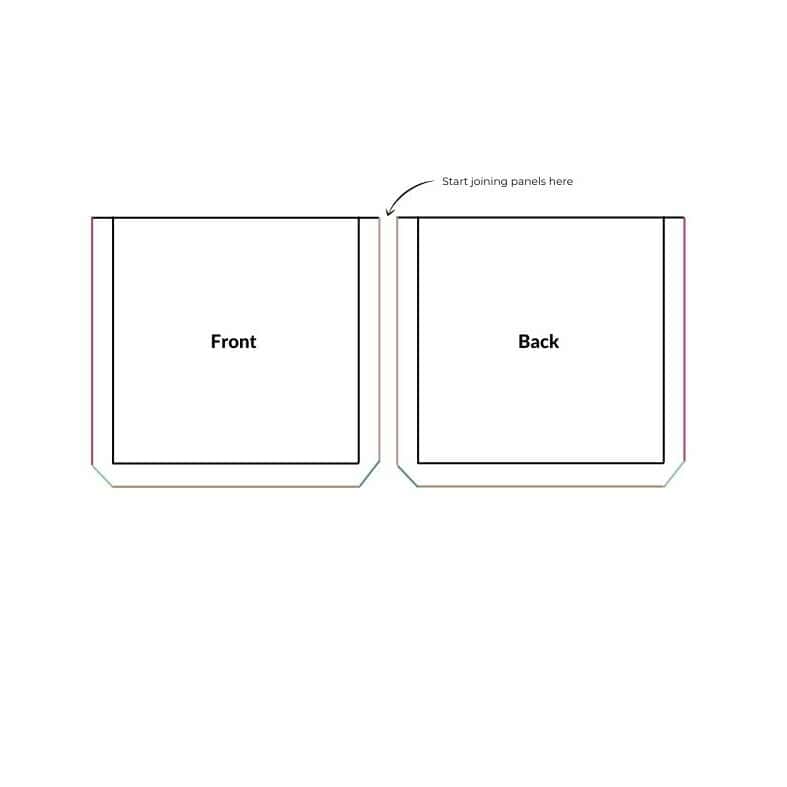
With RS facing you, join the 193 sts of the Side and Bottom Panels together with a flat slip stitch seam (or whipstitch them if you prefer) to create the shape of the bag.
Lay your blocked squares in the format shown in the images and diagram with the WS facing you.
You can seam the squares together using whichever method you feel most comfortable with. I used a whip stitch to join mine but you could crochet them together using a slip stitch seam if you prefer.
Adding the Straps and Clasps:
- Gather your supplies together. Decide where you’d like to place your ‘D’ rings for your strap to attach to.
- On back of bag, sew the 3 D rings in place (I used the same yarn as the bag) at the bottom left and right hand corners and then in the top centre, just below where you would like the bag to turn over to create the flap.
- Attach the clasp clip through the front of the bag and secure in place as shown.
- Attach the front of the clasp and test thoroughly to make sure you are happy with the placement.
Once your D rings and clasp are in place, clip one end of strap one corner D ring, thread strap through the centre D ring at top of bag and then clip opposite end of strap to D ring in opposite corner. Weave in ends to finish.
Get your free guide!
Subscribe to get your free guide to choosing and combining colours!
FAQs
This backpack is suitable for advanced beginners who are comfortable working the herringbone crochet stitch and seaming pieces together.
The backpack is made from two flat rectangles that are seamed together to form the bag, with straps and clasps added afterwards.
Worsted weight cotton yarn works best because it creates a sturdy fabric that holds the shape of the backpack.
Whilst I have not lined mine, you can absolutely add a fabric lining for extra durability.
Join HanJan and Share Your Crochet With Us!
I’d love to hear from you and see your HanJan Crochet project! Here’s where you can do that:
📌 PIN THIS POST – save it to your Pinterest crochet board so you can come back to it again and make more!
↗️ SHARE – Share your yarn choices, progress pics, and finished projects on Facebook or Instagram (make sure to use the hashtag) #hanjancrochet
🧶 JOIN – Join thousands of amazing crafters in the HanJan Crochet Community Group on Facebook ready to cheer you on!
✉️📩📬 SUBSCRIBE – It’s an honour to be able to create and share my free crochet patterns with you. I’d love to stay connected and send you regular discount codes and free patterns! Please sign up for my subscriber list to get a free gift right now!
Congratulations on completing your crochet backpack pattern! 🌟 Now that you’ve crafted this stunning piece, why stop here? Dive into my other crochet bag patterns, each waiting to be transformed into your next crochet masterpiece.
If you enjoy making crochet bag patterns, here are a few more of my designs you might enjoy too:
- Recycled Jeans Bag – upcycle an old pair of jeans into a crocheted bag!
- The Quotidien Satchel Free Crochet Messenger Bag – Practical stylish and textured.
- Mosaic Crochet Tote Bag – A fabulous bag for summer with a clever play of colours.