This post may contain affiliate links. Please see my full disclosure and privacy policy for details.
Overlay mosaic crochet is a clever and beautiful colourwork technique used to create bold patterns using two different stitches: the single crochet in the back loop only and the mosaic double crochet stitch.
In this mosaic double crochet stitch tutorial, I’ll take you step by step through how to form this stitch with lots of photos to help too!
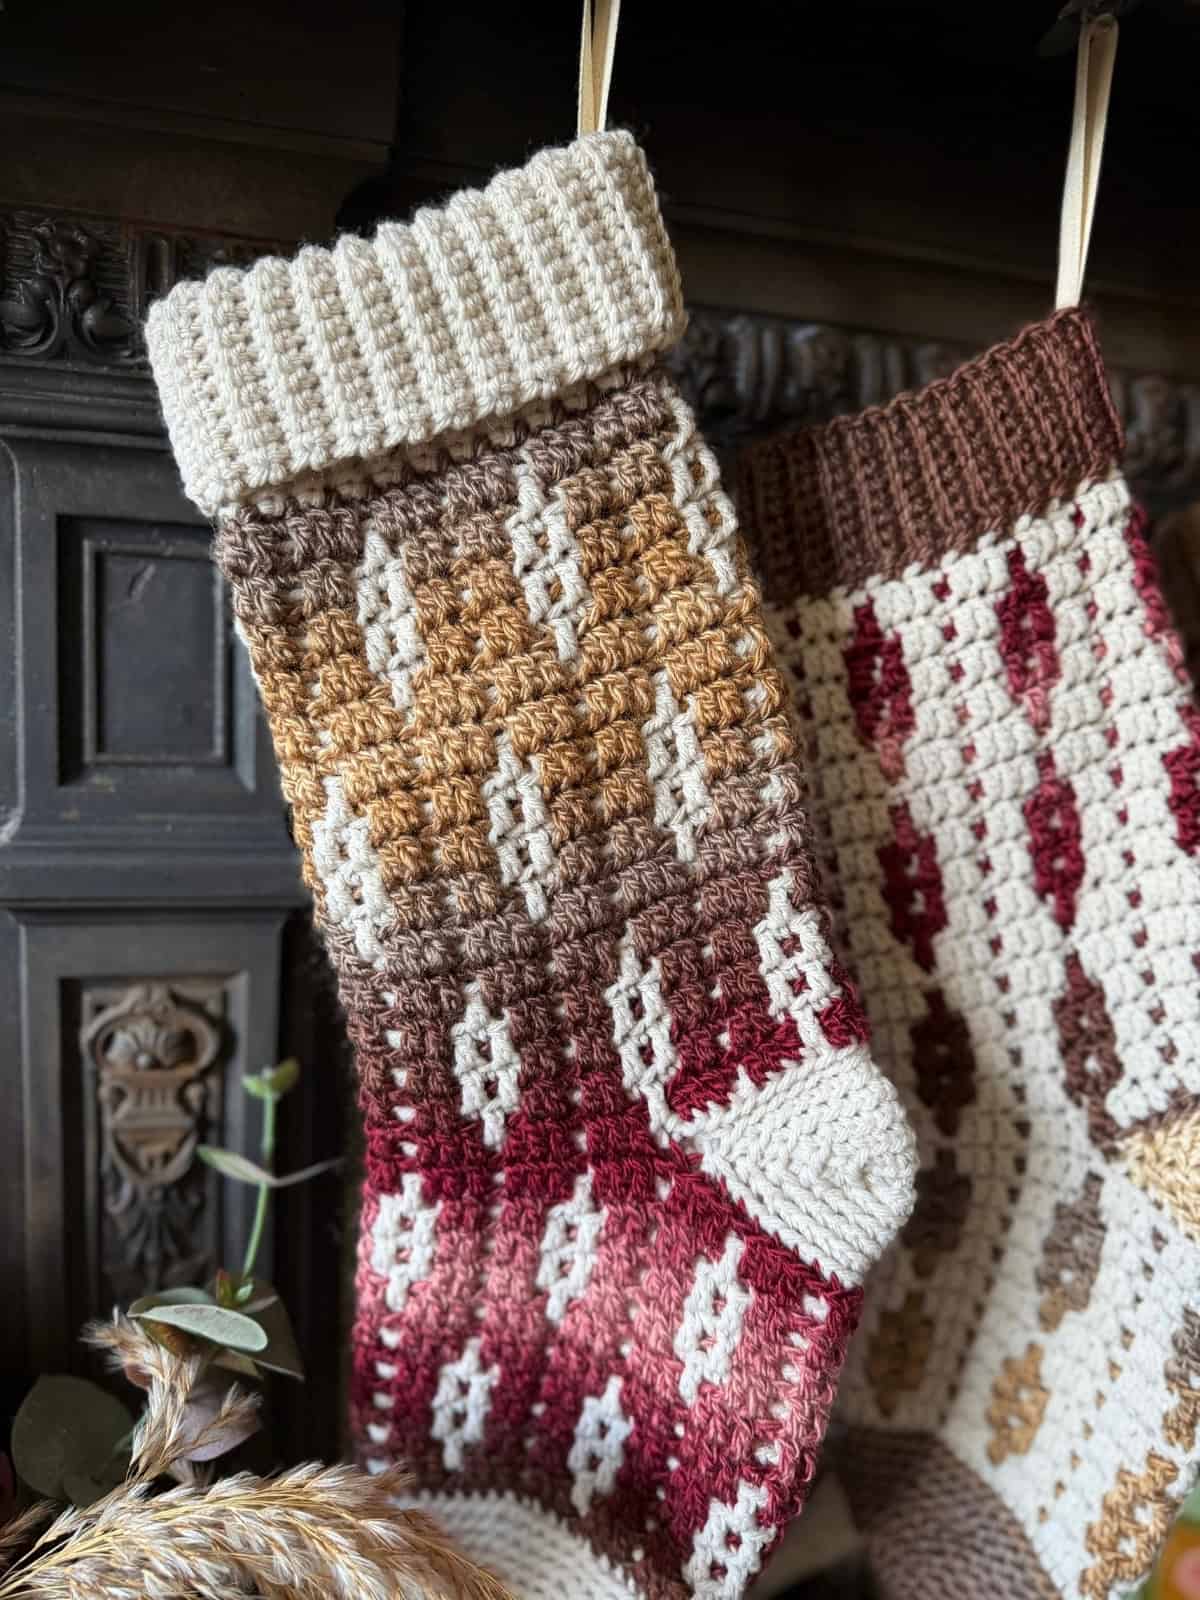
Table of Contents
Overlay Mosaic Crochet
Overlay mosaic crochet is worked on one side of the project only. Right-handers work from right to left (left-handers from left to right), joining our yarn at the start of the row and fastening off at the end of each row.
An example of it is my Yuletide Mosaic Blanket Pattern, but don’t worry – they aren’t all that tricky looking!
Note that when working in rounds, like in the Yuletide Mosaic Stocking Pattern, we can carry the yarn up the inside of the work instead of fastening off each time.
In this technique, we change colour every row or round and we work either a single crochet into the back loop only of the stitch, or we work a mosaic double crochet stitch into the front loop of the stitch 2 rows or rounds below.
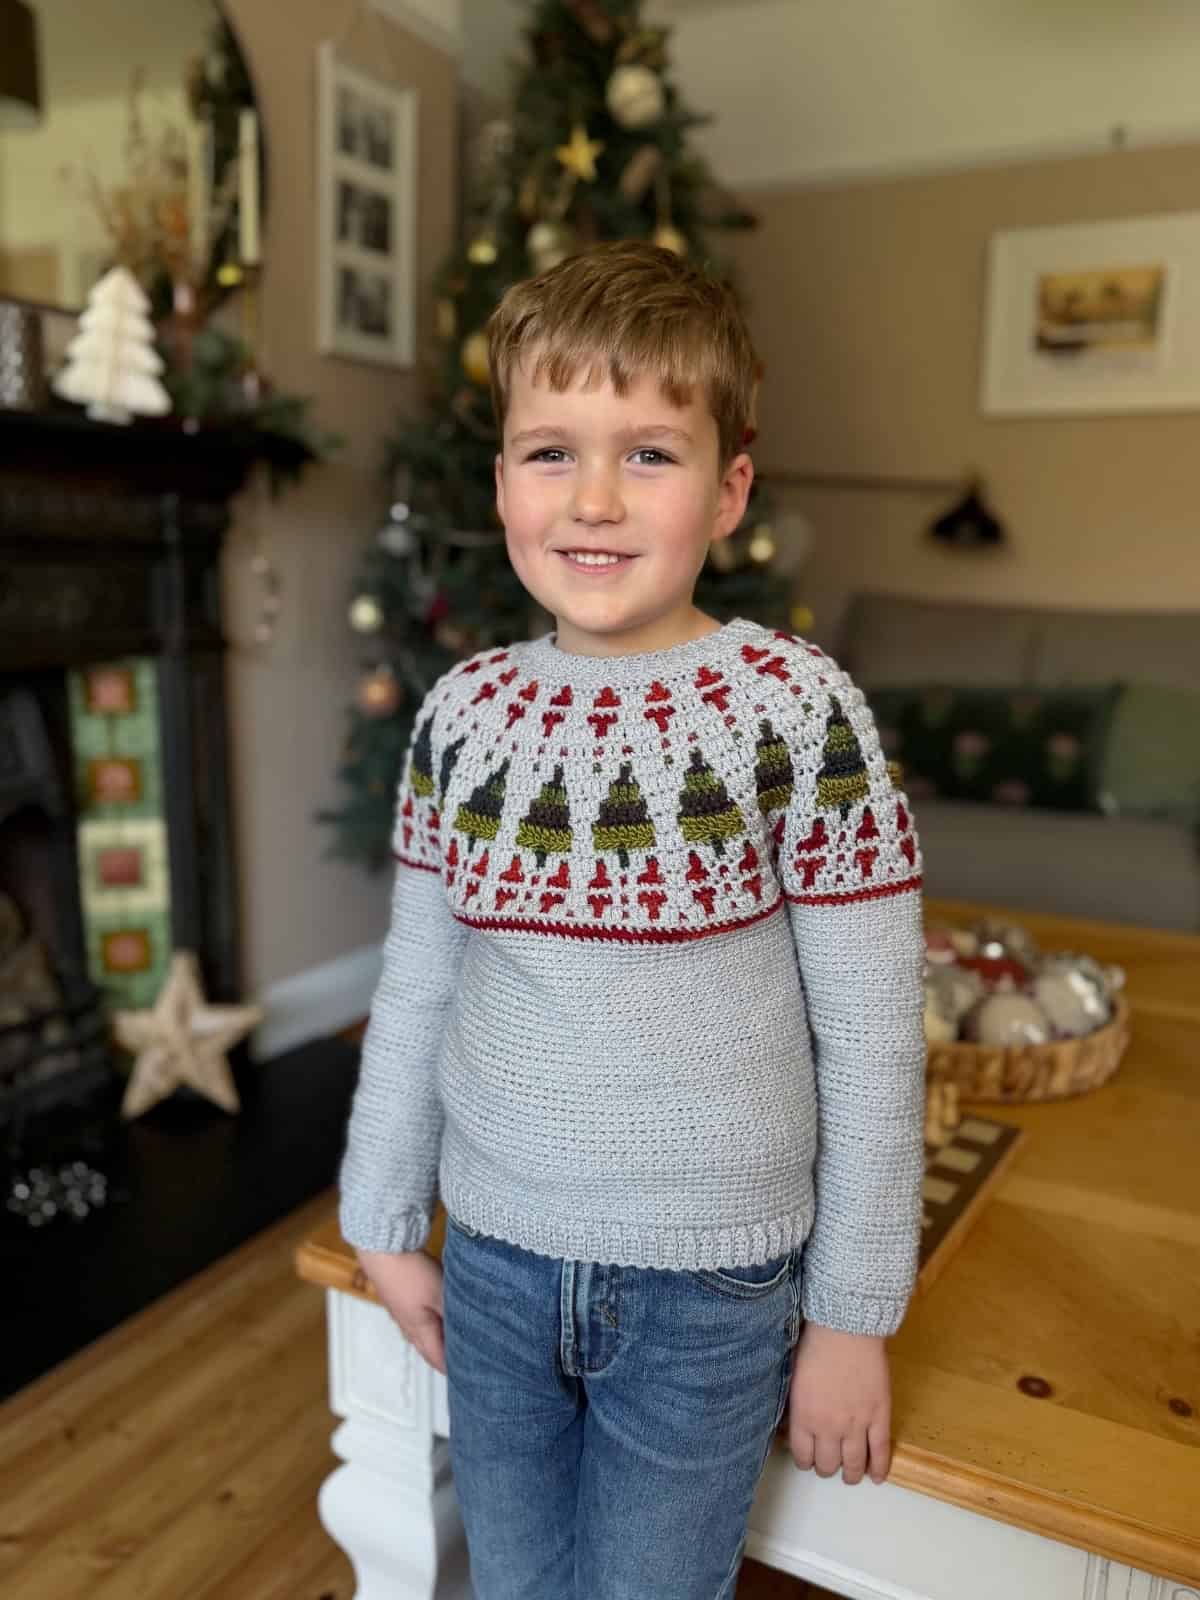
Make a statement this season with a crochet Christmas sweater pattern in baby and child sizes, featuring a stylish tree design for a timeless festive look.
Using just one colour per round it’s amazingly simple to crochet and so fun to wear on Christmas Day!
Stitches Used in Mosaic Crochet
Overlay mosaic crochet relies on just two core stitches: single crochet worked into the back loop only and the mosaic double crochet.
Keeping things this simple is part of what makes mosaic crochet so accessible — once you’re comfortable with these stitches, you can create incredibly detailed designs without complex techniques or frequent colour changes.
A Mosaic Double Crochet stitch is a tall stitch worked into the front loop of a stitch 2 rows below, skipping the row in between.
This allows the stitch to “drop down” over the surface of your work, forming the bold vertical lines and motifs that mosaic crochet is known for. Because it’s worked in a contrasting colour, the stitch really stands out and helps define the pattern.
Are you new to overlay mosaic crochet?
Learn all about the overlay mosaic crochet technique and find out that it’s really not as tricky as it looks in the mosaic crochet tutorial.
Oftentimes mosaic crochet is read from a chart rather than written instructions and this can be super intimidating at first! If it’s the mosaic crochet charts that have you running for the hills, then check out this blogpost all about how to read a mosaic crochet chart.
Once you’ve got the technique mastered, head on over to this collection of overlay mosaic crochet patterns and choose your next project!
Mosaic Double Crochet Tutorial Supplies
You can use any yarn weight from your stash for this tutorial, but be sure to choose 2 contrasting colours. The yarn you choose should be fairly smooth, and not too fussy for a good stitch definition. And probably steer clear of fingering weight yarn when learning!
If you’re starting by making a mosaic crochet blanket then be sure to have a read of my suggestions for the best yarn for crochet blankets!
You will also need:
- A crochet hook to match your yarn
- Scissors
- Tapestry needle
- Stitch markers can help when starting out
Overlay Mosaic Crochet Video Tutorial
Come along as I show you how to do overlay mosaic crochet and see just how easy it is in our step-by-step video tutorial.
These are the two different stitches used in overlay mosaic crochet:
SINGLE CROCHET (sc) always worked in back loop only (blo)
Insert hook from front to back through back loop of stitch to be worked. Yarn over and pull through stitch. Yarn over and pull through both loops on the hook.
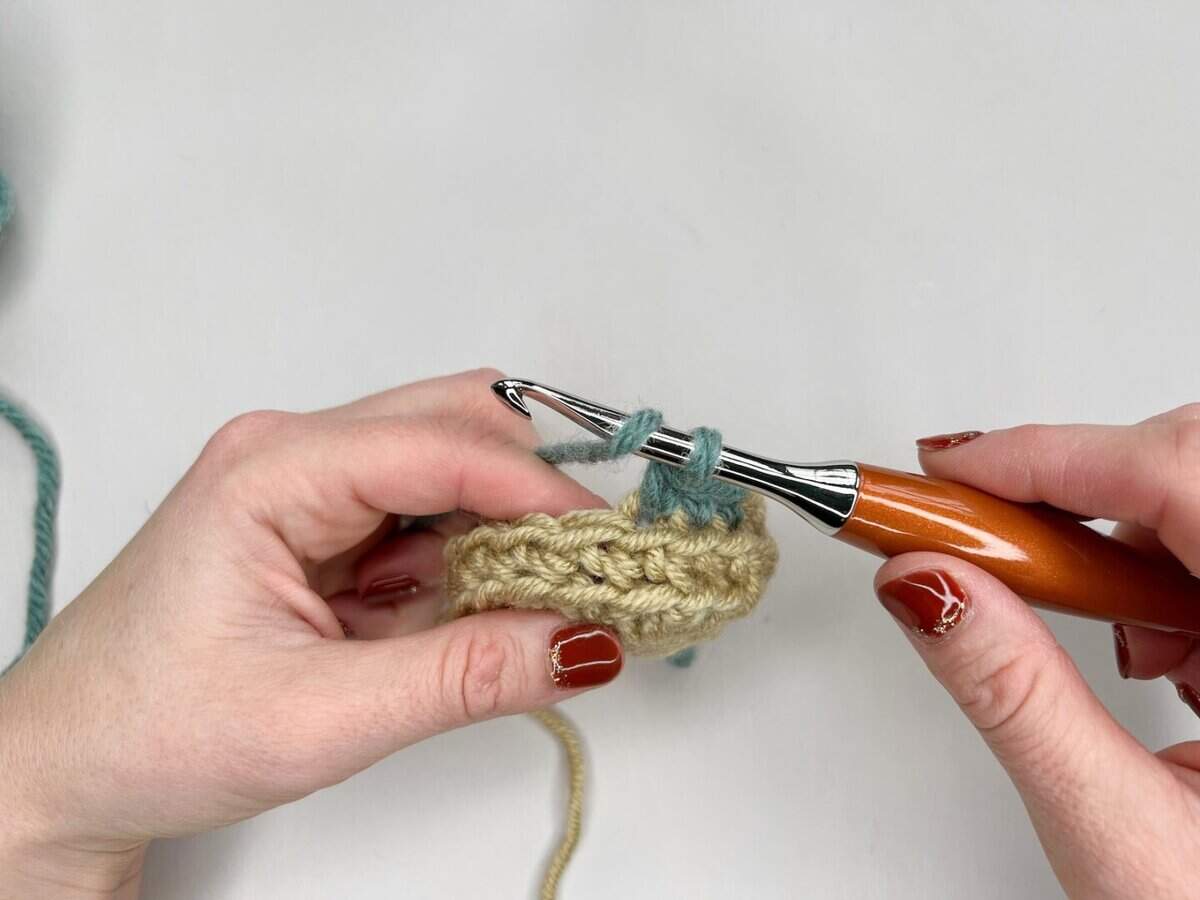
MOSAIC DOUBLE CROCHET (Mdc)
A Mosaic double crochet stitch is worked in exactly the same way as a regular US double crochet (UK treble crochet) is. The only difference is where it is worked.
When you need to work a Mosaic double crochet you’ll need to find the front loop of the corresponding stitch 2 rows below. This is where you will work your stitch.
Top tip – it will be in the same colour of yarn as the one you are currently working in!
Yarn over and insert hook into front loop of stitch two rows below. Yarn over and pull through the stitch. Yarn over and pull through two loops on the hook. Yarn over and pull through remaining two loops on the hook.
The stitch behind the Mdc on the current row is left unworked.
Step by Step Tutorial
- Start your piece by making a row of single crochet. You can start with a foundation chain and then single crochet back, or you can use a foundation single crochet. At the end of the row, chain 1 and break your yarn.
- Do not turn, but join your contrasting yarn at the beginning of the row with a chain 1.
- Following your chart or instructions, work either a single crochet in the back loop only or a mosaic double crochet in the front loop of the stitch two rows below. Find a photo tutorial of the mosaic double crochet below.
- When you reach the end of the row, chain 1 and break your yarn.
- Continue repeating steps 2 to 4 as you follow your written instructions or stitch chart.
Overlay Mosaic Double Crochet Stitch Tutorial
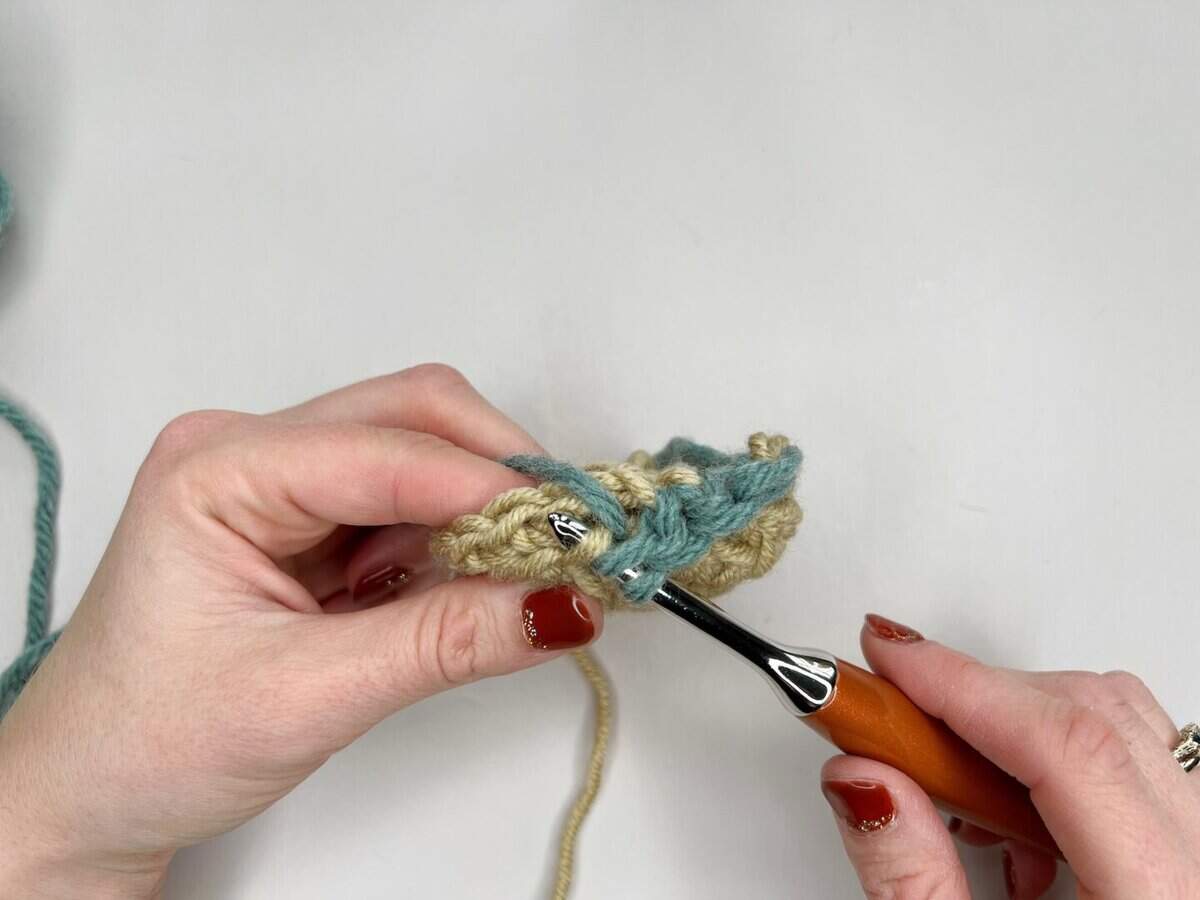
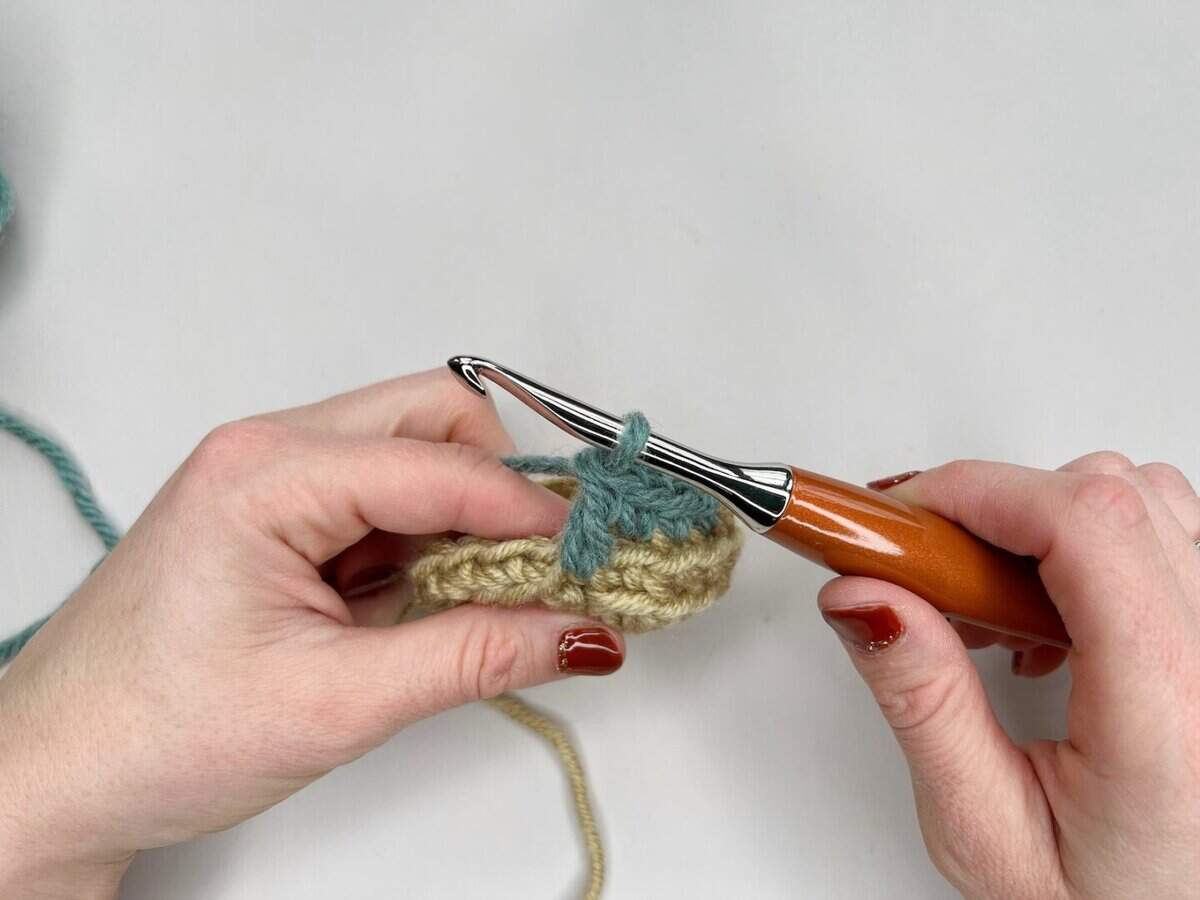
When you need to work a Mosaic double crochet you’ll need to find the front loop of the corresponding stitch 2 rows below. This is where you will work your stitch.
- Yarn over to begin the mosaic double crochet (Mdc)
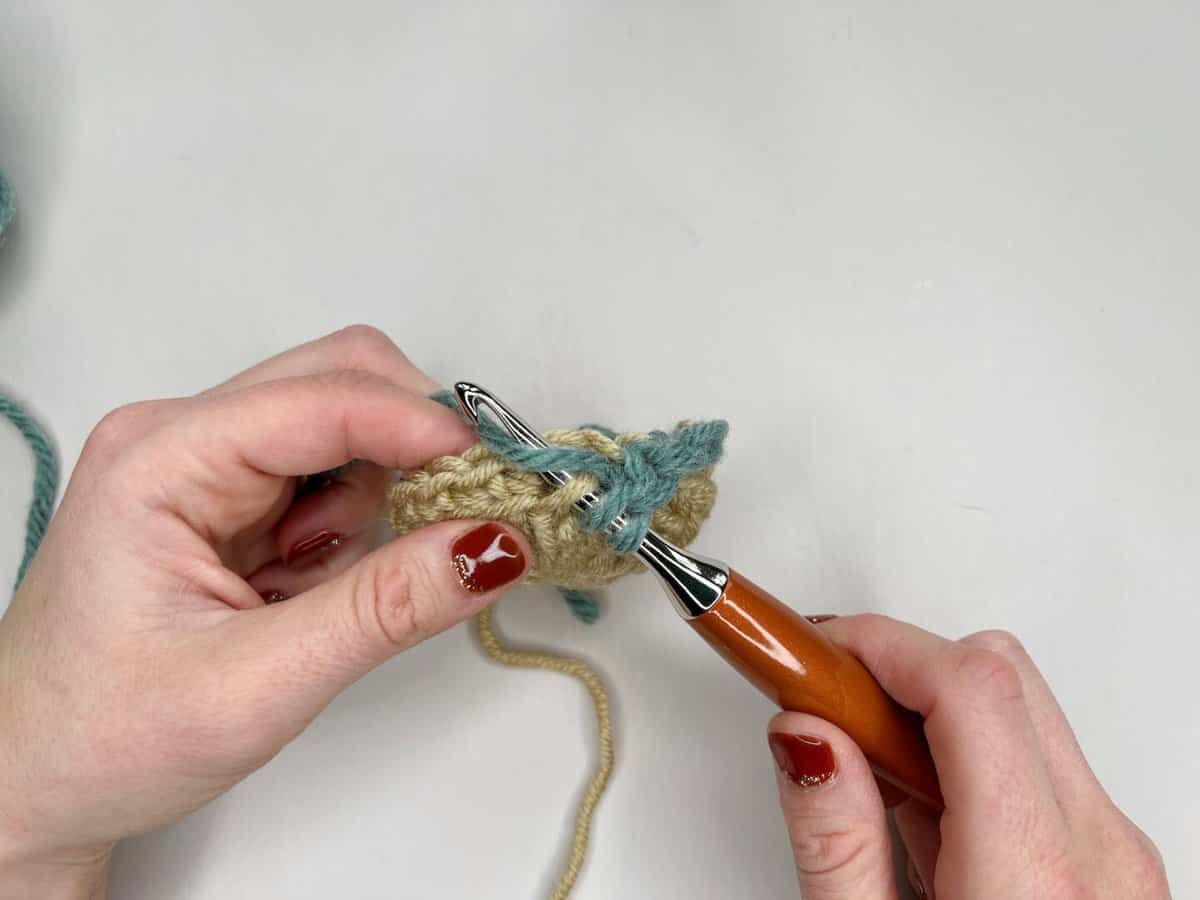
2. Insert hook into front loop of stitch 2 rows or rounds below
3. Yarn over and pull through
4. Yarn over and pull through 2 loops on the hook
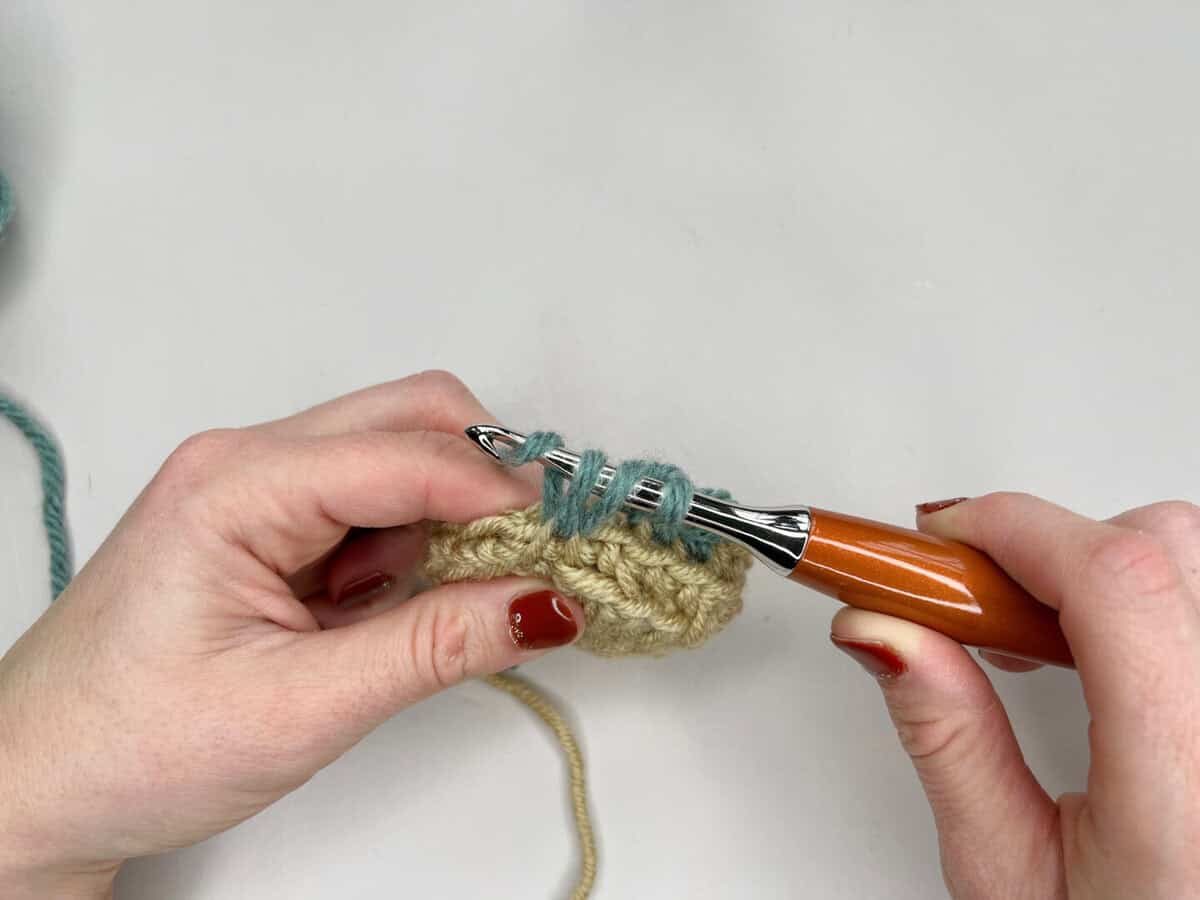
5. Yarn over and pull through remaining loops on the hook
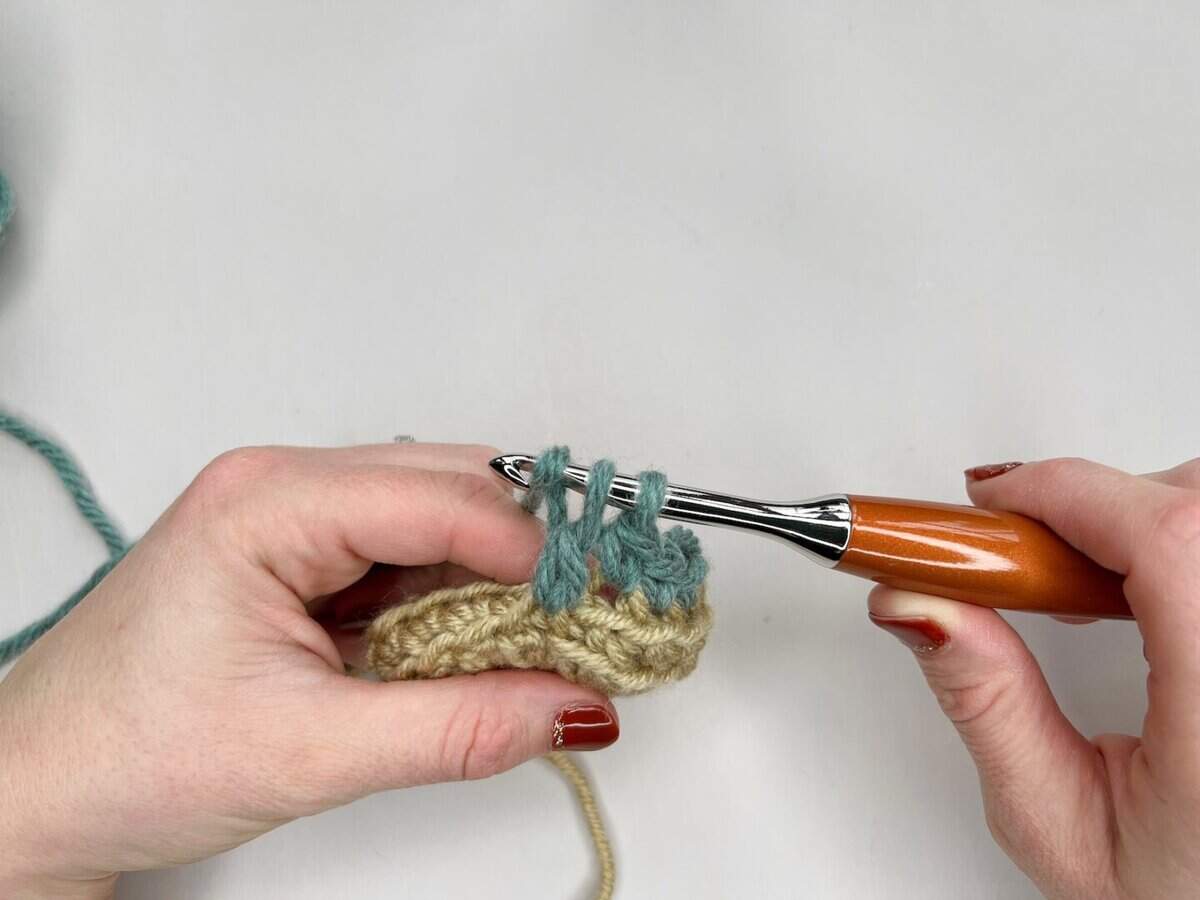
A completed mosaic double crochet stitch (Mdc)
- I always like to start and end a row with a single crochet through both loops – this makes the edges a bit neater.
- Keep your tension nice and even, and be careful not to pull the double crochet stitches too hard, as this can over-extend the front loop it is worked into.
- Be careful that you skip the stitch directly behind a mosaic double crochet to avoid increasing stitches across your row.
- If working in rounds, simply slip stitch to the first stitch to join at the end of the round, and then drop the yarn, picking up the contrasting colour to start the next round – no need to cut the yarn each time!
- Projects to try now: Labyrinth Mosaic Hat for a quick make or the Rainbow Splash Blanket for a great stash buster!
What Projects Can I Use Overlay Mosaic Crochet For?
If you would like to try out some of the things you’ve learnt in this mosaic double crochet stitch tutorial, I would recommend having a look at my mosaic crochet patterns, which include both overlay and inset mosaic crochet patterns.
Overlay Mosaic Crochet Patterns to Try
- Crochet Christmas stocking pattern – create unique heirloom stockings for everyone.
- Crochet poncho pattern – a simple poncho made of 2 rectangles.
- Crochet sock pattern – showstopper socks to wow everyone with!
- Crochet coffee sleeve pattern – quick and easy with 4 designs.

I hope you’ve enjoyed learning all about how to make the mosaic double crochet stitch! I’d love to know if you decide to make any of my patterns using these techniques or if you create your own! You can sign up to become a member of HanJan Crochet and I’ll let you know about all the fabulous crochet adventures, offers, lives and more too!
See you there!
Join our community group!
We’ve built an amazing community always ready to help each other. Join today!
Learn Some More Crochet Stitches With Me
If, like me, you’re eager to learn all the crochet stitches and techniques you possibly can then I’d love you to take a look at my crochet stitch tutorials – here are some of my favourites though:
- Herringbone Half Double Crochet Moss Stitch – great for cosy garments and accessories
- Twisted Cable Stitch – perfect for texture and has a slanted look like herringbone too.
- Double Crochet Moss Stitch – a great stitch for easy colour work
- Ripple Stitch – great fun for blankets espeically!
Pin It For Later