This post may contain affiliate links. Please see my full disclosure and privacy policy for details.
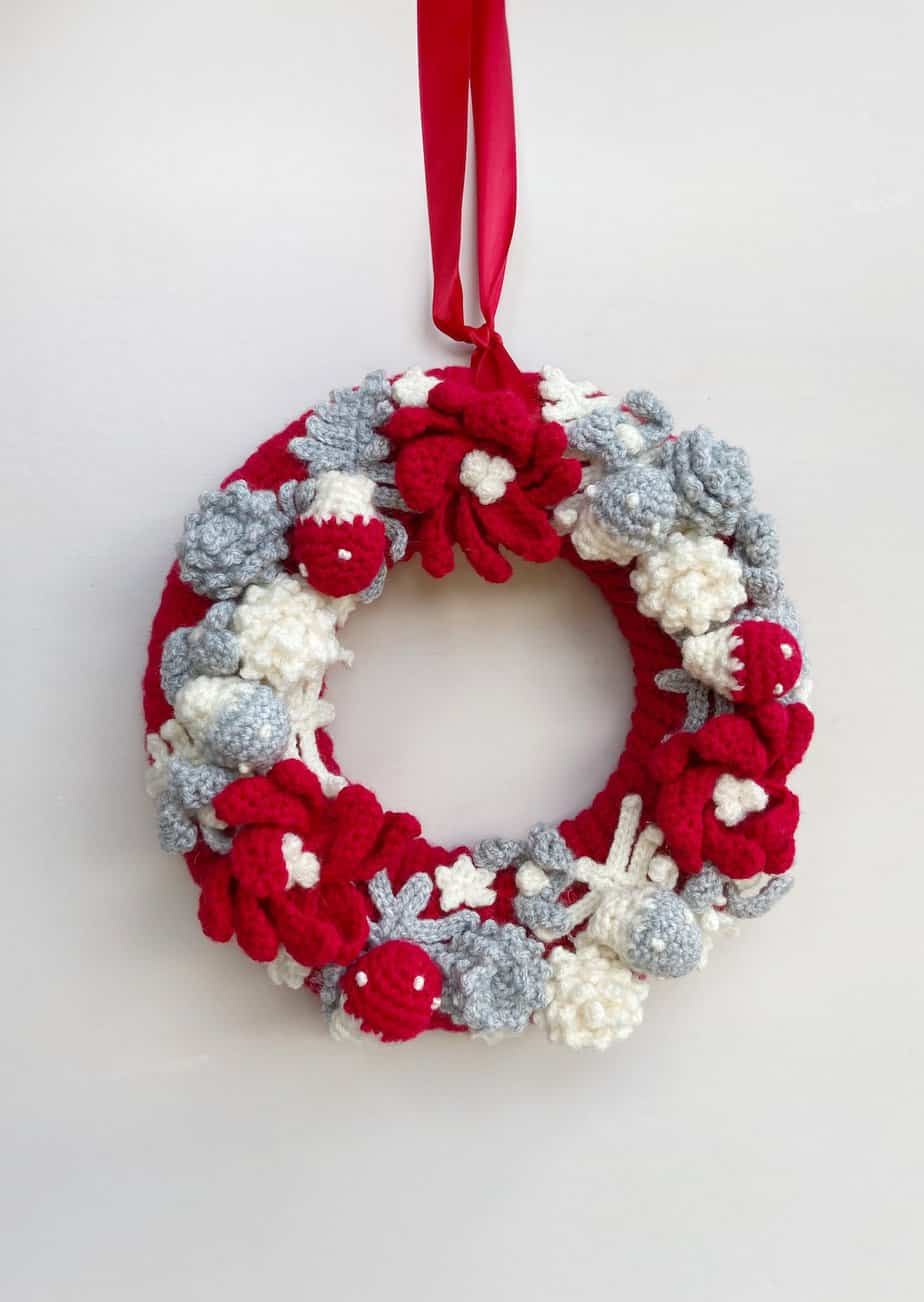
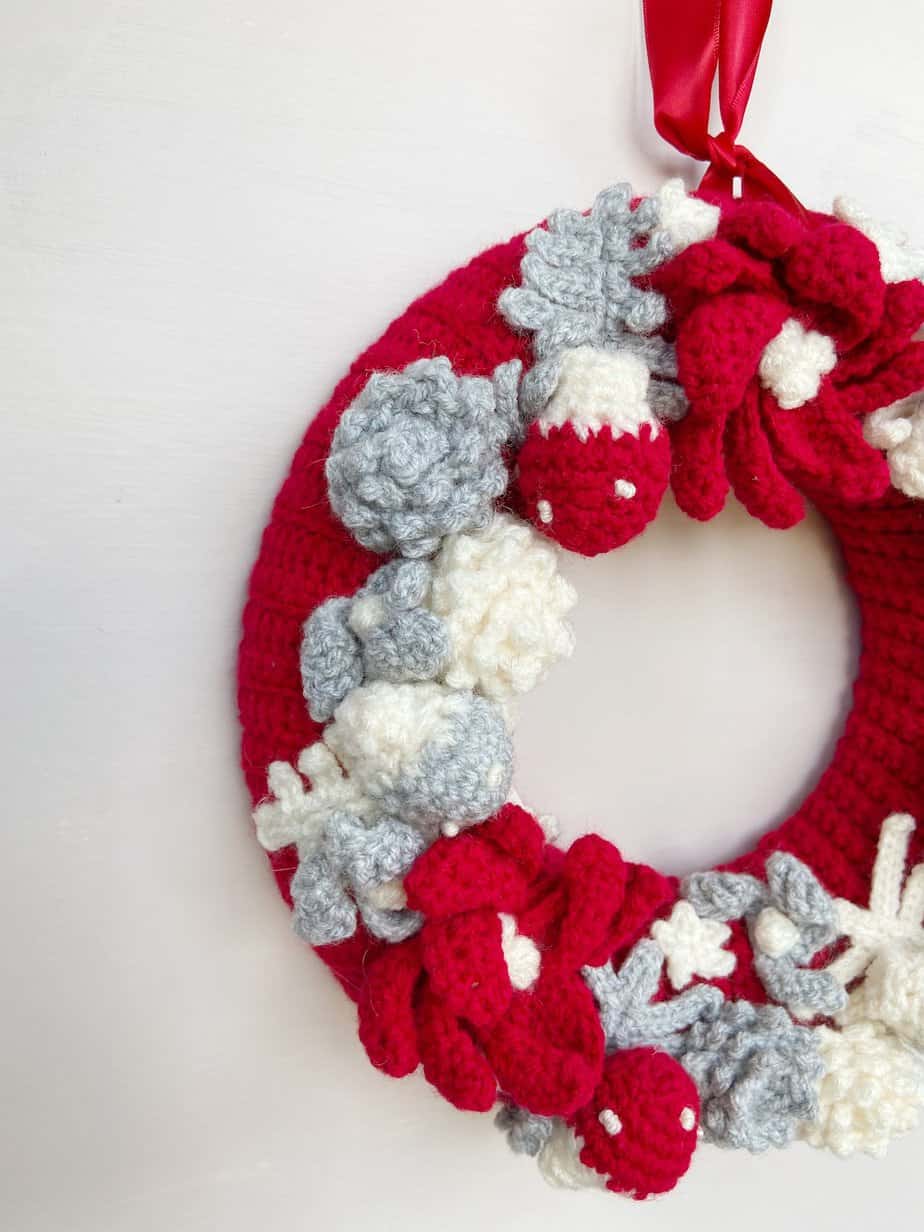
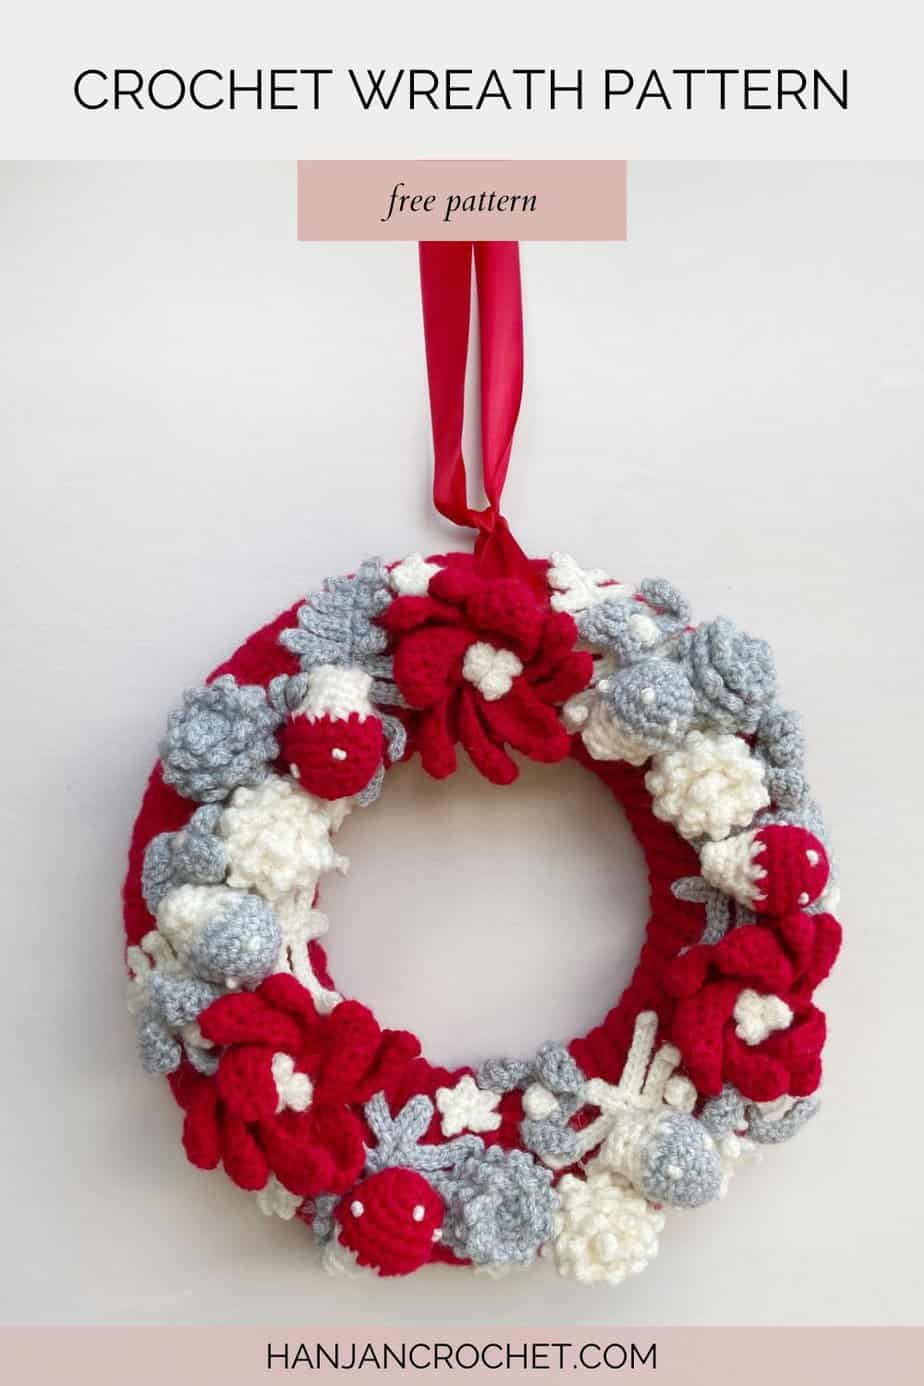
This fun, festive Christmas crochet wreath pattern is the perfect pop of seasonal colour.
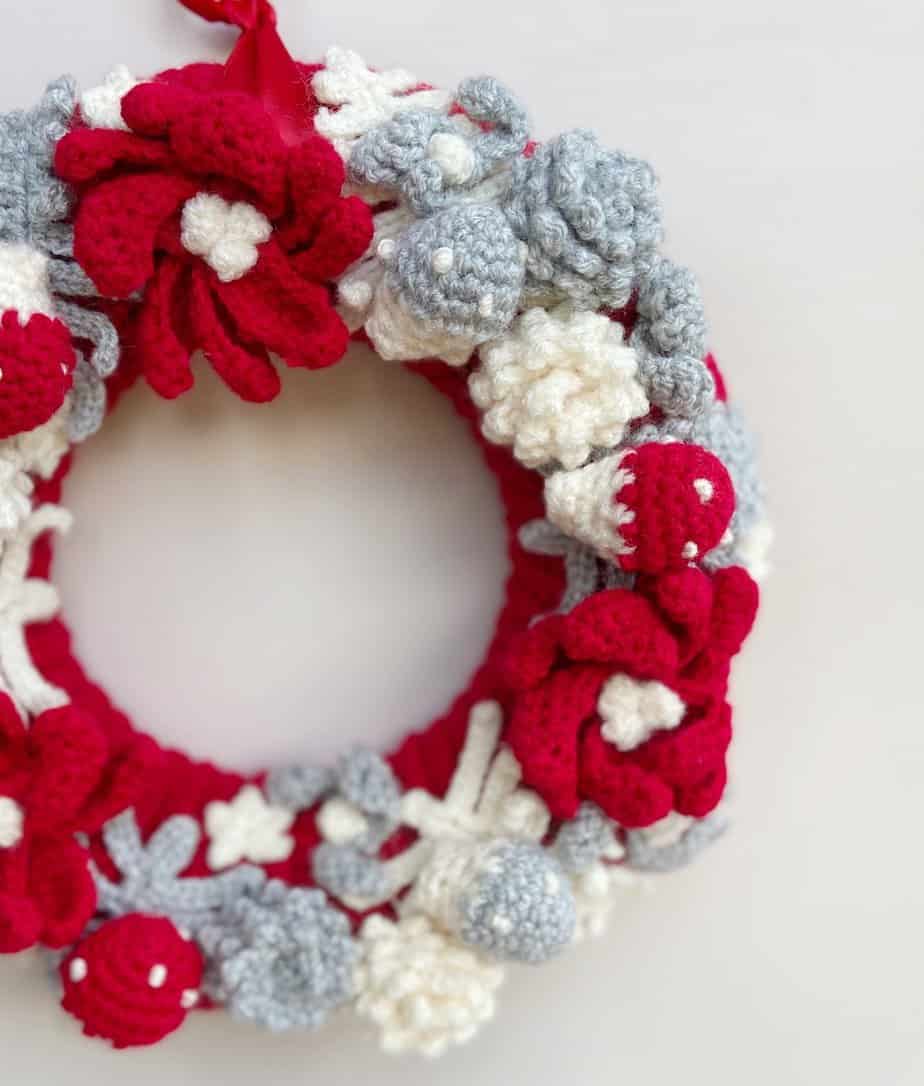
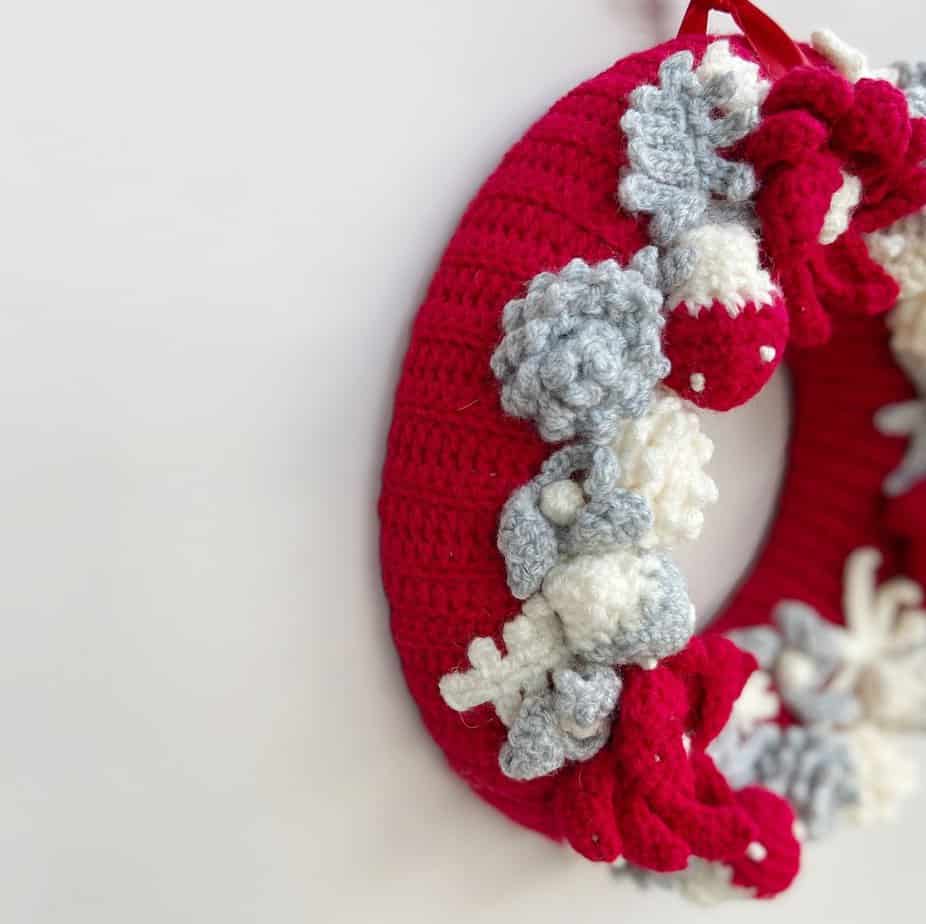
With a whimsical woodland theme including mistletoe, ferns, poinsettias, star, pine cones and toadstools that you can use to create your very own unique version.
Simply make a cover to crochet around a wreath, add your woodland elements and hang it in pride of place.
This post may contain affiliate links. Please see my full disclosure and privacy policy for details.
Want to remove Ads?
- Get ad-free access on all posts; 200+ patterns & tutorials!
- Member-only resource library with downloadable PDF guides
- Bonus eBook (Worth over $30)
Scroll down and sign in to find the free crochet wreath pattern, or purchase an ad-free, printable PDF version here:
Table of Contents
More about the Christmas crochet wreath pattern
I absolutely love adorning our home with handmade crochet decorations all year round and I’m always trying to come up with fun and easy crochet patterns for Christmas that I can share with you!
There’s something about festive hand makes that gets me all nostalgic and I’m happy to say that this winter crochet wreath comes out each year to much excitement from the whole family.
I designed it back in 2015 for a magazine commission but it’s been sitting waiting for the right moment for me to launch it on the blog.
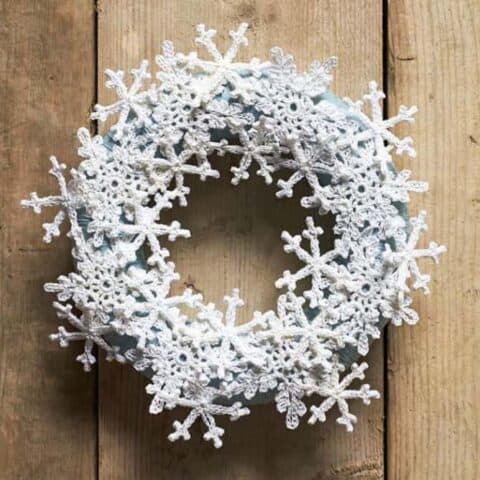
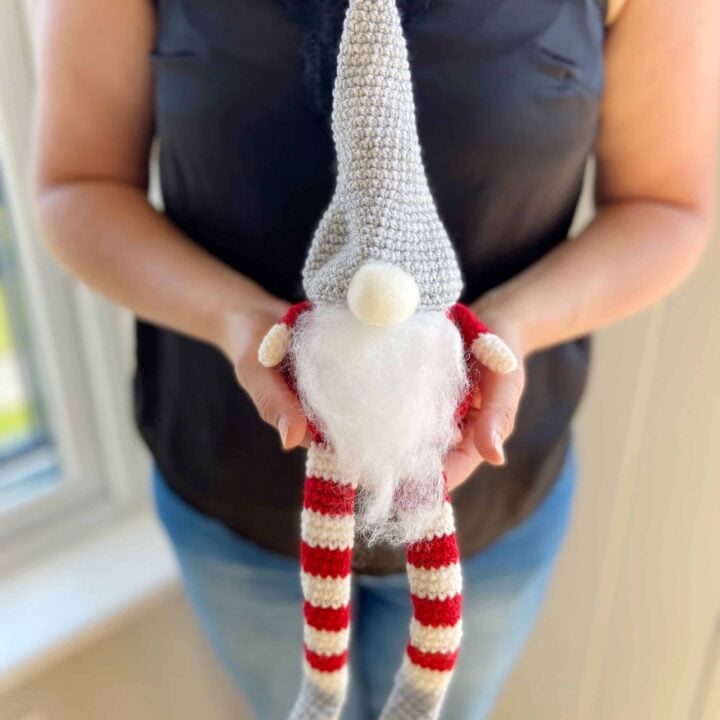
It uses the same colours and yarn as I did for my Christmas gnomes pattern (which is my most popular pattern to date!) and now adds to my wreath patterns alongside my snowflake wreath pattern.
Browse through these easy Christmas crochet patterns for more inspiration!
How do you make an easy crochet wreath?
Although it may look tricky and complicated with all the elements added to it, this is actually a really easy crochet wreath pattern.
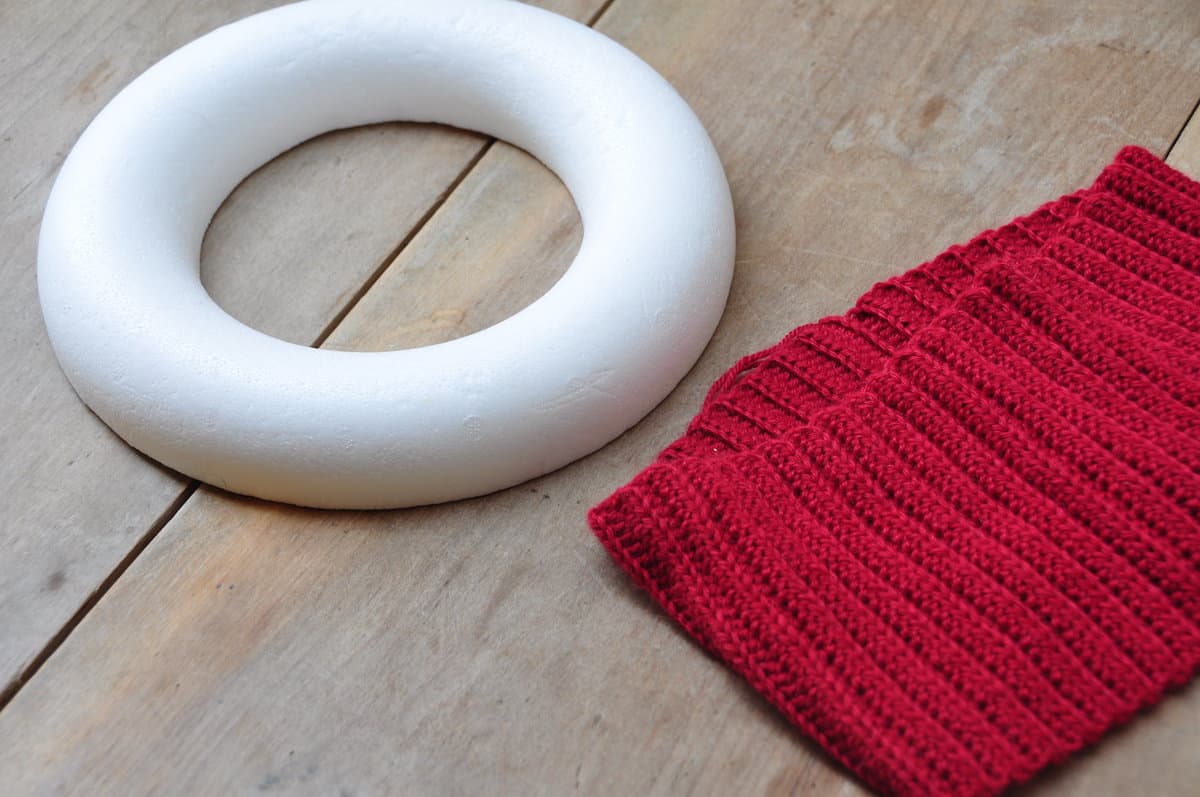
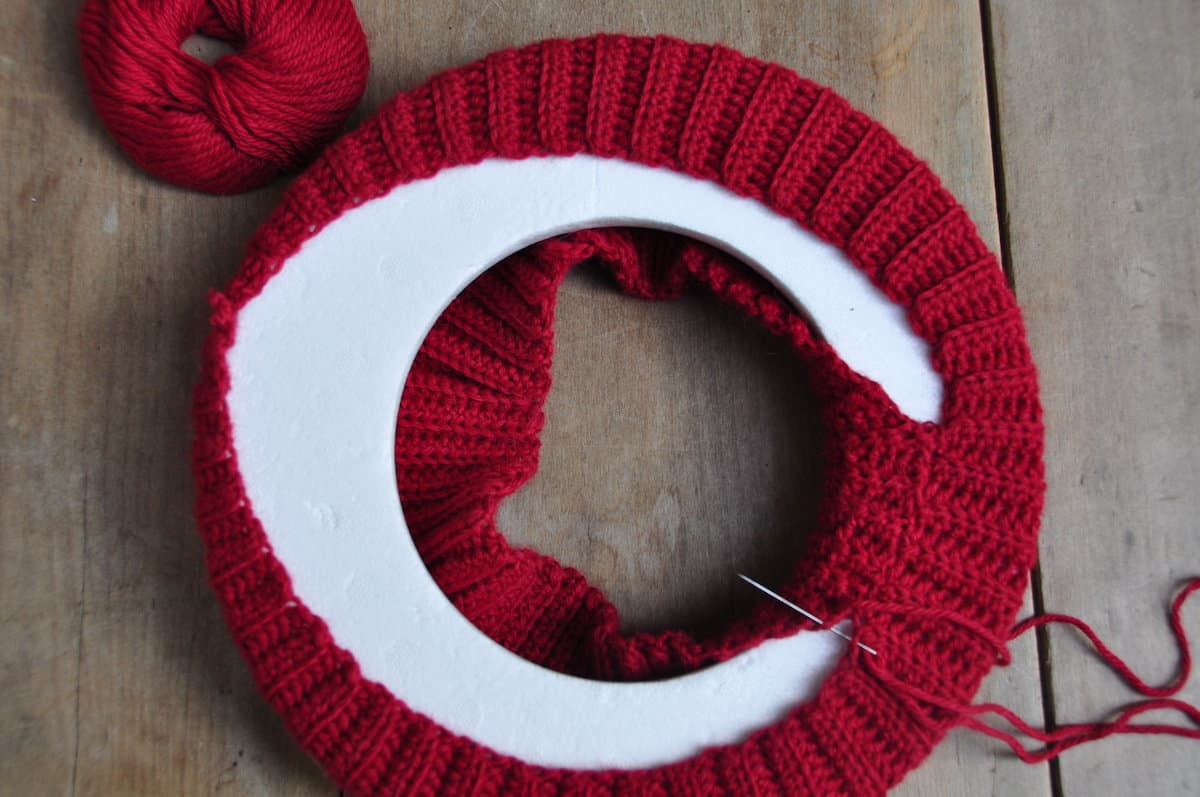
I wanted to be sure that the entire ring is covered well and not just wrapped with yarn for this one so you just simply crochet a rectangle of fabric and attach it to the ring.
Then each of the elements that fit with the woodland wreath theme are made individually.
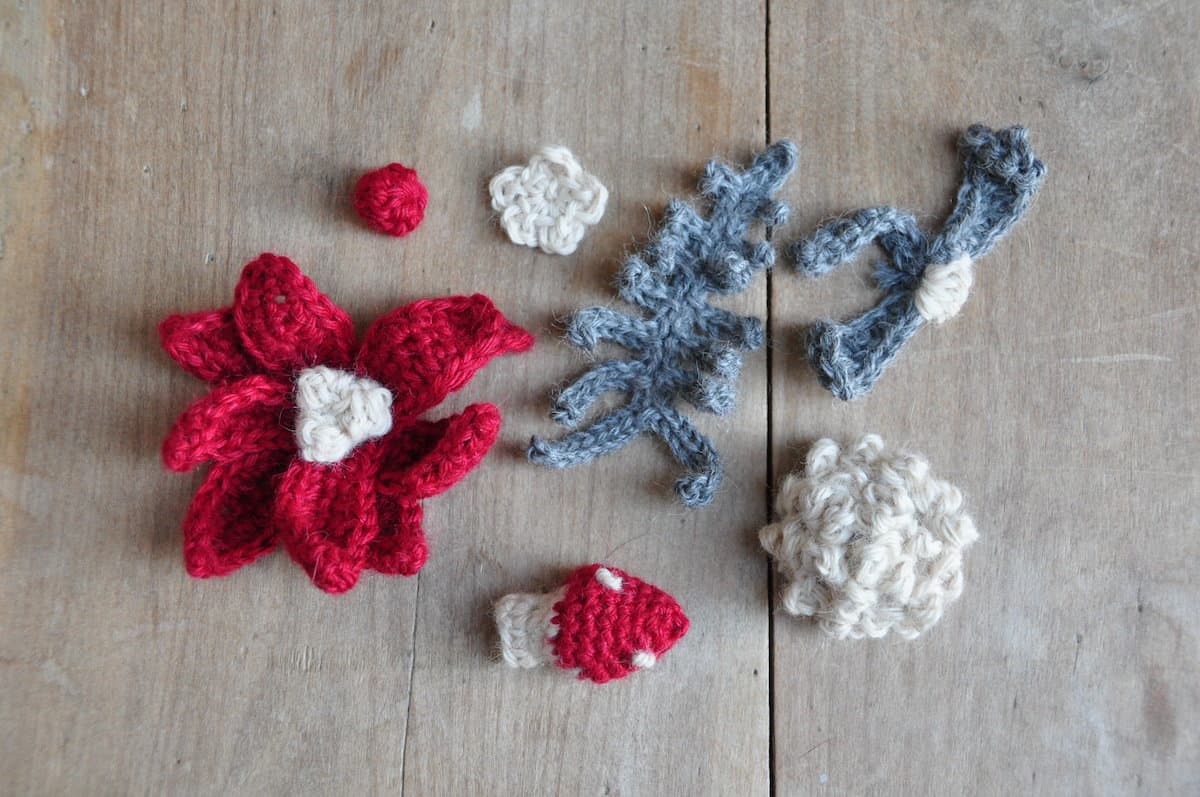
There is mistletoe, ferns, poinsettias, star, pine cones and toadstools included in the design but of course you can make as many or as few of each as you like.
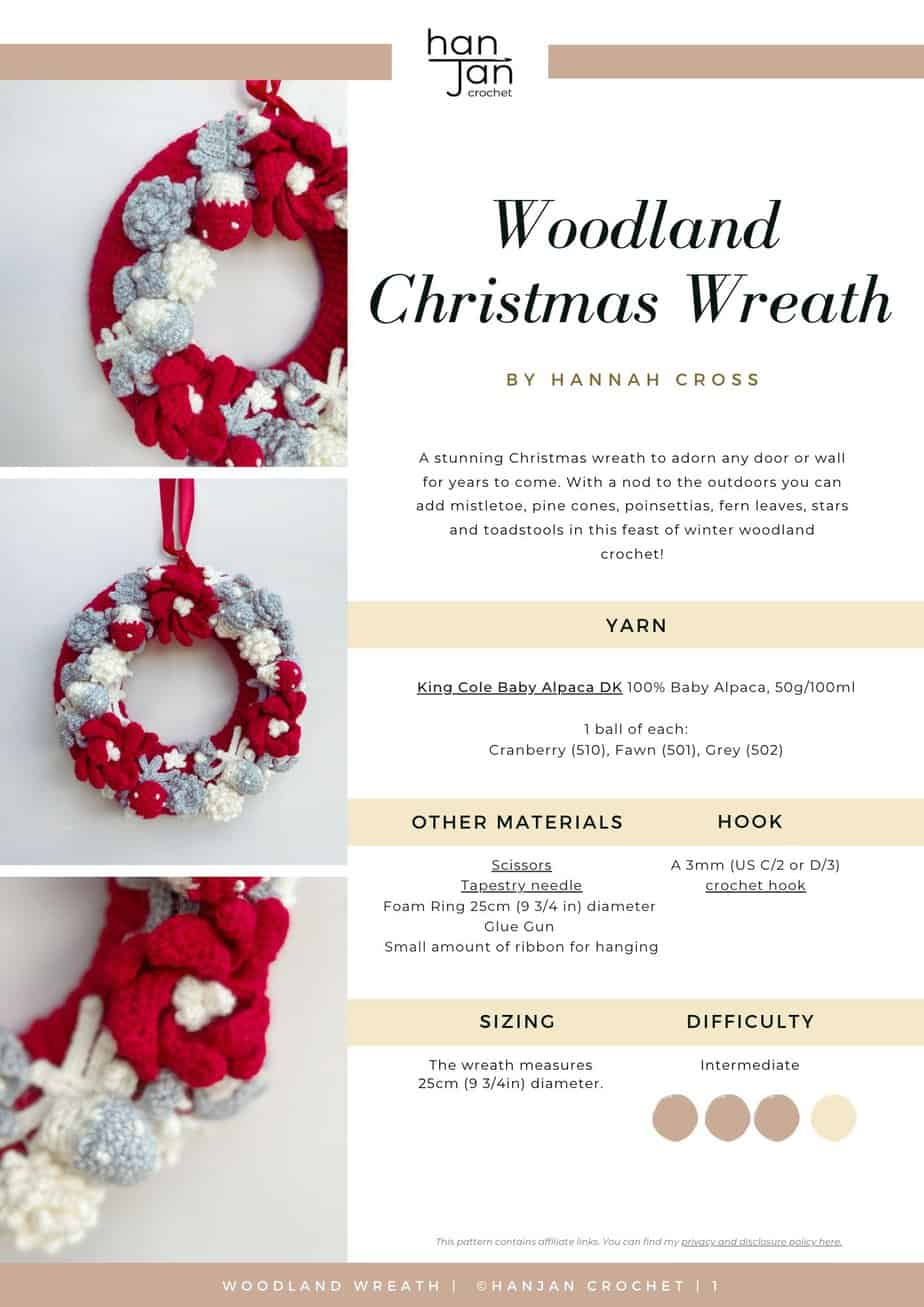
Yarn
To make my version of the wreath I used King Cole Baby Alpaca DK 100% Baby Alpaca, 50g/100m, Category #3 weight.
I used 1 ball each of Cranberry (510), Fawn (501) and Grey (502).
I often get asked about ideas for alternative yarns and so here are some great options that I think will also give you a fabulous winter wreath.
It’s really important to choose a yarn that has good stitch definition for the elements and a luxurious yarn is a great treat but an acrylic would work really nicely too.
Here are some that I think would work really well for this pattern in various price ranges:
- Swish DK by WeCrochet :100% Fine Superwash Merino Wool; 123yds/50g
- DROPS Cotton Merino: 50% fine merino, 50% Egyptian cotton; 110m/50g
- Paintbox Simply DK 100% acrylic; 276m/100g
Tension and Sizing
The wreath measures 25cm (9 3/4in) diameter but of course you can use whatever size of ring you like. Just make sure to adjust the size of your rectangle to cover the wreath.
Tension isn’t essential for this project.
Materials
Along with your yarn, you will need the following:
- A 3mm(D) crochet hook- my favourites are Furls Streamline Swirl crochet hooks or Clover Amour crochet hooks.
- Scissors
- Tapestry Needle
- Foam Ring 25cm (9 3/4 in) diameter
- Glue Gun
- Small amount of ribbon for hanging
Pattern Options
Get this Christmas crochet wreath pattern free in this blog post in US terms – just scroll down to find it in the exclusive members area! You can also purchase an ad-free, printable PDF in both US and UK terms with added extras in my pattern stores:
Purchase and Print
Get the ad-free, printable PDF with added extras in my pattern stores:

Don’t forget to join HanJan Crochet to receive regular discount codes (and more free patterns!) and Pin this free wreath pattern to your crochet Pinterest board!
Glossary and Abbreviations
ch(s) – chain(s)
sp – space
ss – slip stitch
RS – right side
WS – wrong side
sk – skip
rep – repeat
yoh – yarn over hook
blo – back loop only
Crochet Stitches
The stitches used in the woodland wreath are as follows:
sc – single crochet (UK dc – double crochet)
hdc – half double crochet (UK htr – half treble crochet)
dc – double crochet (UK tr – treble crochet)
Special Stitches
The elements use a couple of special stitches as follows:
Ch-4 picot stitch
Ch4, ss into the first of these ch.
US: 3-dc cluster (UK 3-tr cluster)
Yrh, insert hook in space/st indicated, yrh and pull up loop, yrh and draw through 2 loops) 3 times, inserting the hook in the same st each time, yrh and draw through all loops on hook.
Pattern Notes
A ch1 at the beginning of a row or round does not count as a stitch.
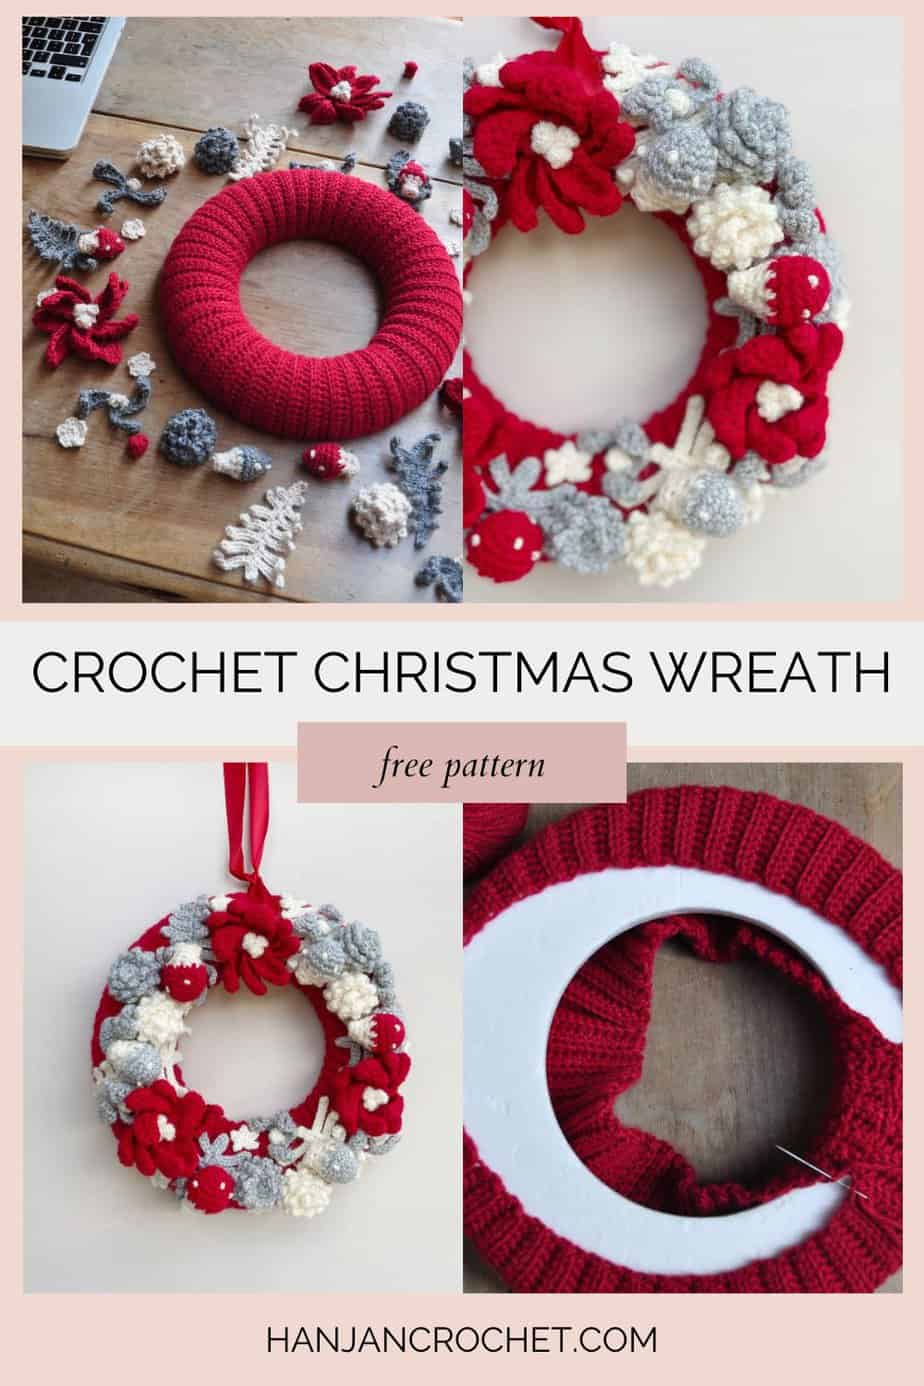
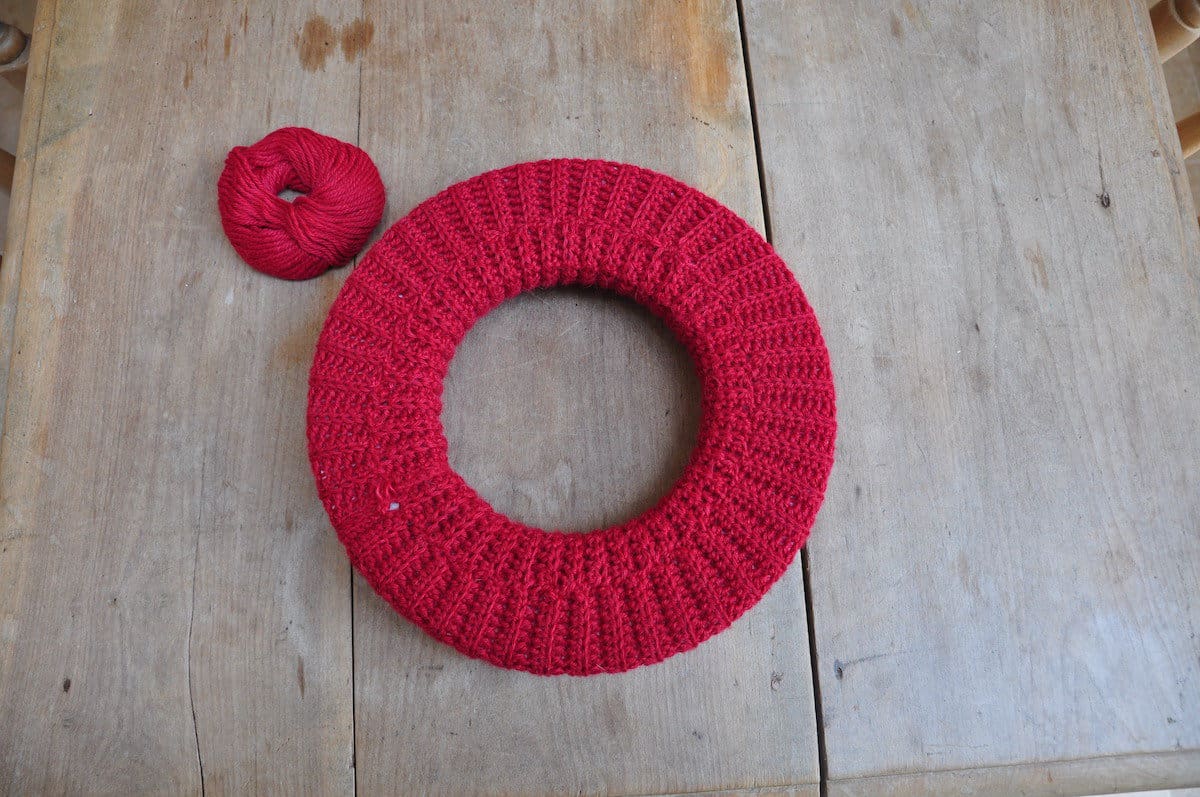
Begin by crocheting the cover for the foam ring.
Then make all of the component parts for your wreath individually.
You can make any combination of the elements to add.
The elements are then all added in whatever order you like to complete the wreath.
The pattern is written in standard US crochet terms.
Woodland Christmas Crochet Wreath Pattern
To unlock Exclusive Content on the HanJan Crochet Blog, all you need to do is click the box below and the Grow.me app will pop up, allowing you to enter your email and create a password.
Once you’ve created an account, every time you see Exclusive Content on my blog (or any others that use Grow), simply login to your Grow account. Be sure to switch to the login screen to enter your login credentials.
If you forget your password, click the “forgot password” link and follow the prompts. Please note that I’m unable to assist with resetting Grow passwords or accessing your Grow account, so be sure to save your login information in a safe place.
Thank you for subscribing and for joining me at HanJan Crochet! I hope you enjoy the exclusive content available on the site and I can’t wait to see what you create 🙂
US Crochet Terminology
WREATH COVER:
Using Cranberry, ch32
Row 1: Ch1 (does not count as st throughout), hdc in second ch from hook and in each ch to end, turn, (32 hdc)
Row 2-88: Working in back loops only: Ch1, hdc in each st to end, turn.
Fasten off and weave in ends.
Sew the long sides together around the foam ring, positioning the seam at the centre back.
Sew the two ends together.
POINSETTIA (MAKE 3)
PETALS (MAKE 3)
Using Cranberry, ch10.
Round 1 (RS) Ch1 (does not count as st) sc in second ch from hook and each ch to end. (10 sc)
Ch11, sc in second ch of new ch-11 and each in each st end, (10sc)
Ss in end of first ch-11, ch11, sc in second ch of new ch-11 and in each ch to end (10sc)
Ss in first ch of first ch-11.
Round 2 Ch1 (does not count as st), *sc in each of next 2 sts, hdc in each of next 2 sts, dc in next st, hdc in each of next 2 sts, sc in each of next 2 sts**, ch1, skip last st, working along other side, rep from *to**. Repeat all from the beginning of Round 2 for each of the other two petals.
Fasten off and weave in ends.
Sew the 3 sets of Petals together to form one flower.
FLOWER CENTRE
Using Fawn, ch3
Round 1 (RS) (3-dc cluster in third ch from hook, ss in the same ch) 3 times, ss in base of first cluster to join.
Fasten off, leaving a long tail.
Sew Flower Centre on top of the petals using long tail. Weave in ends.
MISTLETOE (MAKE 6)
LEAVES
Using Grey, ch12
Round 1 *Tr in fifth ch from hook, tr in next st, dc in each of next 2 sts, hdc in each of next 2 sts, sc in each of next 2 sts**, ch12, rep from * to **, ch9, sc in second ch from hook and each ch to end, ss in centre.
Fasten off and weave in ends.
BERRY
Using Fawn, ch3
Round 1 (RS) 3-dc cluster in third ch from hook, ss in same ch.
Fasten off, leaving a long tail.
Sew Berry on top of Leaves using the long tail.
TOADSTOOLS
Make 3 with Cranberry as Yarn A and 3 with Grey as Yarn A.
Using Yarn A, ch2
Round 1 (RS) 3sc in second ch from hook, ss to first sc. (3sc)
Round 2 Ch1 (does not count as st throughout), 2sc in each st around, ss to first sc (6sc)
Round 3 Ch1, *sc in next st, 2sc in next st; rep from *around, ss to first sc
Round 4 Ch1, *sc in each of next 2 sts, 2sc in next st; rep from * around, ss to first sc (12sc)
Round 5 Ch 1, *sc in each of next 3 sts, 2sc in next st; rep from * around, ss to first sc (15sc)
Round 6 Ch 1, *sc in each of next 4 sts, 2sc in next st; rep from * around, ss to first sc (18sc)
Round 7 Ch 1, sc in each st around, ss to first sc
Change to Fawn
Round 8 Ch1, (sc2tog) around, ss to first sc(9sc)
Round 9 Ch1, sc in next st (sc2tog) 4 times, ss to first sc (5sc)
Round 10 Ch1, 2sc in next st *1sc in next st, 2sc in next st; rep from *, ss to first sc (8sc)
Round 11 Ch1, sc in each st around, ss to first sc (8sc)
Stuff gently and stitch 5 French knots to top using Fawn.
PINE CONES
Make 3 in Fawn and 3 in Grey
Ch15
Row 1 (RS) Working the first dc of the row in the third ch from the hook, work as folls: *(dc,ch-4 picot) 3 times into the same ch; rep from * in each ch of the foundation ch.
Fasten off, leaving a long tail.
Shape into a spiral and sew into place using the long tail.
FERN LEAVES
Make 3 in Fawn and 3 in Grey
Ch21 to form ‘spine’ of the leaf.
Round 1 (RS) Ss in second ch from hook and in each of next 3 ch; for first ‘frond’: ch3, ss in second ch from hook, in each ch back towards spine and in st at base of ch again: for second ‘frond’: *ss in each of next 2 unworked ch of spine, ch4, ss in each ch back towards spine and in st at base of ch again; rep from * 5 more times, but increase the number of ch in each frond by 1 each time, so you will be working ch5, ch6, ch7 and so on, ending with ch9.
Ss in remaining 4 ch, and then repeat working up the other side of the spine to mirror the fronds on the first side.
Fasten off and weave in the ends.
STARS (MAKE 6)
With Fawn (ch2)
Round 1 (RS) Sc in second ch from hook, (ch2, sc in second ch from hook) three times, ss in first sc.
Fasten off, leaving a long tail.
TO MAKE UP
Arrange items on wreath where desired and then glue or sew in place. It is best to start with Fern Leaves as the base and then evenly space out the Poinsettias.
I found it helpful to position them without gluing first and then take a photograph to help remember where to put them.
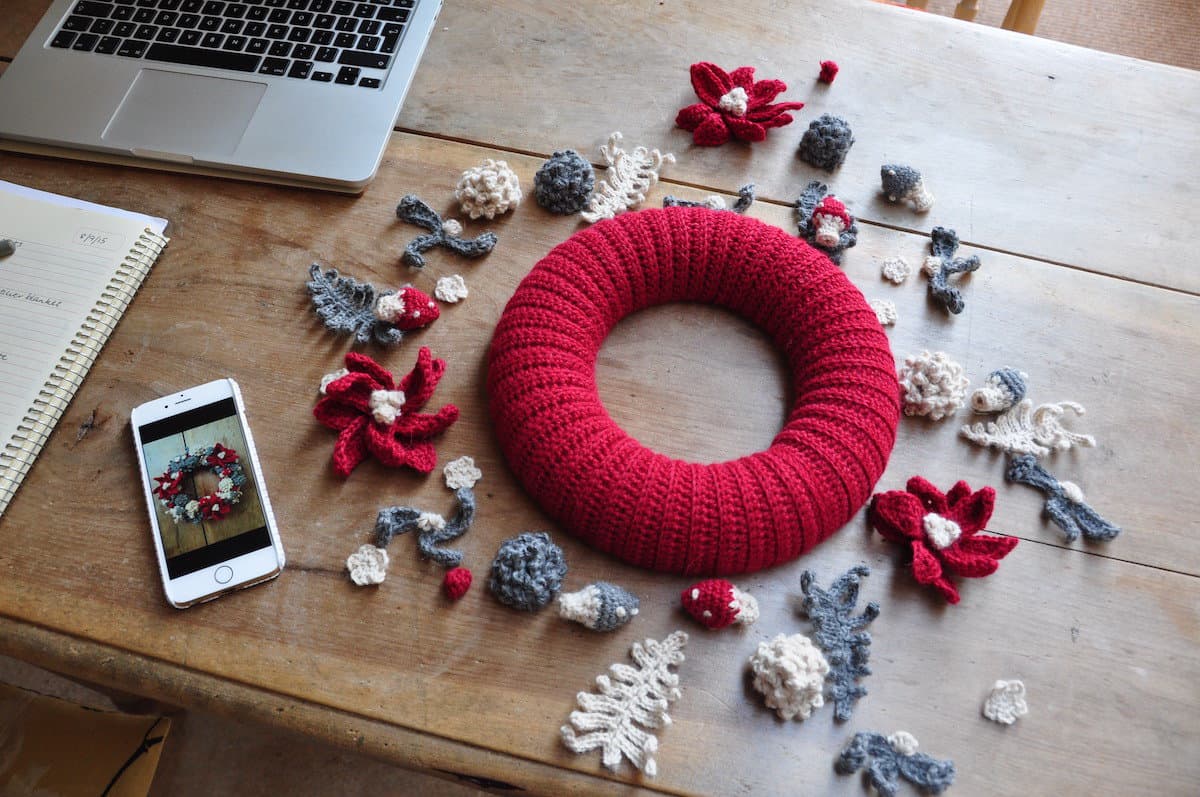
If you are gluing them in place then make sure to keep your wreath flat whilst it dries and only hang it up once you are sure that everything is secure.
That’s it! I hope you’ve enjoyed this Christmas crochet wreath pattern and can’t wait to see your version!
Join HanJan and Share Your Crochet With Us!
I’d love to hear from you and see your HanJan Crochet project! Here’s where you can do that:
📌 PIN THIS POST – save it to your Pinterest crochet board so you can come back to it again and make more!
↗️ SHARE – Share your yarn choices, progress pics, and finished projects on Facebook or Instagram (make sure to use the hashtag) #hanjancrochet
🧶 JOIN – Join thousands of amazing crafters in the HanJan Crochet Community Group on Facebook ready to cheer you on!
✉️📩📬 SUBSCRIBE – It’s an honour to be able to create and share my free crochet patterns with you. I’d love to stay connected and send you regular discount codes and free patterns! Please sign up for my subscriber list to get a free gift right now!
Purchase, download and print
Get the ad-free, printable PDF with added extras in my pattern stores:
More Christmas Crochet Patterns You Might Enjoy
If you enjoy getting set with festive crochet then here are a few more of my designs you might enjoy crocheting!