This post may contain affiliate links. Please see my full disclosure and privacy policy for details.
The time has finally come to start The Kaleidoscope Mandala Throw CAL and I couldn’t be more excited! This week I’ll be sharing the first instalment of the pattern and the following three instalments will follow in two week intervals.
Table of Contents
About the Kaleidoscope Mandala Throw
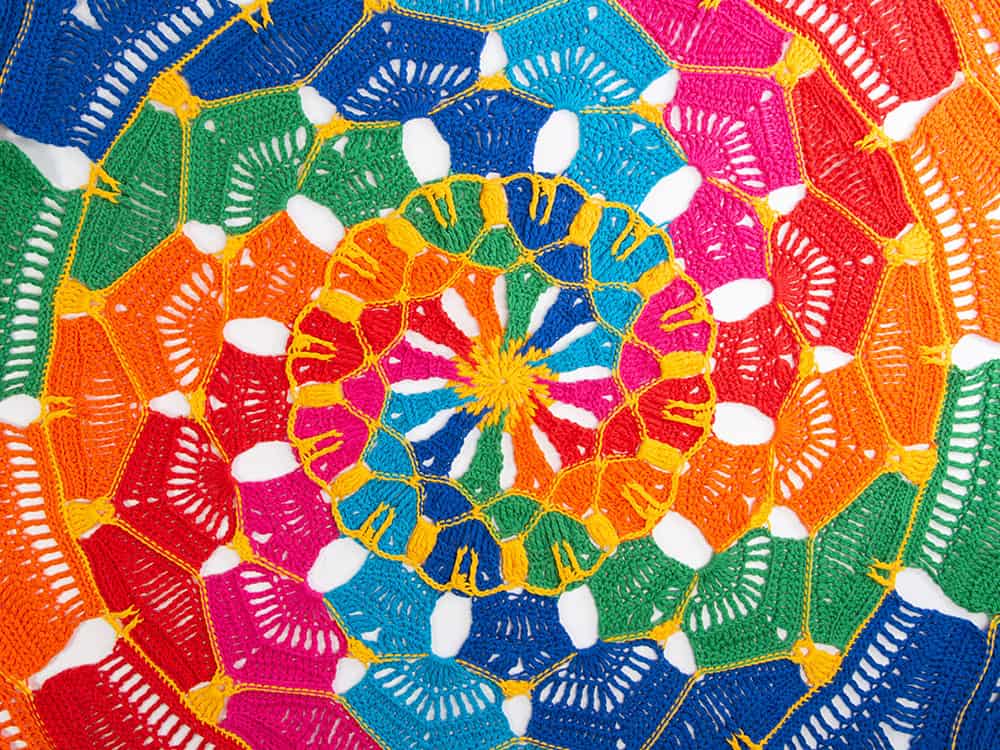
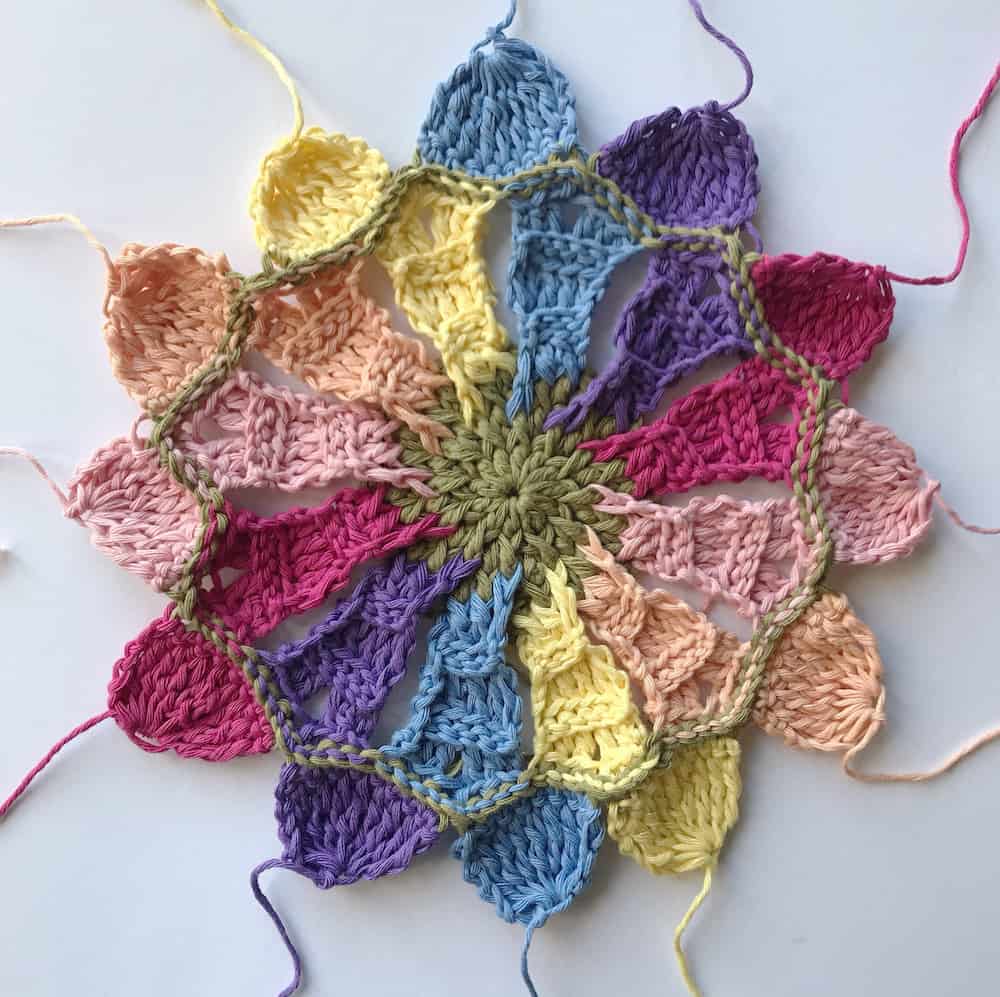
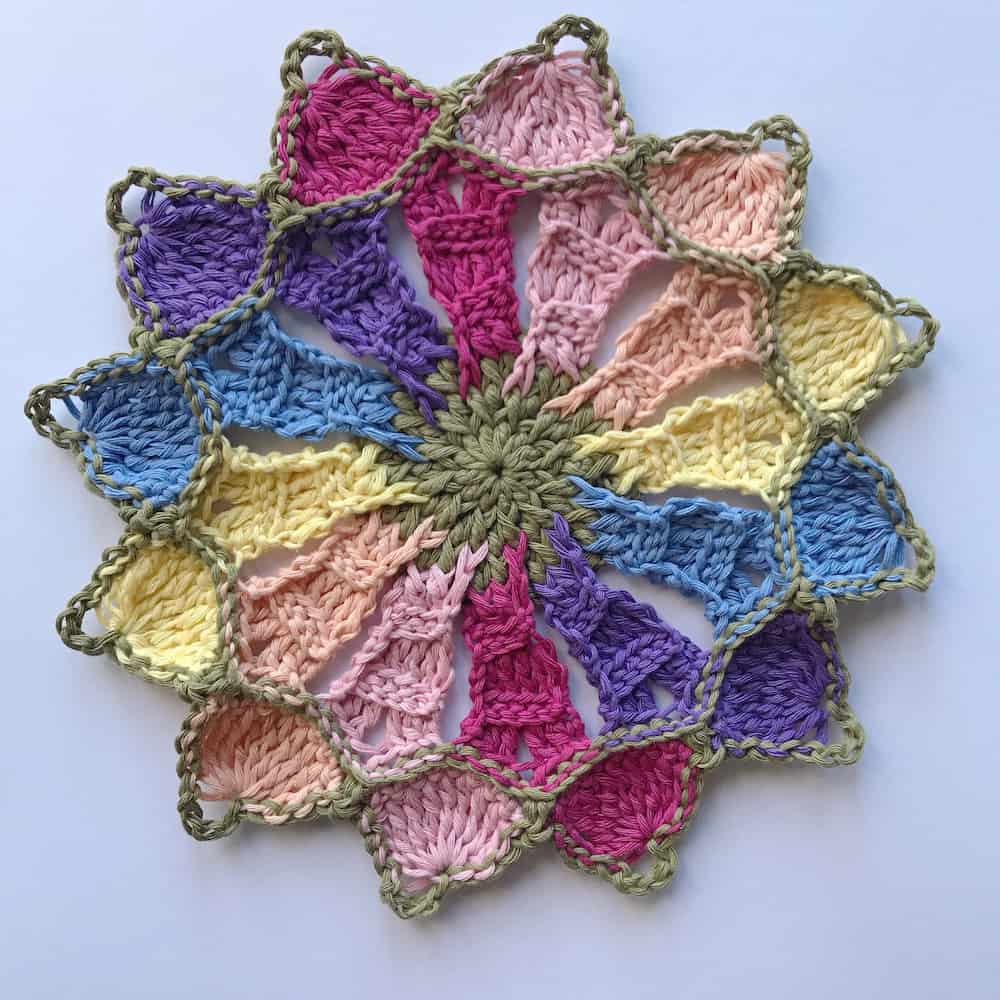
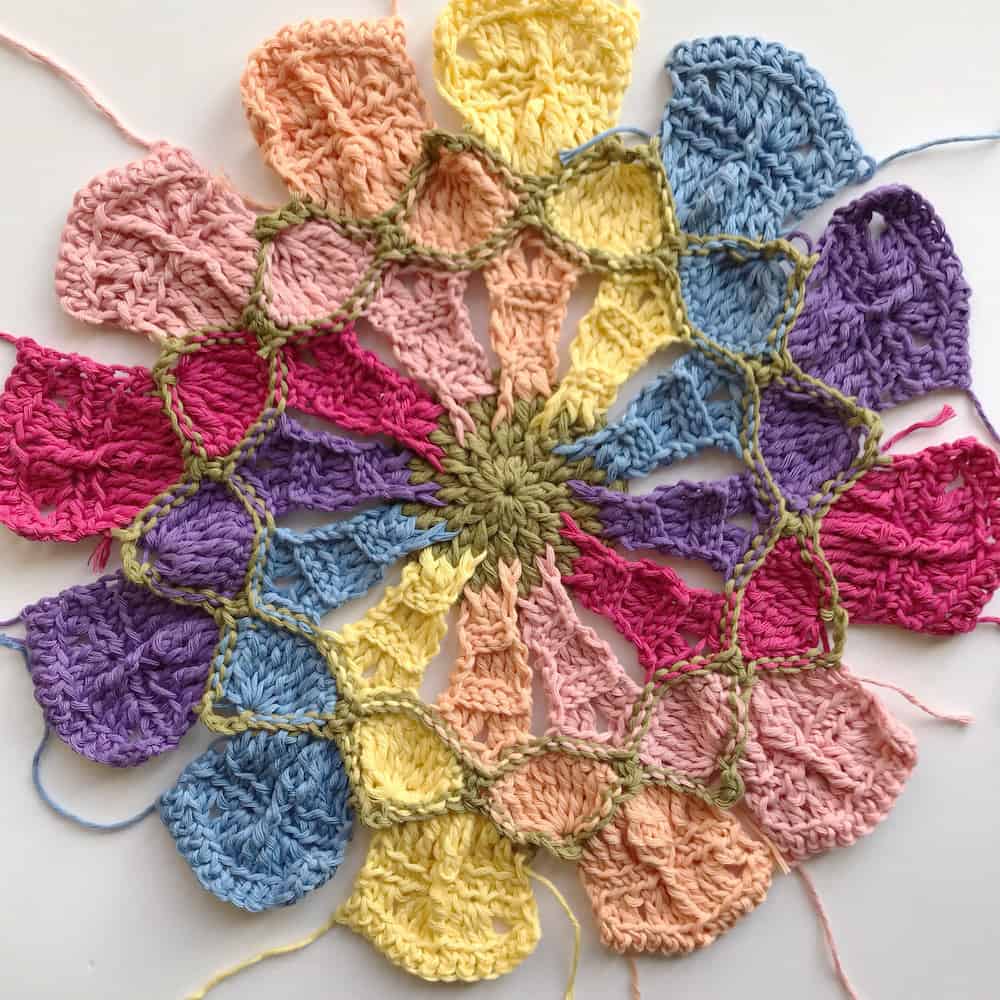
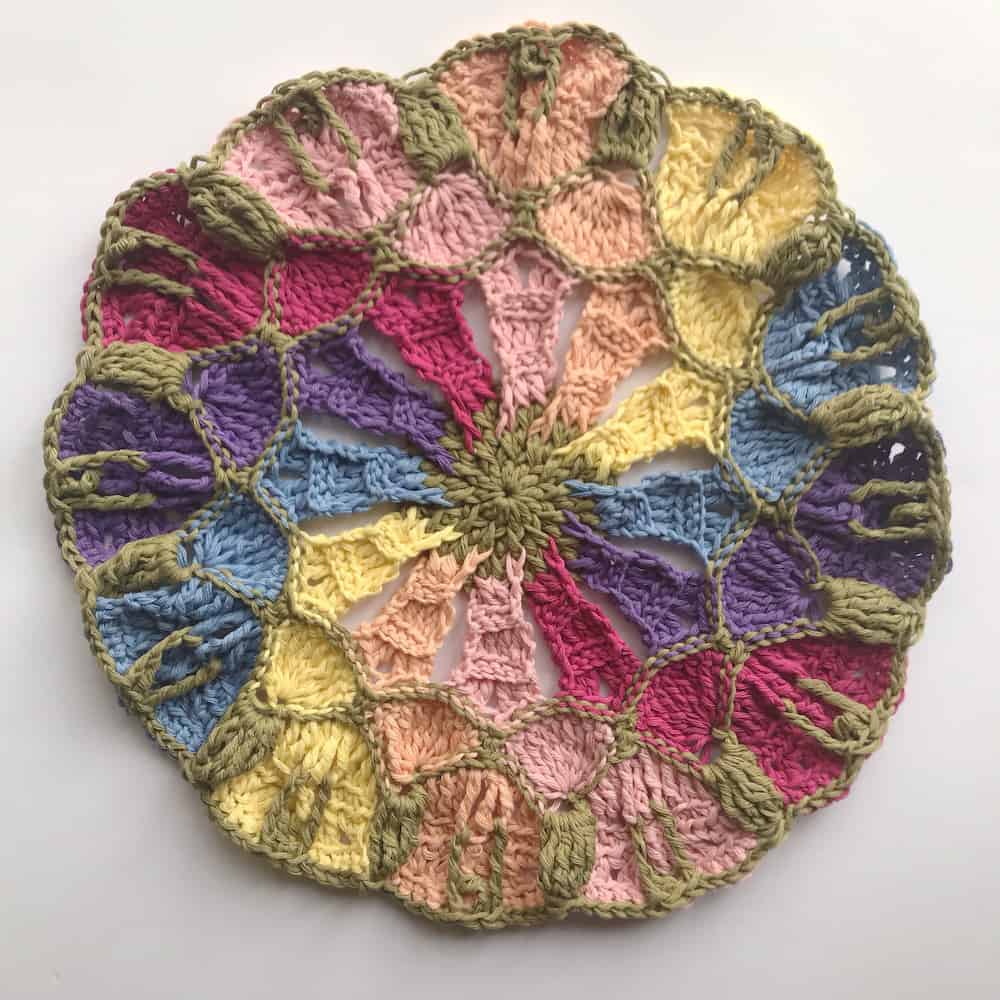
The Kaleidoscope Mandala Throw is an explosion of colour and fun designed to challenge and excite the crocheter and to look absolutely stunning too. Whether used to drape on a sofa or armchair or spread on a bed in all it’s glory, the 135cm round throw is a beautiful addition to any home or garden.
The construction comes from a central round section that has twelve motifs worked onto it in rows which are then joined by a section edging to create the basis for the next set of twelve motifs and so on. Great big chunky tassels finish off the design and add more weight to enhance the glorious drape and shape of the throw.
The pattern is here free for everyone to enjoy in both UK and US terms (which makes it a very long post even when you break the pattern into smaller parts I’m afraid!). The post contains affiliate links that help me to keep bringing free and exciting new crochet patterns to you.
Want to remove Ads?
- Get ad-free access on all posts; 200+ patterns & tutorials!
- Member-only resource library with downloadable PDF guides
- Bonus eBook (Worth over $30)
To start the post I’ll detail the yarn, materials, size, tension, glossary, notes and special stitches. Then comes the UK versions of the pattern followed by the US version. I’ll try and make it as clear as possible by adding a full size picture like the one below between sections to make things easier to find when you’re scrolling. Right at the end of the post I’ll add some step by step pictures of this first part of the throw to help show exactly how it all comes together as it’s quite an unusual construction but one that I hope you’ll enjoy!
There are lots of long and special stitches in the pattern that you will need throughout the coming weeks so I’ll add them all to each post so you can look through them ahead of time if you can. If anyone needs any help with anything at all then please just let me know either on Instagram, Facebook or here on the post and I’m happy to help.

The Yarn
I designed the mandala using the glorious shades of Scheepjes Cahlista and have partnered with Deramores to offer you a choice of three different colourways at a reduced price if you would like them.
RICH JEWELS YARN PACK

Rich Jewels –
4 balls of Yellow Gold (Colour A)
3 balls each of: Royal Orange(B), Hot Red(C), Shocking Pink(D), Vivid Blue(E), Electric Blue(F), Emerald(G)
APRIL FOOLS YARN PACK

April Fools –
4 balls of Willow (Colour A)
3 balls each of: Primrose(B),Vintage Peach(C), Old Rose(D), Cherry(E), Delphinium(F), Bluebird(G)
DEEP POOLS YARN PACK

Deep Pools –
4 balls of Ultramarine (Colour A)
3 balls each of: Capri Blue(B), Light Navy(C), Charcoal(D), Chocolate(E), Caramel(F), Moon Rock(G)
CHOOSE YOUR OWN COLOUR COMBINATION HERE
If you’d like to create your own colour combination then you’ll need 22 balls in total in the following amounts:
A choice of six colours for the segments x 3 balls of each.
A choice of colour for the edging x 4 balls.
Tension and Sizing
The finished throw measures 135cm (53in) in diameter without the tassels and the first centre three rounds = 10cm. Tension isn’t really important in this project though, as long as you remain consistent throughout the throw will look fabulous.

Materials
Along with the yarn, you will need:
A 5.5mm crochet hook
Scissors
Needle
Glossary
ch -chain,
ss – slip stitch,
FP-front post,
beg-beginning,
st-stitch,
FL-front loop,
BL-back loop,
inc-including,
RS-right side,
WS-wrong side,
tog-together,
sp-space,
yrh – yarn round hook
Notes
The ch1 at the beginning of a round/row does not count as a st; the ch3 at the beginning of round/row does count as a st.
The Mandala has a centre piece worked in the round. 12 segments are each worked separately in rows around the centre piece then an edging in colour A which is worked in the round, around the last row sts of each of the segments to join them into a circle. This process is repeated, so that the next round of 12 segments are worked in rows, into the edging stitches of the previous round, followed by an edging round.
The colour order of each round is B,C,D,E,F,G. Refer to the image for colour changes and pay attention to RS and WS rows as they do not always follow in logical order.
The next part of the post contains the UK version of the pattern so if you’d like the US version then just scroll down until you find the next picture of the throw like the one below.
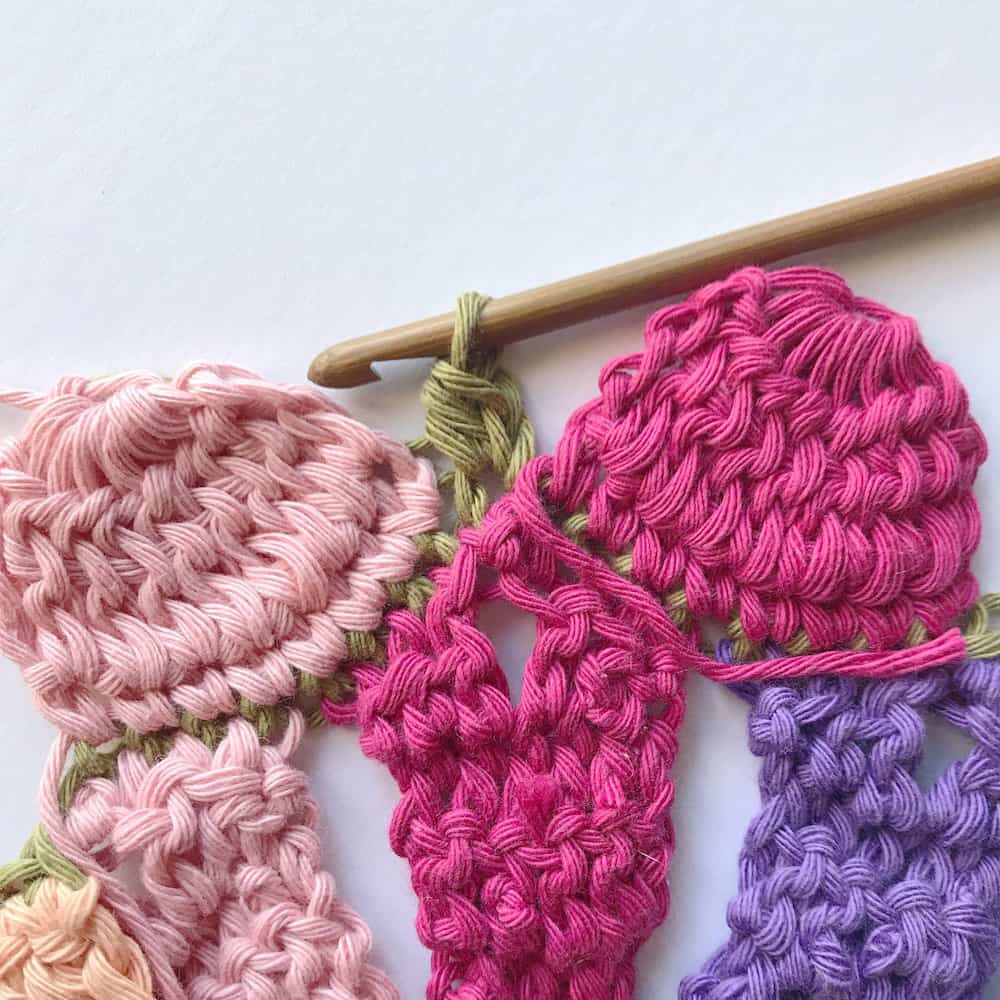
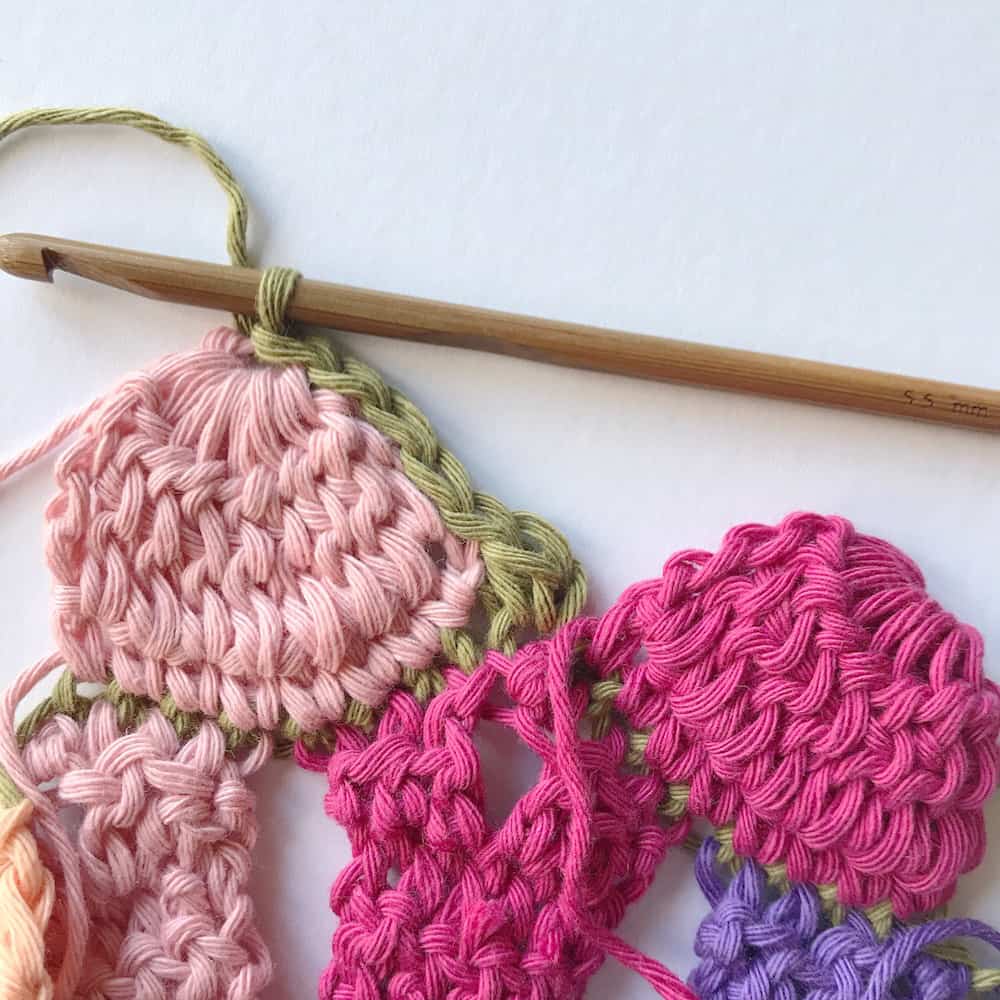
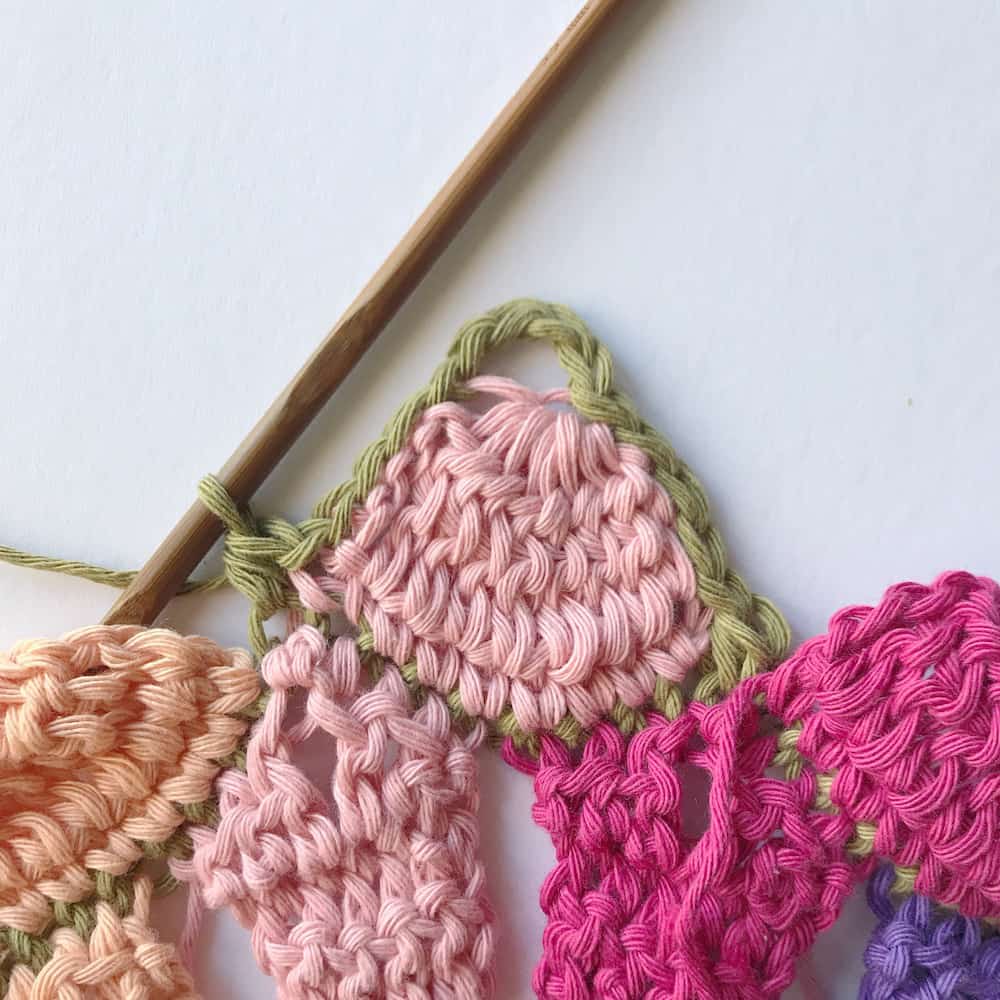
After the pattern I have added some step by step photos to help out with showing you about the construction and stitches and I hope that they are really helpful. I’ll add reference numbers to them in the pattern so you can find where they relate to.
UK Terminology
dc-double crochet, htr-half treble, tr-treble, dtr-double treble, ttr- triple treble, qtr- quadruple treble
UK Special Abbreviations
Picot – ch the specified number then ss in first ch
6ttr cluster – *Yrh 3 times, insert into st, yrh and pull through st, (yrh and pull through 2 loops) three times; rep from *into the same st 5 more times.
Qtr- Yrh 4 times, insert hook into st, yrh and pull through st, (yrh and pull through 2 loops) 5 times.
Dtr5(8)tog – *Yrh twice, insert hook in next st, yrh and pull through st, (yrh and pull through 2 loops) twice; rep from * 4(7) more times, yrh and pull through all loops on hook.
FPdtr – Yrh twice, insert hook around the post of specified st from front, to back, to front, yrh and pull up the loop, (yrh and pull through 2 loops) twice.
FPttr – Yrh 3 times, insert hook around post of specified st from the front, to back, to front, yrh and pull up the loop, (yrh and pull through 2 loops) three times.
UK Pattern – Week One of the Kaleidoscope Mandala Throw CAL
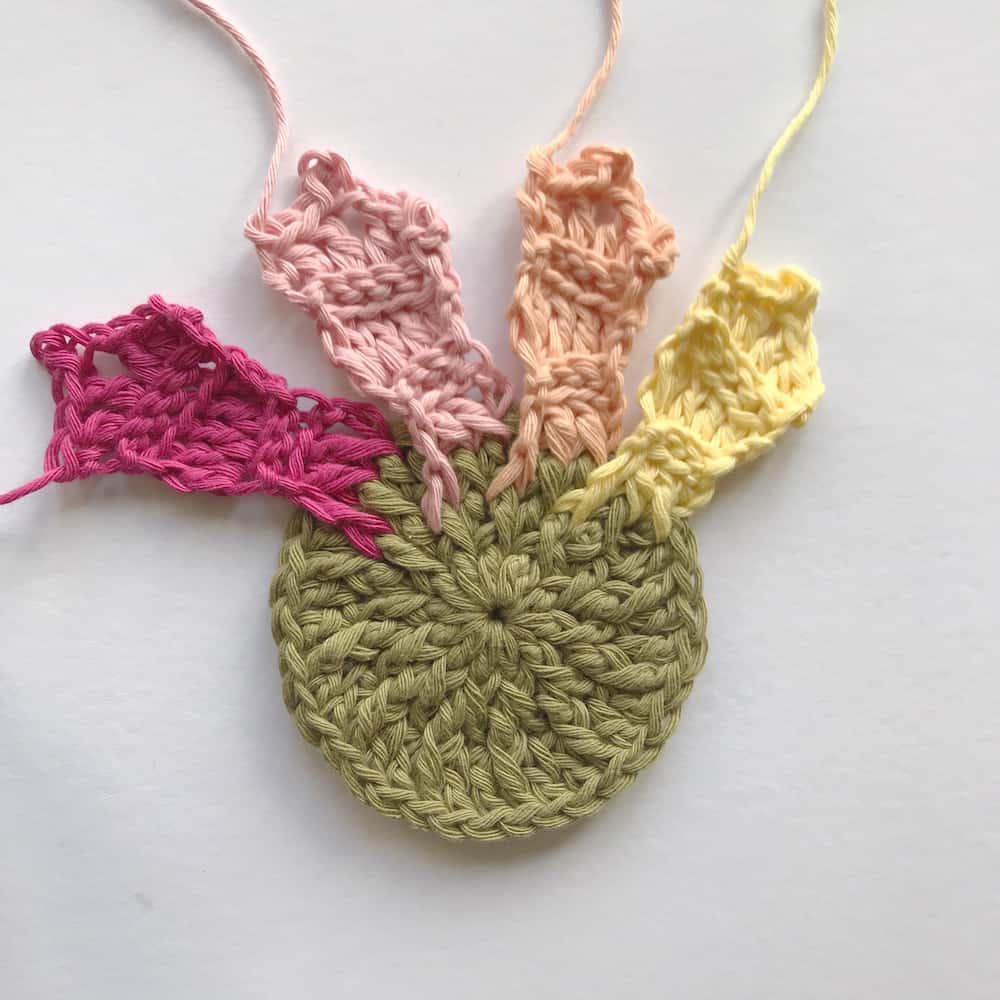
CENTRE –
Using A, ch2
Round 1(RS): 12tr in 2nd ch from hook, ss in 1st to join [12] (Photo 1)
Round 2: ch3, FPtr in same st as ch3, (tr, FPtr) in each remaining st around, ss in 1st to join [24] (Photo 2)
Round 3: ch3, FPtr in same, tr, *(tr, FPtr) in next, tr, rep from * around, ss in 1st to join [36] (Photo 3)
FIRST SEGMENT –
Work in rows.
Change to B.
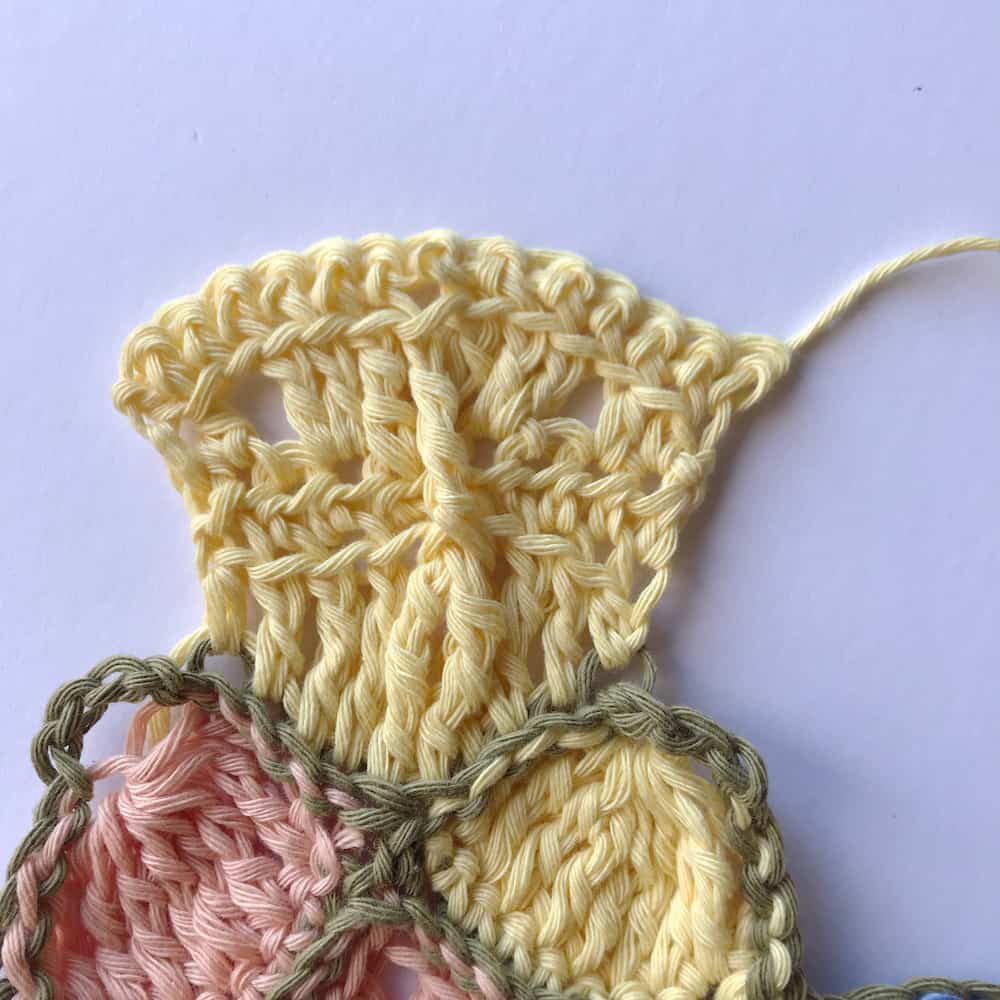
Row 1: ch3, FPtr in same st as ch3, FPtr, FPtr in next st two rounds below, [4]TURN at end of each row now (Photo 4)
Row 2: ch1, ss in FL of each st [4] (Photo 5)
Row 3: BL only – ch3, tr in same st, tr in 2, 2tr in last st [6] (Photo 6)
Row 4: Rep Row 2 (Photo 7)
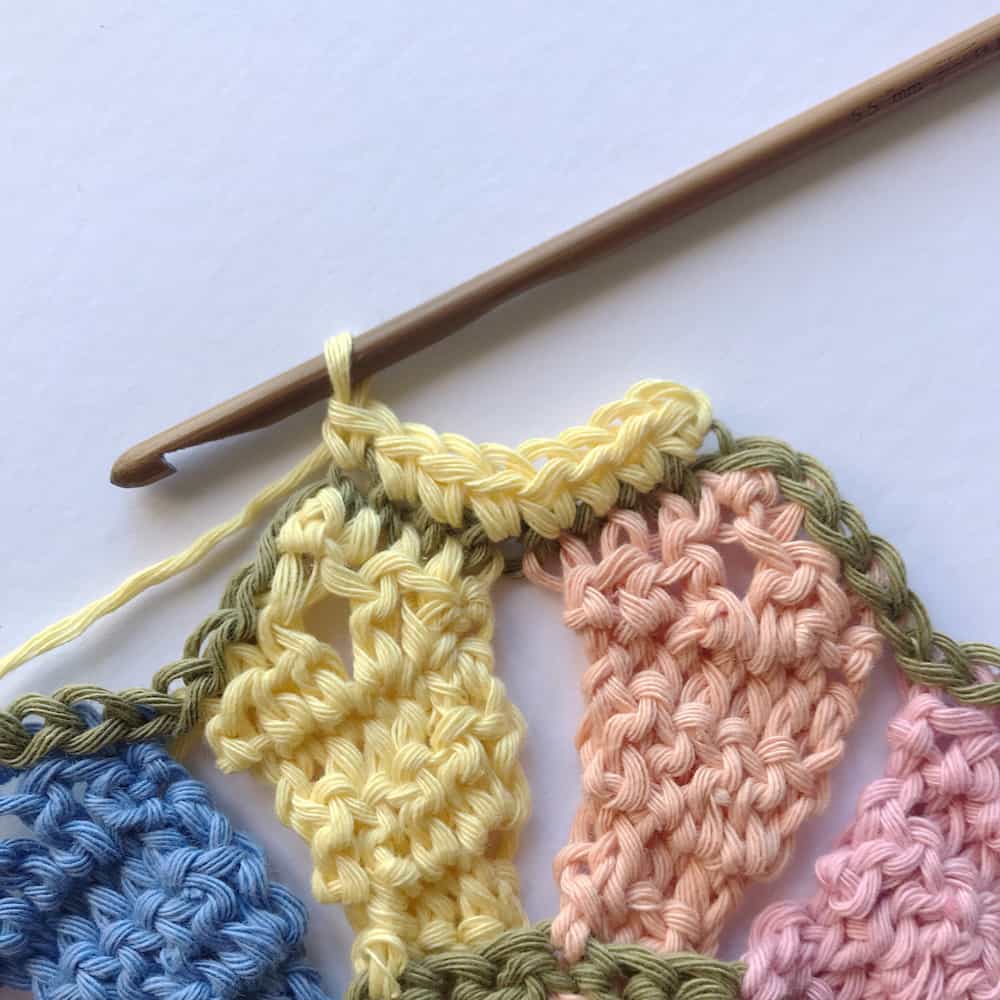
Row 5: BL only – ch1, dc, htr, tr, ch3-picot, tr, htr, dc. (Photo 8)
Fasten off.
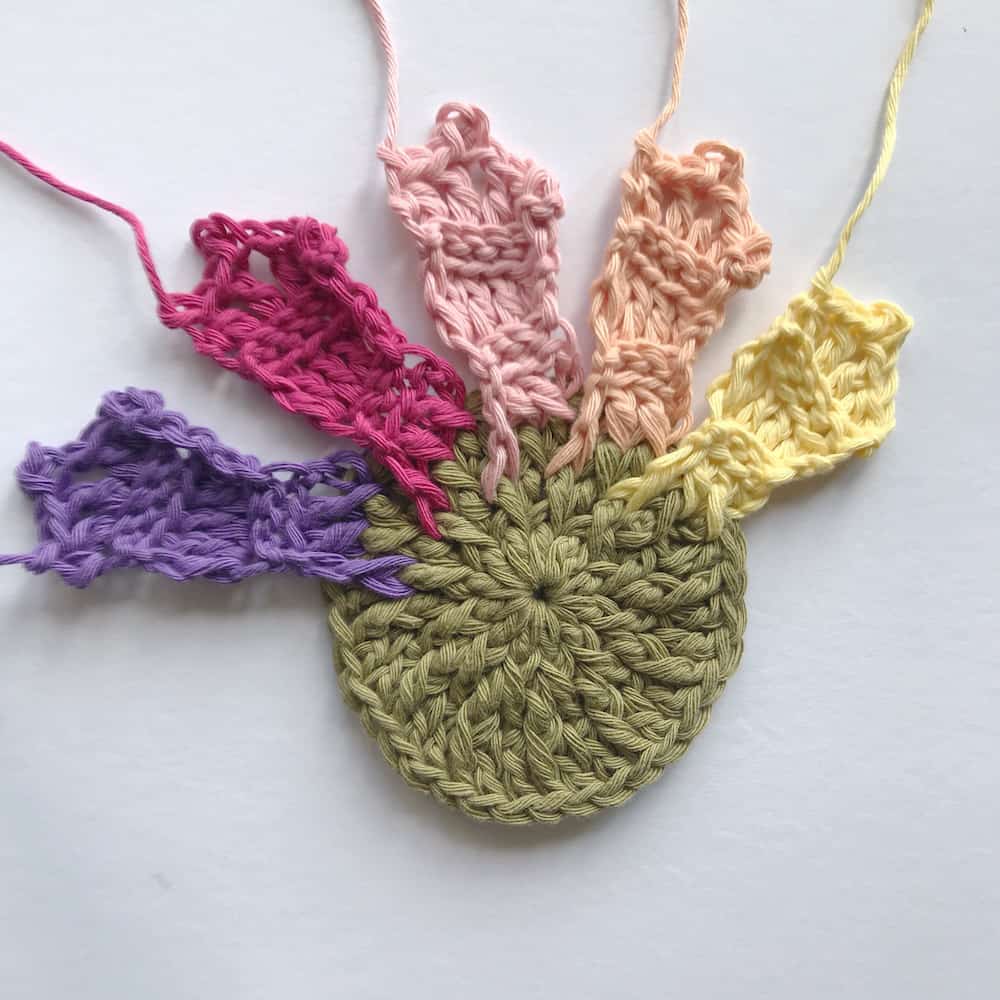
REMAINING FIRST SEGMENTS –
Join next colour to the next unworked st of Centre Round 3 and repeat Rows 1-5 of First Segment. Repeat around the Centre following the colour order [12 segments] (Photos 9-14)
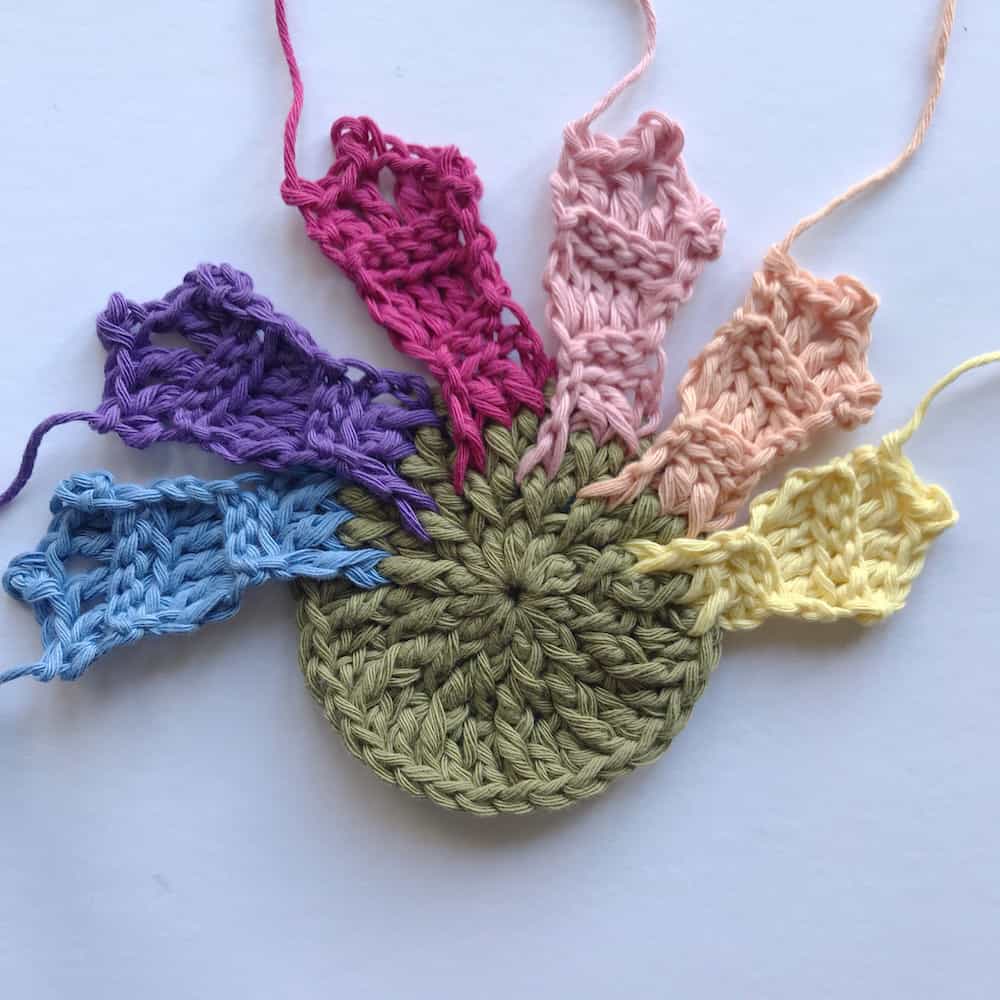
EDGING –
With WS facing, join A to the first st of any Segment.
Round 1 (WS): ss in FL of each around, including each ch of picot, ss in first st to join [9st per Segment = 108 in total] (Photos 15-17)
SECOND SEGMENT –
With WS facing, join B to stitch to left of centre of first C Segment.
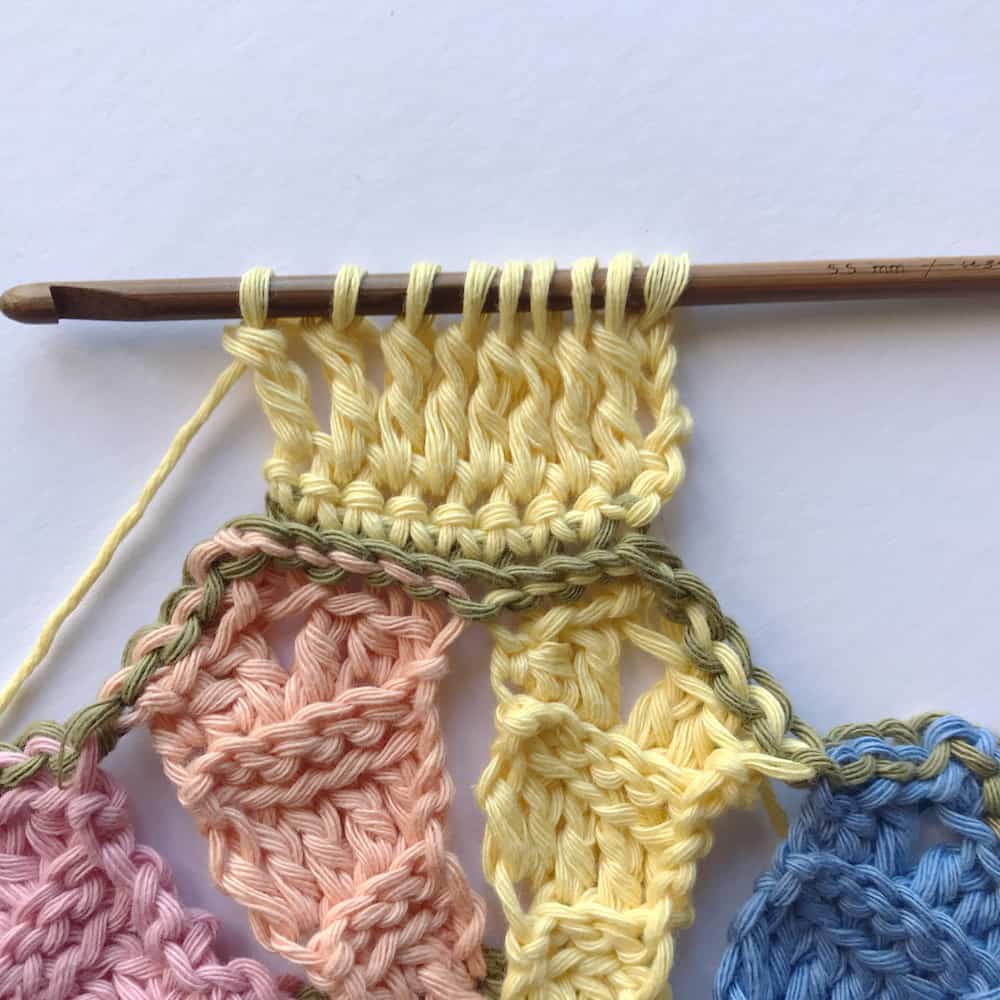
Row 1: ch1, dc in FL of next 8st, [8] TURN at end of each row now (Photos 18-19)
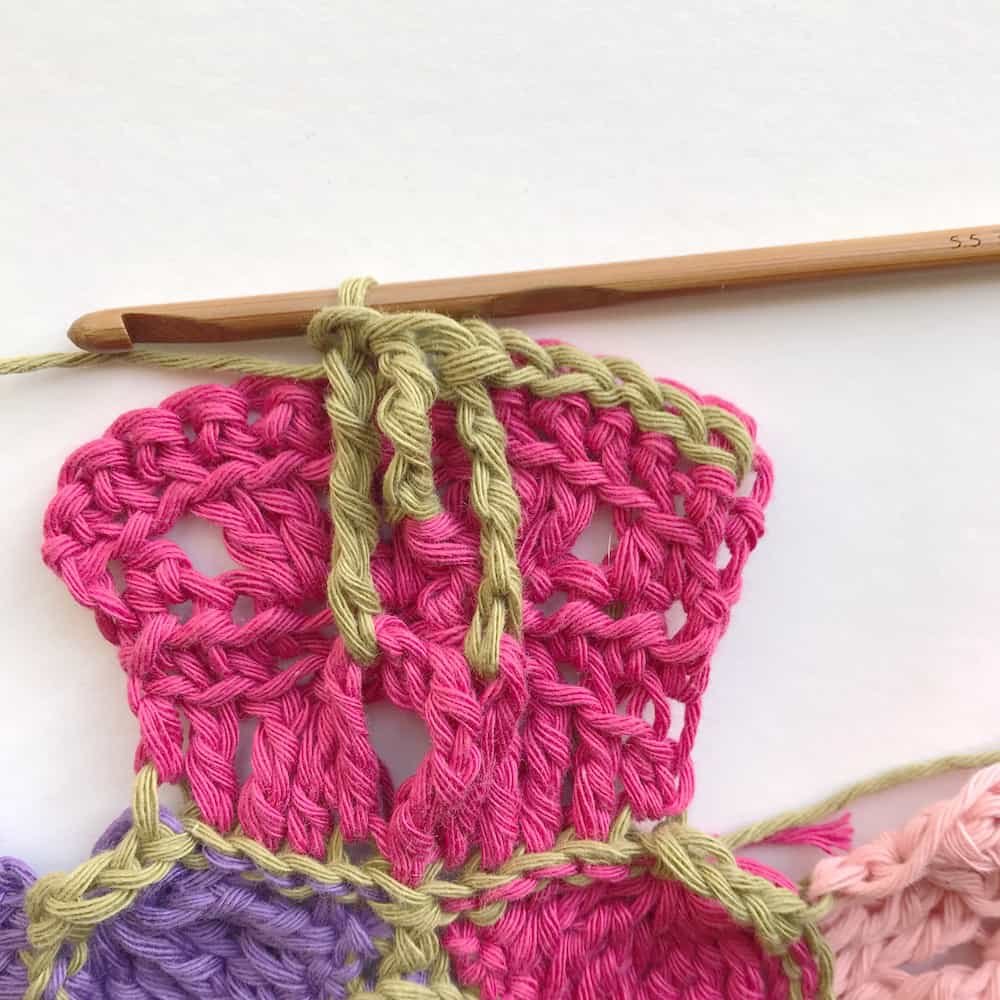
Row 2: (RS) ch4, dtr8tog, ch1 to close. (Photos 20-21)
Fasten off.
Repeat Second Segment around in colour sequence leaving ss between Segments unworked. As you are working the first row of each Segment from the WS, the order of the colours is reversed and so will be G,F,E,D,C. (Photos 22-24)
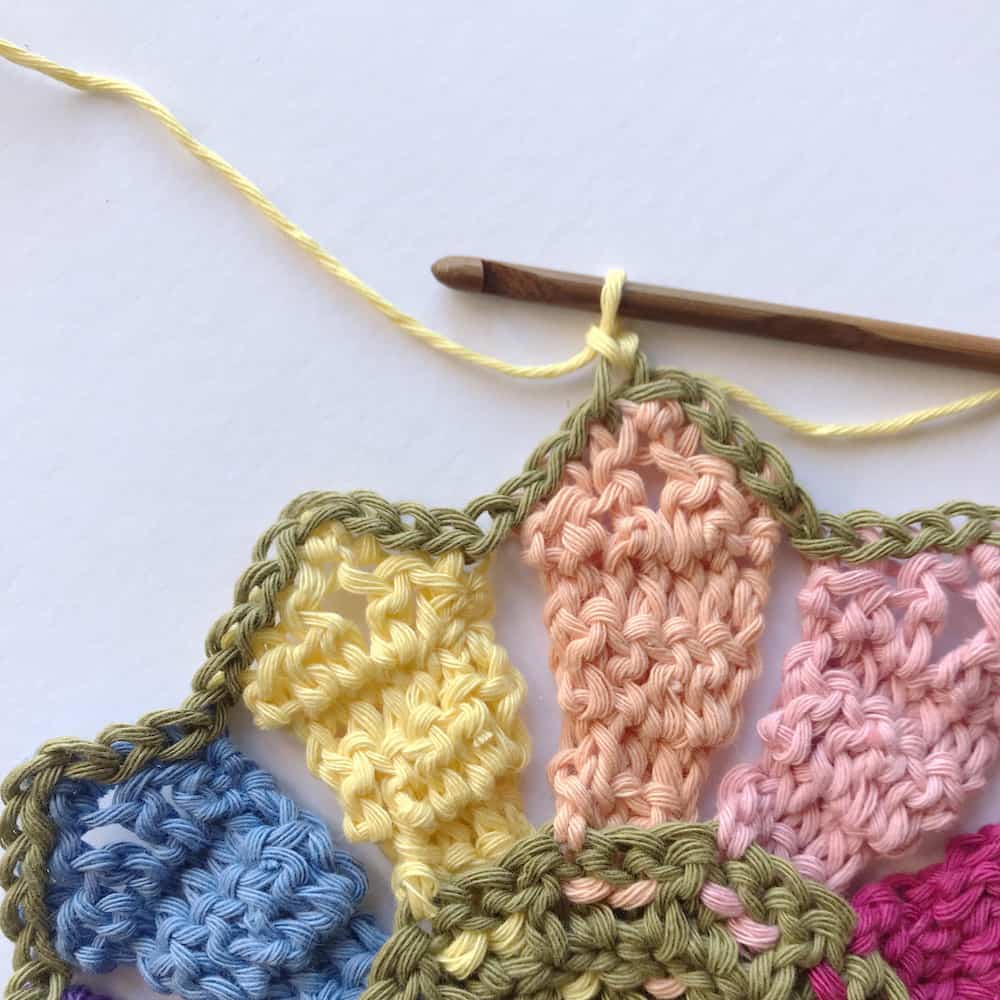
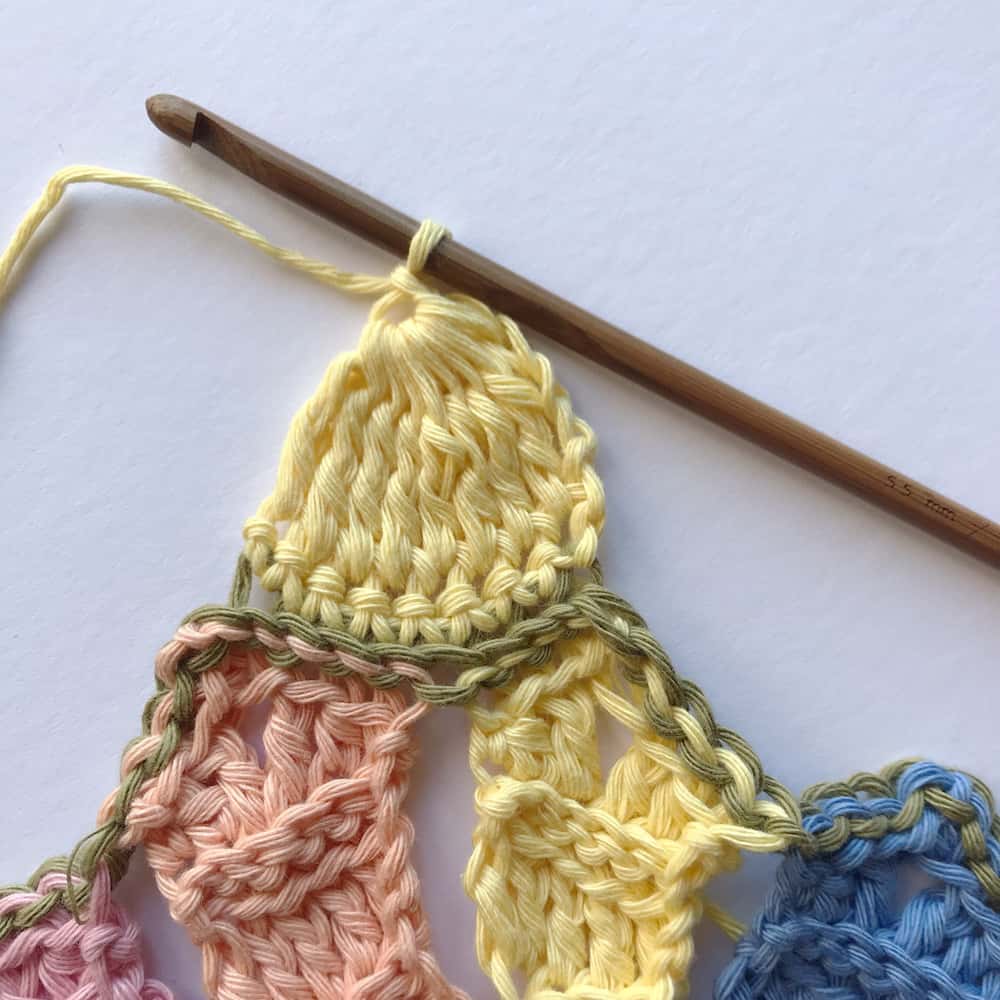
EDGING –
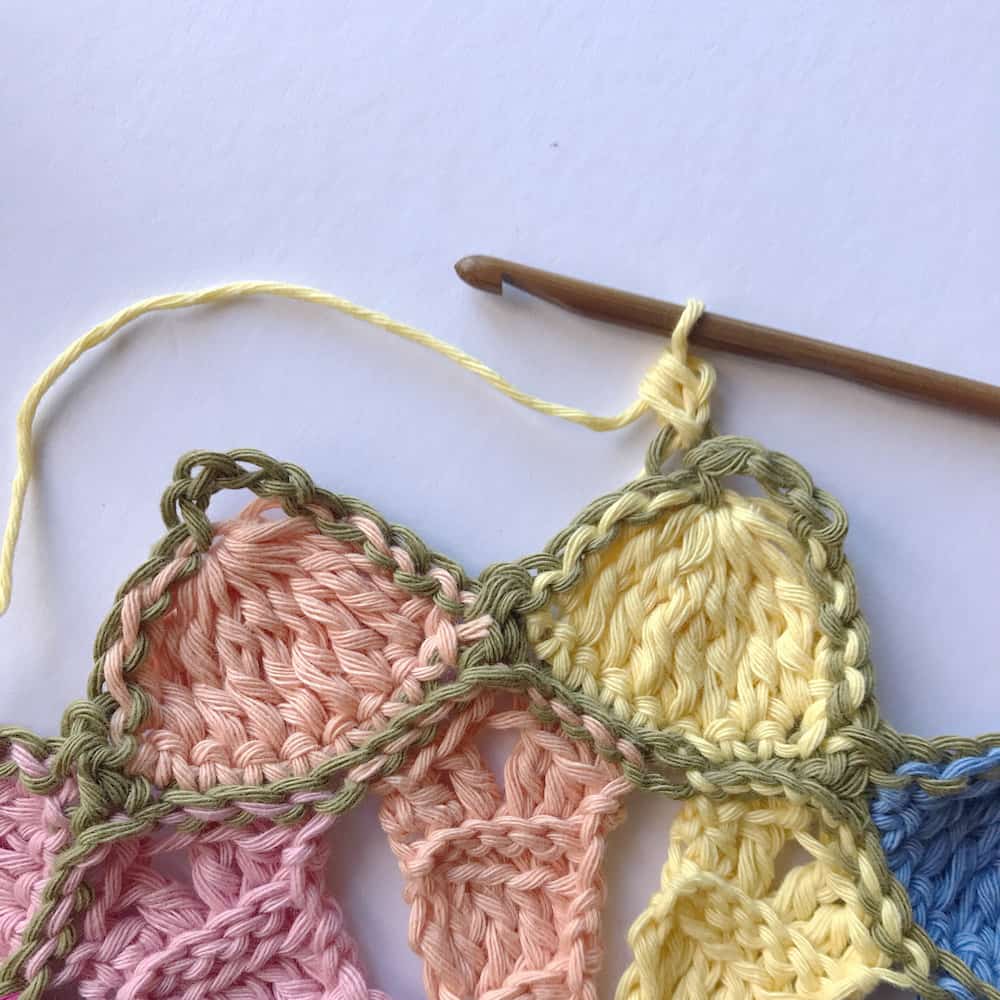
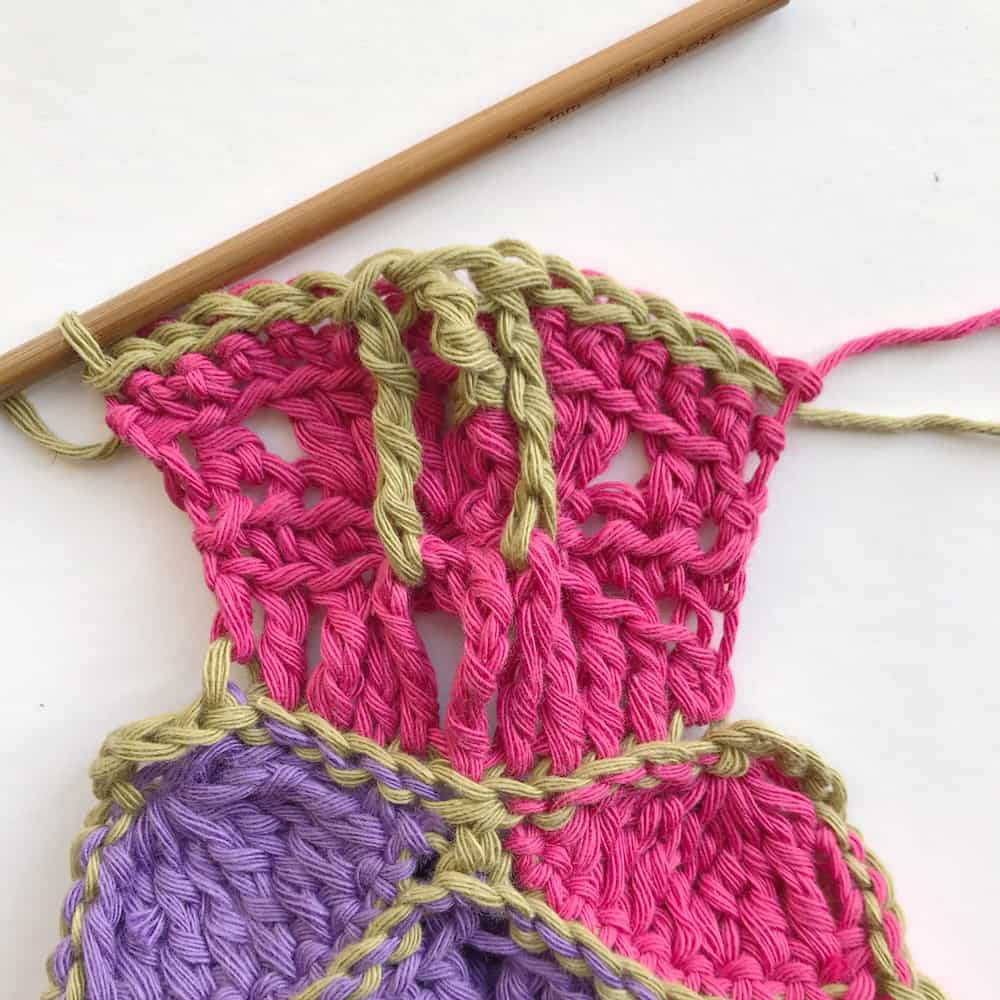
Round 1: With WS facing, join A to unworked ss between Segments, ch1, htr in FL, *5ss evenly along side of Segment, ch4, 5ss evenly along opposite side of same Segment, htr in FL of next st, rep from * around, ss in 1st ss to join. [120ss, 12ch-4sps, 12htr] (Photos 25-28)
Fasten off.
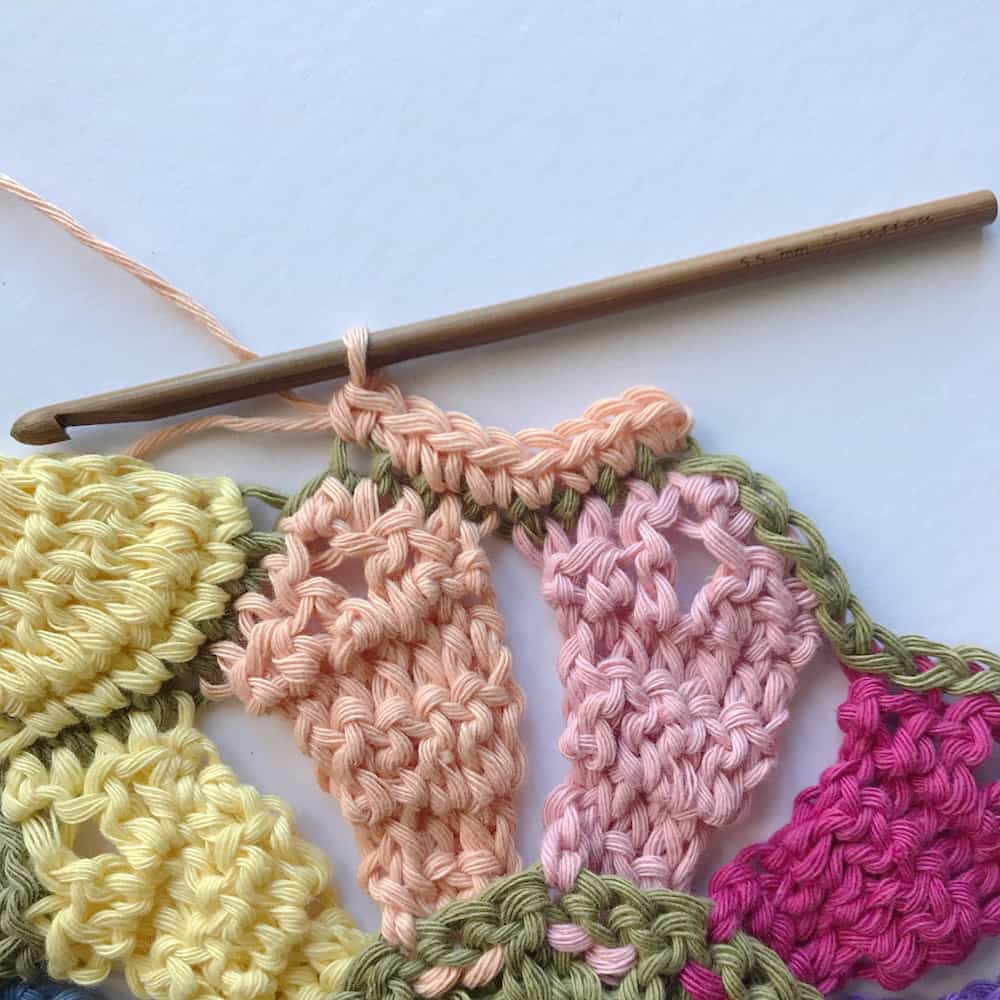
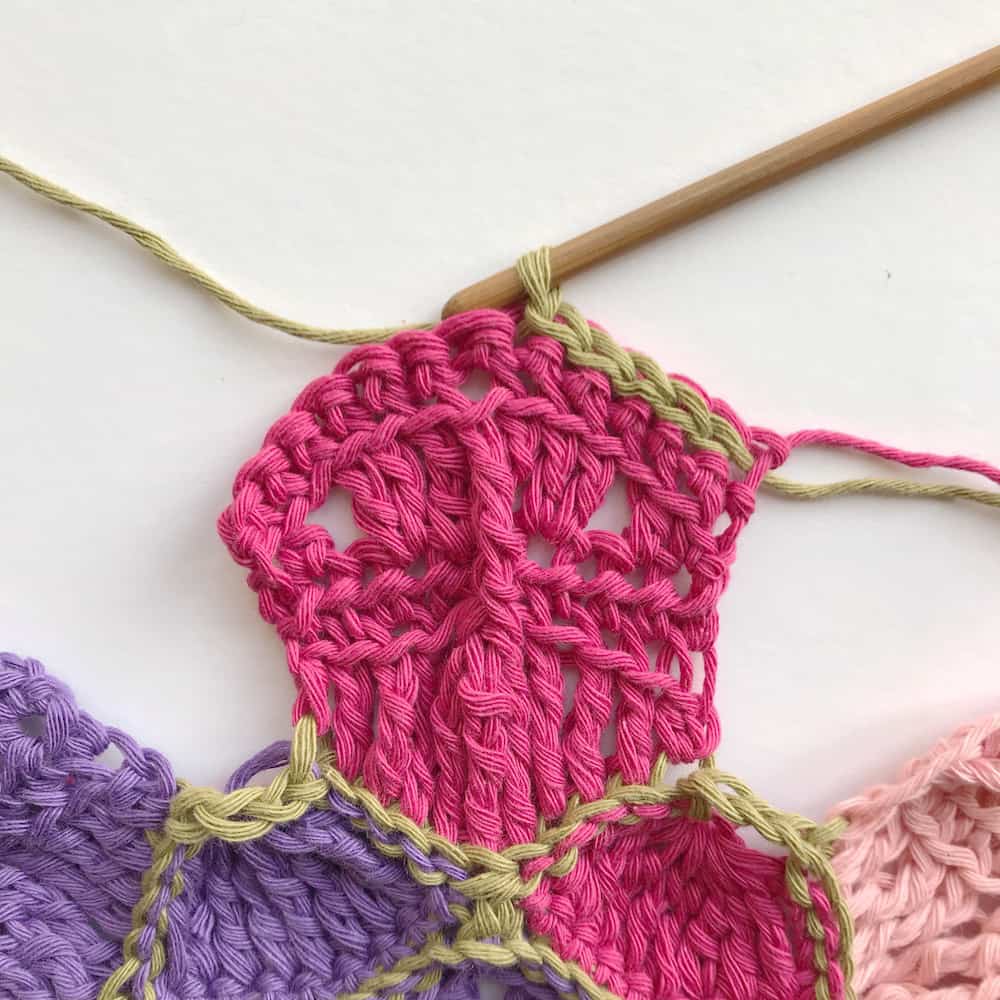
THIRD SEGMENT –
With RS facing, join correct colour to first ss after ch4-sp from Second Segment edging.
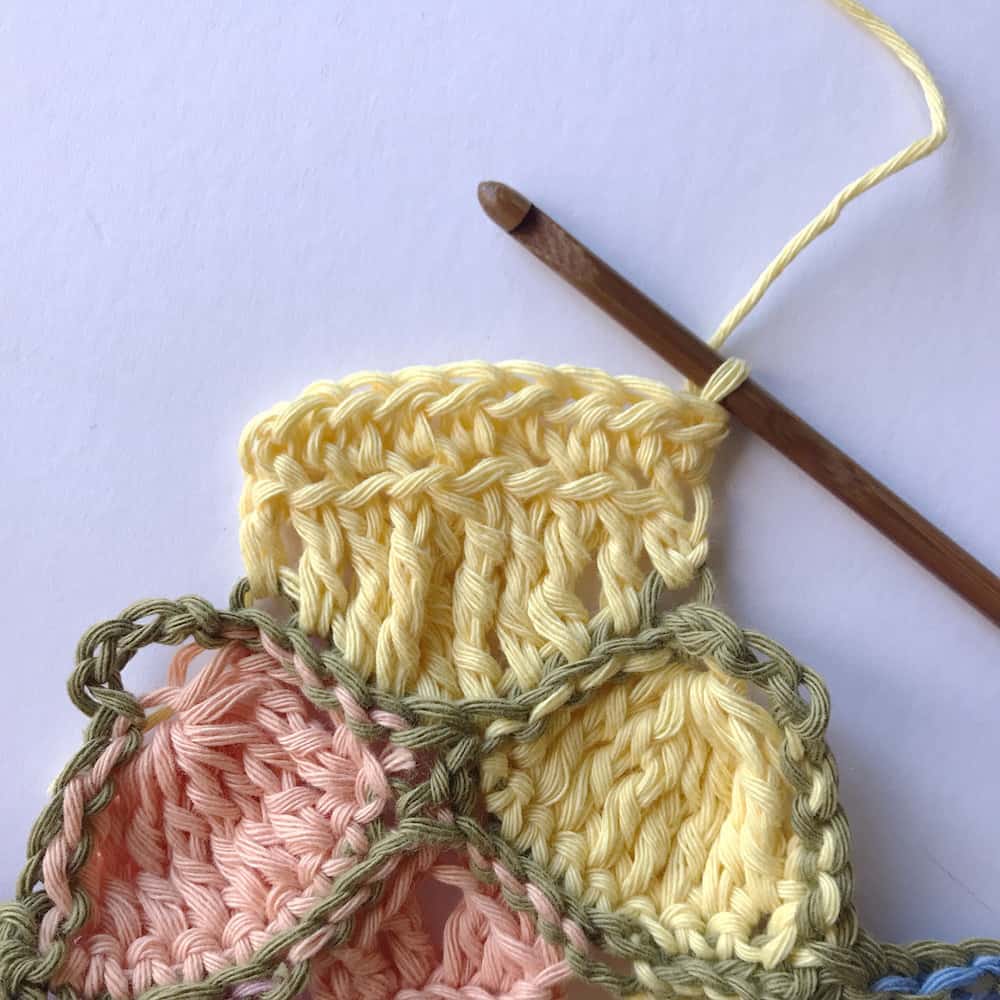
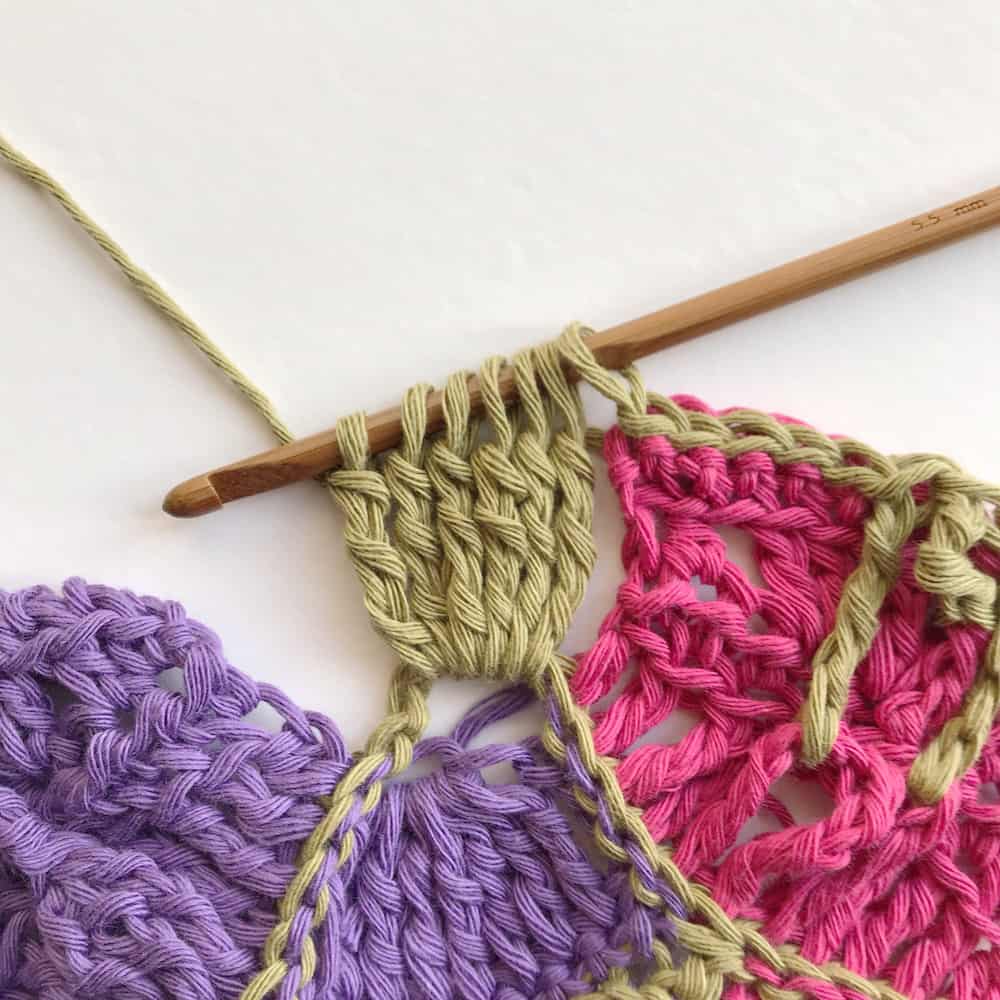
Row 1 (RS): BL only – ch1, htr, tr, dtr in 2, ttr3tog, dtr in 2, tr, htr [9] TURN at end of each row now (Photos 29-30)
Row 2: FL only – ch1, htr in each across [9] (Photo 31)
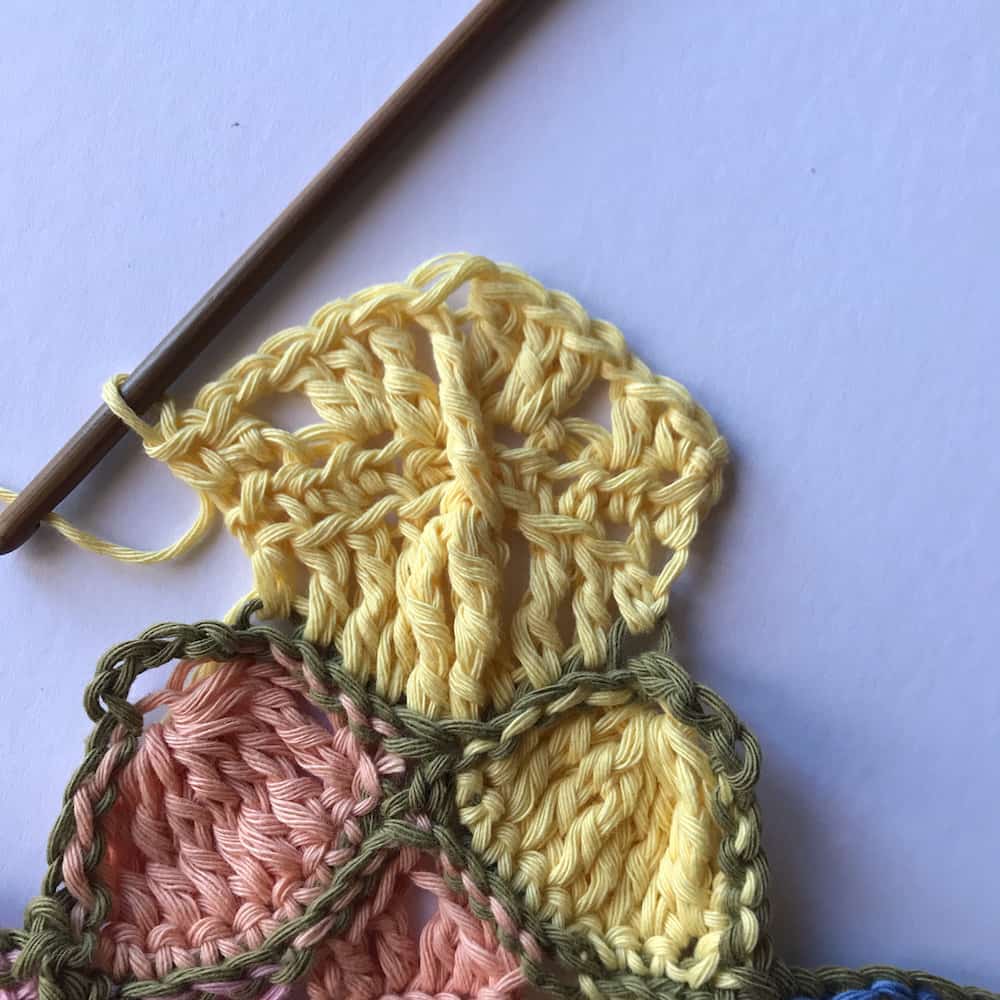
Row 3: ch1, dc, htr, ch1, skip 1, 2tr in next, dtr, FPttr in ttr3tog of Row 1, dtr in same st as last dtr, 2tr in next, ch1, skip 1, htr, dc [13 including ch] (Photo 32)
Row 4: FL only – ch1, dc in each [13] (Photo 33)
Fasten off.
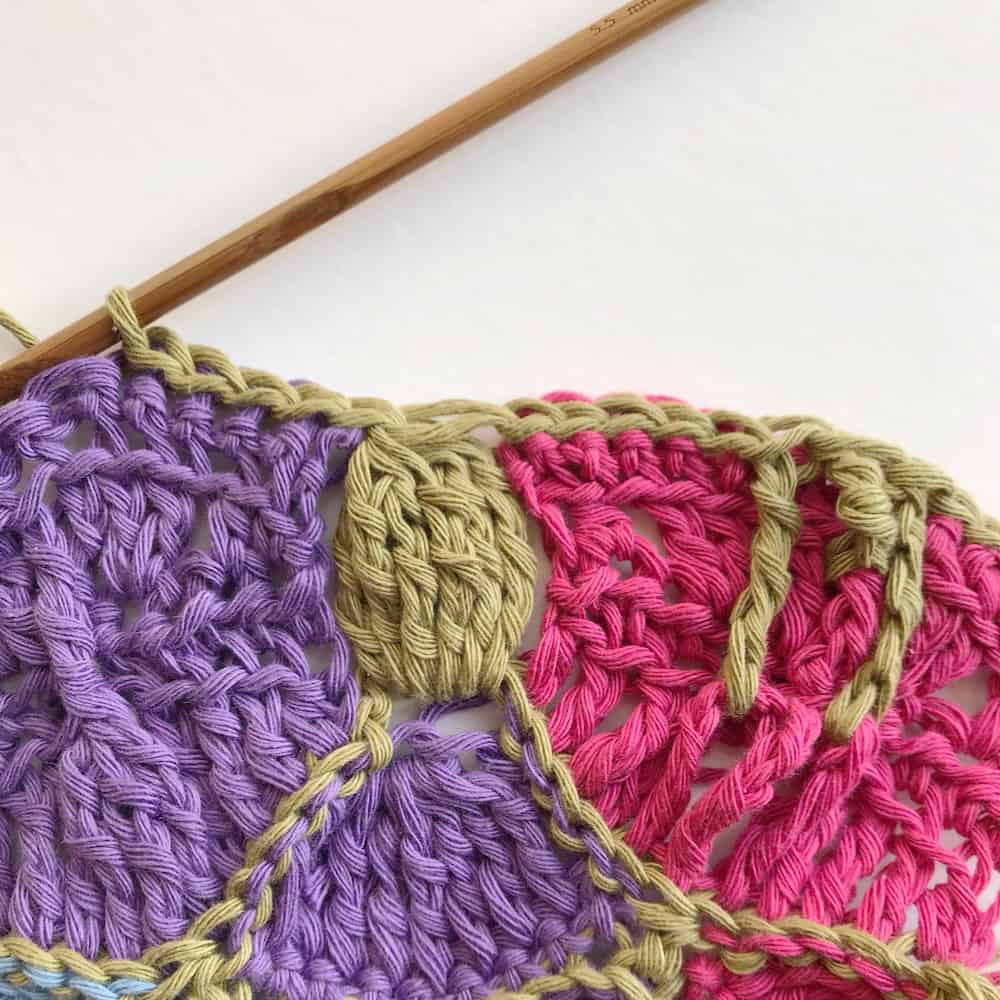
Repeat the Third Segment in colour sequence around. (Photo 34)
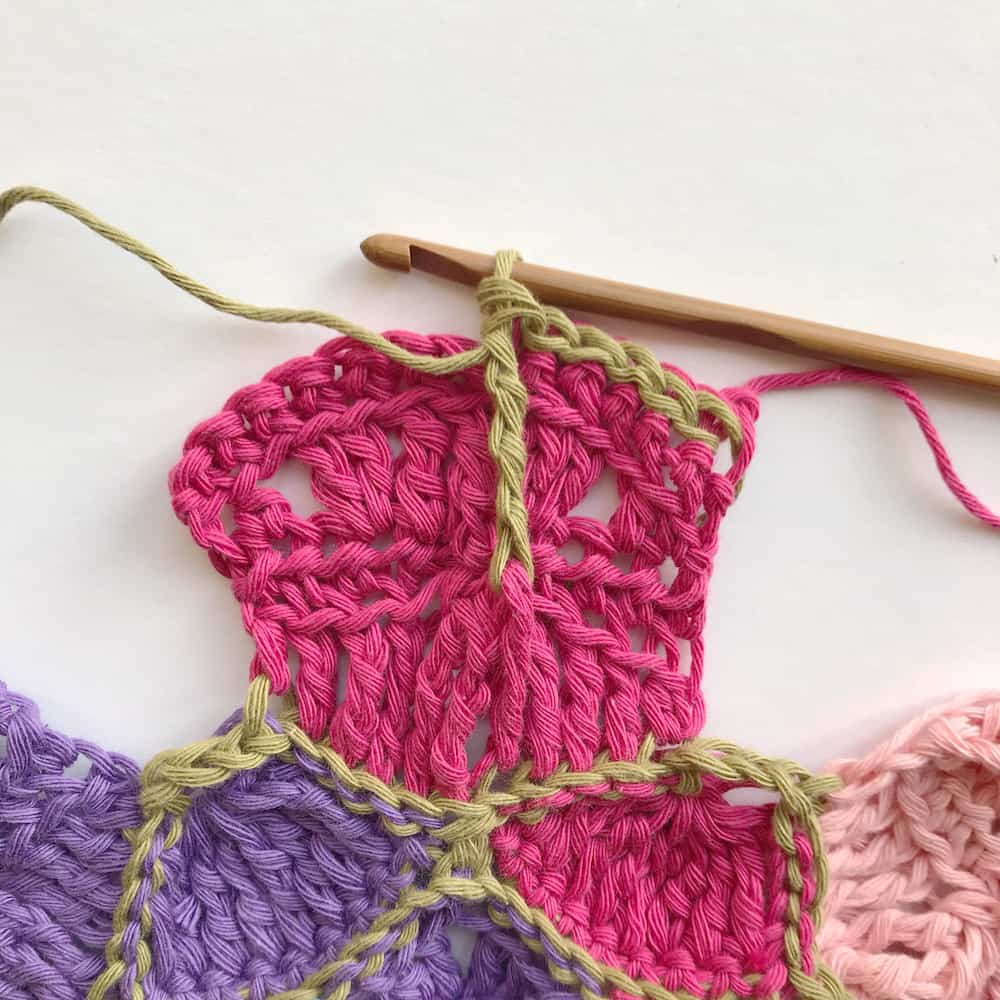
EDGING –
With RS facing, join A to first st of any Segment. Work the following ss as surface crochet around the posts of the last row, leaving the top of each Row 4 st unworked.
Round 1: *ss in 5, FPttr around ttr3tog (1st post) of Row 1, FPttr around FPttr of Row 3, FPttr around ttr3tog (3rd post) of Row 1, ss in 5, 6-ttr cluster in ch4 of Second Segment edging, rep from * around, ss in first to join. [13st per segment, 12 clusters] (Photos 35-42)
US Terminology
sc – single crochet, hdc-half double crochet, dc – double crochet, tr – treble crochet, dtr – double treble crochet, ttr – triple treble crochet
US Special Stitches
Picot – ch the specified number then ss in first ch
6dtr cluster – *Yrh 3 times, insert into st, yrh and pull through st, (yrh and pull through 2 loops) three times; rep from *into the same st 5 more times.
Ttr- Yrh 4 times, insert hook into st, yrh and pull through st, (yrh and pull through 2 loops) 5 times.
Tr5(8)tog – *Yrh twice, insert hook in next st, yrh and pull through st, (yrh and pull through 2 loops) twice; rep from * 4(7) more times, yrh and pull through all loops on hook.
FPtr – Yrh twice, insert hook around the post of specified st from front, to back, to front, yrh and pull up the loop, (yrh and pull through 2 loops) twice.
FPdtr – Yrh 3 times, insert hook around post of specified st from the front, to back, to front, yrh and pull up the loop, (yrh and pull through 2 loops) three times.

US Pattern – Week One of the Kaleidoscope Mandala Throw CAL
CENTRE –
Using A, ch2
Round 1(RS): 12dc in 2nd ch from hook, ss in 1st to join [12] (Photo 1)
Round 2: ch3, FPdc in same st as ch3, (dc, FPdc) in each remaining st around, ss in 1st to join [24] (Photo 2)
Round 3: ch3, FPdc in same, dc, *(dc, FPdc) in next, dc, rep from * around, ss in 1st to join [36] (Photo 3)
FIRST SEGMENT –
Work in rows.
Change to B.
Row 1: ch3, FPdc in same st as ch3, FPdc, FPdc in next st two rounds below, [4] TURN at end of each row now (Photo 4)
Row 2: ch1, ss in FL of each st [4] (Photo 5)
Row 3: BL only – ch3, dc in same st, dc in 2, 2dc in last st [6] (Photo 6)
Row 4: Rep Row 2 (Photo 7)
Row 5: BL only – ch1, sc, hdc, dc, ch3-picot, dc hdc sc. (Photo 8)
Fasten off.
REMAINING FIRST SEGMENTS –
Join next colour to the next unworked st of Centre Round 3 and repeat Rows 1-5 of First Segment. Repeat around the Centre following the colour order [12 segments] (Photos 9-14)
EDGING –
With WS facing, join A to the first st of any Segment.
Round 1 (WS): ss in FL of each around, including each ch of picot, ss in first st to join [9st per Segment = 108 in total] (Photos 15-17)
SECOND SEGMENT –
With WS facing, join B to stitch to left of centre of first C Segment.
Row 1: ch1, sc in FL of next 8st, [8] TURN at end of each row now (Photos 18-19)
Row 2: (RS) ch4, tr8tog, ch1 to close. (Photos 20-21)
Fasten off.
Repeat Second Segment around in colour sequence leaving ss between Segments unworked. As you are working the first row of each Segment from the WS, the order of the colours is reversed and so will be G,F,E,D,C. (Photos 22-24)
EDGING –
Round 1: With WS facing, join A to unworked ss between Segments, ch1, hdc in FL, *5ss evenly along side of Segment, ch4, 5ss evenly along opposite side of same Segment, hdc in FL of next st, rep from * around, ss in 1st ss to join. [120ss, 12ch-4sps, 12hdc] (Photos 25-28)
Fasten off.
THIRD SEGMENT –
With RS facing, join correct colour to first ss after ch4-sp from Second Segment edging.
Row 1 (RS): BL only – ch1, hdc, dc, tr in 2, dtr3tog, tr in 2, dc, hdc [9] TURN at end of each row now (Photos 29-30)
Row 2: FL only – ch1, hdc in each across [9] (Photo 31)
Row 3: ch1, sc, hdc, ch1, skip 1, 2dc in next, tr, FPdtr in dtr3tog of Row 1, tr in same st as last tr, 2dc in next, ch1, skip 1, hdc, sc [13 including ch] (Photo 32)
Row 4: FL only – ch1, sc in each [13] (Photo 33)
Fasten off.
Repeat the Third Segment in colour sequence around. (Photo 34)
EDGING –
With RS facing, join A to first st of any Segment. Work the following ss as surface crochet around the posts of the last row, leaving the top of each Row 4 st unworked.
Round 1: *ss in 5, FPdtr around dtr3tog (1st post) of Row 1, FPdtr around FPdtr of Row 3, FPdtr around dtr3tog (3rd post) of Row 1, ss in 5, 6-dtr cluster in ch4 of Second Segment edging, rep from * around, ss in first to join. [13st per segment, 12 clusters] (Photos 35-42)
Step By Step Tutorial
There might be some stitches that you haven’t encountered before so I’m going to add a few here to help walk you through the construction of the first section of the mandala. I’ll pop a little description of each below it but will also add a reference number in the pattern to show you where I’m talking about.
If you need any help at all with it then please just let me know either on Instagram or Facebook and I’ll help as much as I can as soon as I can. I often work night shifts so please don’t I haven’t seen your message if I don’t get straight back to you!
Centre –


First Segment –


First Segment – Adding the next colours –


Second Segment –

Third Segment


That’s it! First week complete!
I’d love to know how you’re getting on and see any progress photos you have. Just tag me @hanjancrochet or use the hashtag #hanjancrochet on Instagram or post on my Facebook page so that I can see them. If I can help in any way then please just let me know too.
The next instalment of the CAL is due to be launched on Monday 11th March 2019 so if you’d like to know as soon as it’s released then sign up below and you won’t miss anything!