This post may contain affiliate links. Please see my full disclosure and privacy policy for details.
Learn the crochet waistcoat stitch (often called the split single crochet stitch) in this super easy and cute crochet bow tie pattern.
We are off our first big family holiday since our little boy Elliot arrived soon and we can’t wait for some sun!
We’re off on a cruise and so to help Elliot look the part at dinner I thought I’d make him a few little bow ties (we’ve been cruising before and the guys are more serious about their bow tie action than the girls are about heels!).
They are the simplest things to make in no time at all and the size and pattern is yours for the taking; once you’ve mastered the waistcoat stitch you can let your imagination run wild.
Want to remove Ads?
- Get ad-free access on all posts; 200+ patterns & tutorials!
- Member-only resource library with downloadable PDF guides
- Bonus eBook (Worth over $30)

Table of Contents
Waistcoat Stitch
The tutorial photos within this post show the process but here is a much fuller explanation and tutorial about the waistcoat crochet stitch.
Materials
Yarn: Paintbox Cotton Aran – 100% Aran Cotton, 50g/85m
A 5mm/H crochet hook
Scissors
Tapestry needle
A length of elastic to fit over head
Details
Size: Each bow tie measures 9cm by 4cm but you can make them as big or small as you like.
Tension: Tension isn’t too important for this project, just try to keep it loose as this makes the stitches easier to work into for this particular stitch.
Pattern Notes
1. Work in continuous rounds throughout the pattern
Glossary/Abbreviations: Standard UK terms (Standard US terms)
st(s) – stitch(es)
ch – chain
dc – double crochet (sc – single crochet)
The Pattern
Foundation chain: ch26 (you can use any multiple for the foundation chain).
If you would like your bow tie bigger or smaller then just change the length of your foundation chain. You need the foundation chain to be twice as long as you want the bow tie to end up.

Round 1: Taking care not to twist, work a dc/sc into each chain on the foundation chain
Insert hook into first chain:

Yarn over hook and pull through:

dc/sc in each chain:

Round 2: Work a dc/sc into the centre of each dc/sc of the previous round. Working into the centre of the stitch is what creates the waistcoat stitch.
Insert hook into the centre of stitch:

Yarn over and pull through:

Yarn over and pull through:

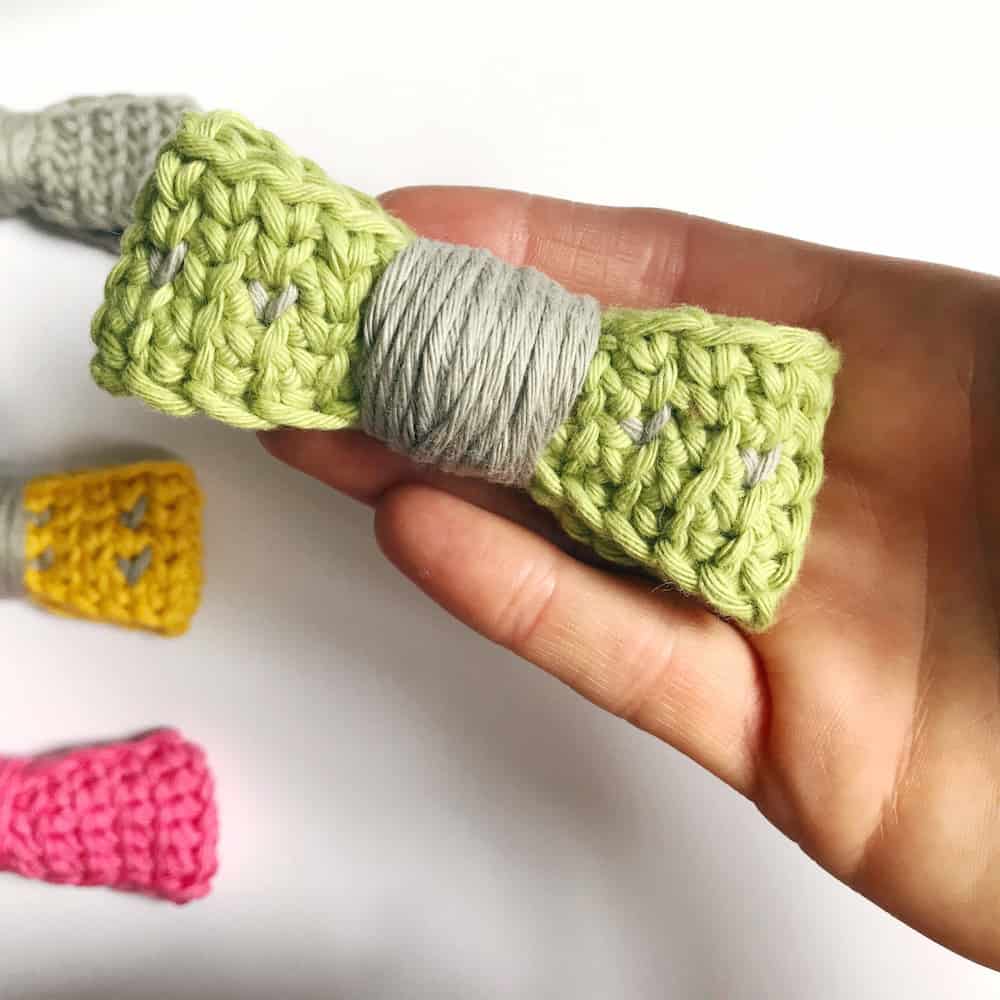
Round 3: Work a dc/sc into the centre of each dc/sc of the previous round. Change colours every other stitch if you have chosen an even foundation chain, or change colour wherever you would like.
The most important thing to keep your stitches neat and tidy is to complete every single stitch with the main colour. It feels completely wrong to do this but I promise it will work and make it look fabulous.
Work a waistcoat stitch in main colour, don’t change colour yet:

Insert hook into next stitch, yarn over hook with new colour:

Pull through new colour:

Yarn over with main colour and pull through

Carry yarn at the back of the work rather than work it in:

Always complete every stitch with the main colour:

Rounds 4-5: Work another two rounds of waistcoat stitch in whatever colours you would like.
If you would like your bow tie to be deeper then just keep repeating rounds of waistcoat stitch until its the size you would like.

When you’ve worked as many rounds as you would like, break the yarn and weave in the ends.
Then wind some yarn around the centre of the bow tie to shape it, tie the ends at the back to secure.. Again, you can make this as big or small as you would like to suit.

Finally, sew a loop of elastic to the back of the bow tie so that it can slip over the head of whoever is lucky enough for you to be making it for!
That’s all there is to it. Bow ties, hair clips, shoe clips, necklaces, make them into whatever you fancy!
If you like quick and easy crochet projects like this then you might also like my easy crochet necklace pattern – it only uses 4 rows of ruffle stitch to make the whole thing!
I absolutely love to see completed projects so make sure you add your completed projects to Ravelry here and use #hanjancrochet and tag me over on Instagram so I can find you!